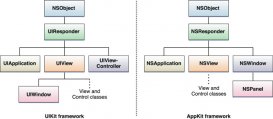
用系统自带的视听媒体的框架,avfoundation实现照片拍摄。相比uikit框架(uiimagepickercontroller高度封装),avfoundation框架让开发者有更大的发挥空间。
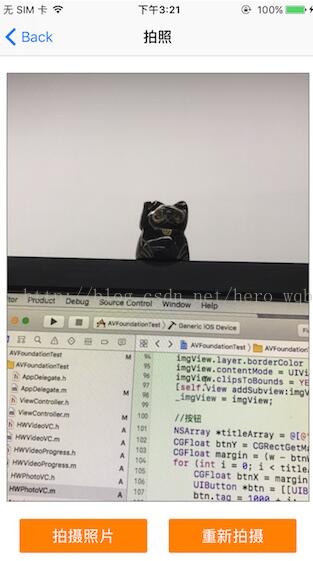
首先看一下效果图:

下面贴上核心控制器代码:
|
1
2
3
4
5
6
7
8
9
10
11
12
13
14
15
16
17
18
19
20
21
22
23
24
25
26
27
28
29
30
31
32
33
34
35
36
37
38
39
40
41
42
43
44
45
46
47
48
49
50
51
52
53
54
55
56
57
58
59
60
61
62
63
64
65
66
67
68
69
70
71
72
73
74
75
76
77
78
79
80
81
82
83
84
85
86
87
88
89
90
91
92
93
94
95
96
97
98
99
100
101
102
103
104
105
106
107
108
109
110
111
112
113
114
115
116
117
118
119
120
121
122
123
124
125
126
127
128
129
130
131
132
133
134
135
136
137
138
139
140
141
142
143
144
145
146
147
148
149
150
151
152
153
154
155
156
157
158
159
160
161
162
163
164
165
166
167
168
169
170
171
172
173
174
175
176
177
178
179
180
181
182
183
184
185
186
187
188
189
190
191
192
193
194
195
196
197
198
199
200
201
202
203
204
205
206
207
208
209
210
211
212
213
214
215
216
217
218
219
220
221
222
223
224
225
226
227
228
229
230
231
232
233
234
235
236
237
238
239
240
241
242
243
244
245
246
247
248
249
250
251
252
253
254
255
256
257
258
259
260
261
262
263
264
265
266
267
268
269
270
271
272
273
274
275
276
277
278
279
280
281
282
283
284
285
286
287
288
289
290
291
292
293
294
295
296
297
298
299
300
301
302
303
304
305
306
307
308
309
310
311
312
313
314
315
316
317
318
319
320
321
322
323
324
325
326
327
328
329
330
331
332
333
334
335
336
337
338
339
340
341
342
343
344
345
346
347
348
349
350
351
352
353
354
355
356
357
358
359
360
361
362
363
364
365
366
367
368
369
370
371
372
373
374
375
376
377
378
379
380
381
382
383
384
385
386
387
388
389
390
391
392
393
394
395
396
397
|
#import "hwphotovc.h"#import <avfoundation/avfoundation.h> @interface hwphotovc () @property (nonatomic, strong) avcapturesession *capturesession;//负责输入和输出设备之间的数据传递@property (nonatomic, strong) avcapturedeviceinput *capturedeviceinput;//负责从avcapturedevice获得输入数据@property (nonatomic, strong) avcapturestillimageoutput *capturestillimageoutput;//照片输出流@property (nonatomic, strong) avcapturevideopreviewlayer *capturevideopreviewlayer;//相机拍摄预览图层@property (nonatomic, weak) uiview *containerview;//内容视图@property (nonatomic, weak) uiimageview *focuscursor;//聚焦按钮@property (nonatomic, weak) uiimageview *imgview;//拍摄照片 @end @implementation hwphotovc - (void)viewdidload { [super viewdidload]; self.navigationitem.title = @"拍照"; self.view.backgroundcolor = [uicolor whitecolor]; //创建控件 [self creatcontrol];} - (void)viewwillappear:(bool)animated{ [super viewwillappear:animated]; //初始化信息 [self initphotoinfo];} - (void)viewdidappear:(bool)animated{ [super viewdidappear:animated]; [self.capturesession startrunning];} - (void)viewdiddisappear:(bool)animated{ [super viewdiddisappear:animated]; [self.capturesession stoprunning];} - (void)creatcontrol{ cgfloat btnw = 150.f; cgfloat btnh = 40.f; cgfloat marginy = 20.f; cgfloat w = [uiscreen mainscreen].bounds.size.width; cgfloat h = [uiscreen mainscreen].bounds.size.height; //内容视图 cgfloat containerviewh = h - 64 - btnh - marginy * 3; uiview *containerview = [[uiview alloc] initwithframe:cgrectmake(10, 64 + marginy, w - 20, containerviewh)]; containerview.backgroundcolor = [uicolor whitecolor]; containerview.layer.borderwidth = 1.f; containerview.layer.bordercolor = [[uicolor graycolor] cgcolor]; [self.view addsubview:containerview]; _containerview = containerview; //摄像头切换按钮 cgfloat cameraswitchbtnw = 50.f; cgfloat cameraswitchbtnmargin = 10.f; uibutton *cameraswitchbtn = [[uibutton alloc] initwithframe:cgrectmake(containerview.bounds.size.width - cameraswitchbtnw - cameraswitchbtnmargin, 64 + marginy + cameraswitchbtnmargin, cameraswitchbtnw, cameraswitchbtnw)]; [cameraswitchbtn setimage:[uiimage imagenamed:@"camera_switch"] forstate:uicontrolstatenormal]; [cameraswitchbtn addtarget:self action:@selector(cameraswitchbtnonclick) forcontrolevents:uicontroleventtouchupinside]; [self.view addsubview:cameraswitchbtn]; //聚焦图片 uiimageview *focuscursor = [[uiimageview alloc] initwithframe:cgrectmake(50, 50, 75, 75)]; focuscursor.alpha = 0; focuscursor.image = [uiimage imagenamed:@"camera_focus_red"]; [containerview addsubview:focuscursor]; _focuscursor = focuscursor; //拍摄照片容器 uiimageview *imgview = [[uiimageview alloc] initwithframe:containerview.frame]; imgview.hidden = yes; imgview.layer.borderwidth = 1.f; imgview.layer.bordercolor = [[uicolor graycolor] cgcolor]; imgview.contentmode = uiviewcontentmodescaleaspectfill; imgview.clipstobounds = yes; [self.view addsubview:imgview]; _imgview = imgview; //按钮 nsarray *titlearray = @[@"拍摄照片", @"重新拍摄"]; cgfloat btny = cgrectgetmaxy(containerview.frame) + marginy; cgfloat margin = (w - btnw * titlearray.count) / (titlearray.count + 1); for (int i = 0; i < titlearray.count; i++) { cgfloat btnx = margin + (margin + btnw) * i; uibutton *btn = [[uibutton alloc] initwithframe:cgrectmake(btnx, btny, btnw, btnh)]; btn.tag = 1000 + i; [btn settitle:titlearray[i] forstate:uicontrolstatenormal]; btn.backgroundcolor = [uicolor orangecolor]; btn.layer.cornerradius = 2.0f; btn.layer.maskstobounds = yes; if (i == 1) { btn.hidden = yes; } [btn addtarget:self action:@selector(btnonclick:) forcontrolevents:uicontroleventtouchupinside]; [self.view addsubview:btn]; }} - (void)initphotoinfo{ //初始化会话 _capturesession = [[avcapturesession alloc] init]; //设置分辨率 if ([_capturesession cansetsessionpreset:avcapturesessionpreset1280x720]) { _capturesession.sessionpreset = avcapturesessionpreset1280x720; } //获得输入设备,取得后置摄像头 avcapturedevice *capturedevice = [self getcameradevicewithposition:avcapturedevicepositionback]; if (!capturedevice) { nslog(@"取得后置摄像头时出现问题"); return; } nserror *error = nil; //根据输入设备初始化设备输入对象,用于获得输入数据 _capturedeviceinput = [[avcapturedeviceinput alloc]initwithdevice:capturedevice error:&error]; if (error) { nslog(@"取得设备输入对象时出错,错误原因:%@", error.localizeddescription); return; } //初始化设备输出对象,用于获得输出数据 _capturestillimageoutput = [[avcapturestillimageoutput alloc] init]; nsdictionary *outputsettings = @{avvideocodeckey:avvideocodecjpeg}; //输出设置 [_capturestillimageoutput setoutputsettings:outputsettings]; //将设备输入添加到会话中 if ([_capturesession canaddinput:_capturedeviceinput]) { [_capturesession addinput:_capturedeviceinput]; } //将设备输出添加到会话中 if ([_capturesession canaddoutput:_capturestillimageoutput]) { [_capturesession addoutput:_capturestillimageoutput]; } //创建视频预览层,用于实时展示摄像头状态 _capturevideopreviewlayer = [[avcapturevideopreviewlayer alloc] initwithsession:self.capturesession]; //摄像头方向 avcaptureconnection *captureconnection = [self.capturevideopreviewlayer connection]; captureconnection.videoorientation = avcapturevideoorientationportrait; calayer *layer = _containerview.layer; layer.maskstobounds = yes; _capturevideopreviewlayer.frame = layer.bounds; //填充模式 _capturevideopreviewlayer.videogravity = avlayervideogravityresizeaspectfill; //将视频预览层添加到界面中 [layer insertsublayer:_capturevideopreviewlayer below:self.focuscursor.layer]; [self addnotificationtocapturedevice:capturedevice]; [self addgensturerecognizer];} - (void)btnonclick:(uibutton *)btn{ if (btn.tag == 1000) { //拍摄照片 [self photobtnonclick]; }else if (btn.tag == 1001) { //重新拍摄 [self resetphoto]; }} #pragma mark 拍照- (void)photobtnonclick{ //根据设备输出获得连接 avcaptureconnection *captureconnection = [self.capturestillimageoutput connectionwithmediatype:avmediatypevideo]; captureconnection.videoorientation = avcapturevideoorientationportrait; //根据连接取得设备输出的数据 [self.capturestillimageoutput capturestillimageasynchronouslyfromconnection:captureconnection completionhandler:^(cmsamplebufferref imagedatasamplebuffer, nserror *error) { if (imagedatasamplebuffer) { nsdata *imagedata = [avcapturestillimageoutput jpegstillimagensdatarepresentation:imagedatasamplebuffer]; uiimage *image = [uiimage imagewithdata:imagedata]; _imgview.image = image; _imgview.hidden = no; } }]; uibutton *btn = (uibutton *)[self.view viewwithtag:1001]; btn.hidden = no;} //重新拍摄- (void)resetphoto{ _imgview.hidden = yes; uibutton *btn = (uibutton *)[self.view viewwithtag:1001]; btn.hidden = yes;} #pragma mark - 通知//给输入设备添加通知- (void)addnotificationtocapturedevice:(avcapturedevice *)capturedevice{ //注意添加区域改变捕获通知必须首先设置设备允许捕获 [self changedeviceproperty:^(avcapturedevice *capturedevice) { capturedevice.subjectareachangemonitoringenabled = yes; }]; //捕获区域发生改变 [[nsnotificationcenter defaultcenter] addobserver:self selector:@selector(areachange:) name:avcapturedevicesubjectareadidchangenotification object:capturedevice];} - (void)removenotificationfromcapturedevice:(avcapturedevice *)capturedevice{ [[nsnotificationcenter defaultcenter] removeobserver:self name:avcapturedevicesubjectareadidchangenotification object:capturedevice];} //移除所有通知- (void)removenotification{ [[nsnotificationcenter defaultcenter] removeobserver:self];} //设备连接成功- (void)deviceconnected:(nsnotification *)notification{ nslog(@"设备已连接...");} //设备连接断开- (void)devicedisconnected:(nsnotification *)notification{ nslog(@"设备已断开.");} //捕获区域改变- (void)areachange:(nsnotification *)notification{ nslog(@"捕获区域改变...");} #pragma mark - 私有方法//取得指定位置的摄像头- (avcapturedevice *)getcameradevicewithposition:(avcapturedeviceposition )position{ nsarray *cameras = [avcapturedevice deviceswithmediatype:avmediatypevideo]; for (avcapturedevice *camera in cameras) { if ([camera position] == position) { return camera; } } return nil;} #pragma mark 切换前后摄像头- (void)cameraswitchbtnonclick{ avcapturedevice *currentdevice = [self.capturedeviceinput device]; avcapturedeviceposition currentposition = [currentdevice position]; [self removenotificationfromcapturedevice:currentdevice]; avcapturedevice *tochangedevice; avcapturedeviceposition tochangeposition = avcapturedevicepositionfront; if (currentposition == avcapturedevicepositionunspecified || currentposition == avcapturedevicepositionfront) { tochangeposition = avcapturedevicepositionback; } tochangedevice = [self getcameradevicewithposition:tochangeposition]; [self addnotificationtocapturedevice:tochangedevice]; //获得要调整的设备输入对象 avcapturedeviceinput *tochangedeviceinput = [[avcapturedeviceinput alloc] initwithdevice:tochangedevice error:nil]; //改变会话的配置前一定要先开启配置,配置完成后提交配置改变 [self.capturesession beginconfiguration]; //移除原有输入对象 [self.capturesession removeinput:self.capturedeviceinput]; //添加新的输入对象 if ([self.capturesession canaddinput:tochangedeviceinput]) { [self.capturesession addinput:tochangedeviceinput]; self.capturedeviceinput = tochangedeviceinput; } //提交会话配置 [self.capturesession commitconfiguration];} //改变设备属性的统一操作方法- (void)changedeviceproperty:(void (^)(avcapturedevice *))propertychange{ avcapturedevice *capturedevice = [self.capturedeviceinput device]; nserror *error; //注意改变设备属性前一定要首先调用lockforconfiguration:调用完之后使用unlockforconfiguration方法解锁 if ([capturedevice lockforconfiguration:&error]) { propertychange(capturedevice); [capturedevice unlockforconfiguration]; }else { nslog(@"设置设备属性过程发生错误,错误信息:%@", error.localizeddescription); }} //设置闪光灯模式- (void)setflashmode:(avcaptureflashmode)flashmode{ [self changedeviceproperty:^(avcapturedevice *capturedevice) { if ([capturedevice isflashmodesupported:flashmode]) { [capturedevice setflashmode:flashmode]; } }];} //设置聚焦模式- (void)setfocusmode:(avcapturefocusmode)focusmode{ [self changedeviceproperty:^(avcapturedevice *capturedevice) { if ([capturedevice isfocusmodesupported:focusmode]) { [capturedevice setfocusmode:focusmode]; } }];} //设置曝光模式- (void)setexposuremode:(avcaptureexposuremode)exposuremode{ [self changedeviceproperty:^(avcapturedevice *capturedevice) { if ([capturedevice isexposuremodesupported:exposuremode]) { [capturedevice setexposuremode:exposuremode]; } }];} //设置聚焦点- (void)focuswithmode:(avcapturefocusmode)focusmode exposuremode:(avcaptureexposuremode)exposuremode atpoint:(cgpoint)point{ [self changedeviceproperty:^(avcapturedevice *capturedevice) { if ([capturedevice isfocusmodesupported:focusmode]) { [capturedevice setfocusmode:avcapturefocusmodeautofocus]; } if ([capturedevice isfocuspointofinterestsupported]) { [capturedevice setfocuspointofinterest:point]; } if ([capturedevice isexposuremodesupported:exposuremode]) { [capturedevice setexposuremode:avcaptureexposuremodeautoexpose]; } if ([capturedevice isexposurepointofinterestsupported]) { [capturedevice setexposurepointofinterest:point]; } }];} //添加点按手势,点按时聚焦- (void)addgensturerecognizer{ [self.containerview addgesturerecognizer:[[uitapgesturerecognizer alloc] initwithtarget:self action:@selector(tapscreen:)]];} - (void)tapscreen:(uitapgesturerecognizer *)tapgesture{ cgpoint point = [tapgesture locationinview:self.containerview]; //将ui坐标转化为摄像头坐标 cgpoint camerapoint = [self.capturevideopreviewlayer capturedevicepointofinterestforpoint:point]; [self setfocuscursorwithpoint:point]; [self focuswithmode:avcapturefocusmodeautofocus exposuremode:avcaptureexposuremodeautoexpose atpoint:camerapoint];} //设置聚焦光标位置- (void)setfocuscursorwithpoint:(cgpoint)point{ self.focuscursor.center = point; self.focuscursor.transform = cgaffinetransformmakescale(1.5, 1.5); self.focuscursor.alpha = 1.0; [uiview animatewithduration:1.0 animations:^{ self.focuscursor.transform = cgaffinetransformidentity; } completion:^(bool finished) { self.focuscursor.alpha = 0; }];} - (void)dealloc{ [self removenotification];} @end |
demo下载链接
以上就是本文的全部内容,希望对大家的学习有所帮助,也希望大家多多支持服务器之家。
原文链接:https://blog.csdn.net/hero_wqb/article/details/77620878


