最近做了一个剪辑视频的小项目,踩了一些小坑,但还是有惊无险的实现了功能。
其实 Apple 官方也给了一个 UIVideoEditController 让我们来做视频的处理,但难以进行扩展或者自定义,所以咱们就用 Apple 给的一个框架 AVFoundation 来开发自定义的视频处理。
而且发现网上并没有相关的并且比较系统的资料,于是写下了本文,希望能对也在做视频处理方面的新手(比如我)能带来帮助。
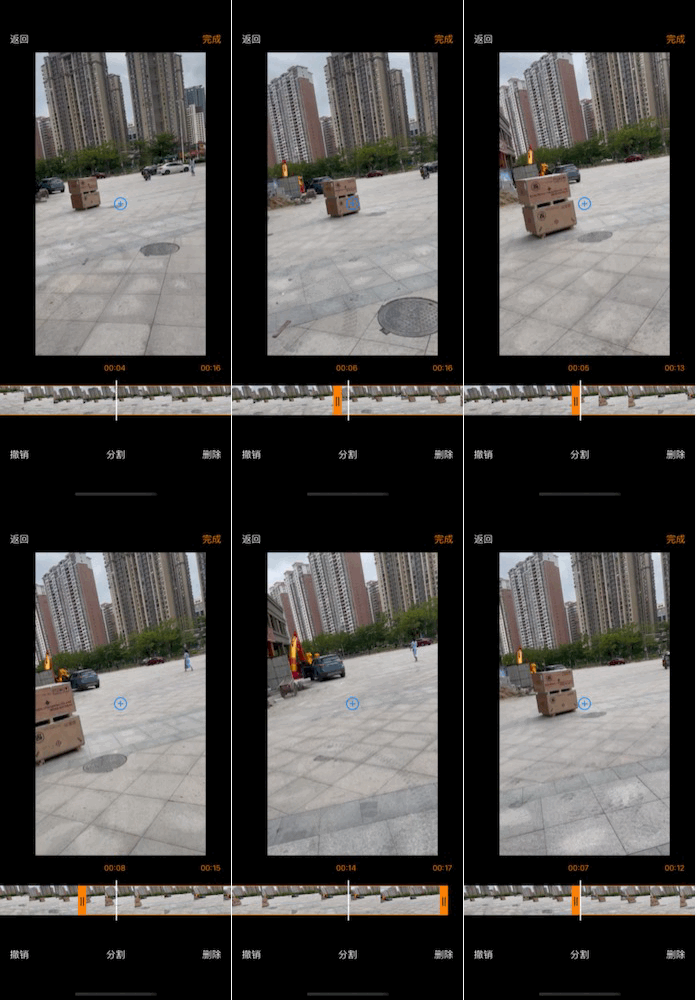
项目效果图
项目的功能大概就是对视频轨道的撤销、分割、删除还有拖拽视频块来对视频扩展或者回退的功能

功能实现
一、选取视频并播放
通过 UIImagePickerController 选取视频并且跳转到自定义的编辑控制器
这一部分没什么好说的
示例:
 //选择视频
       @objc func selectVideo() {
           if UIImagePickerController.isSourceTypeAvailable(.photoLibrary) {
               //初始化图片控制器
               let imagePicker = UIImagePickerController()
               //设置代理
               imagePicker.delegate = self
               //指定图片控制器类型
               imagePicker.sourceType = .photoLibrary
               //只显示视频类型的文件
               imagePicker.mediaTypes = [kUTTypeMovie as String]
               //弹出控制器,显示界面
               self.present(imagePicker, animated: true, completion: nil)
           }
           else {
               print("读取相册错误")
           }
       }

    func imagePickerController(_ picker: UIImagePickerController, didFinishPickingMediaWithInfo info: [UIImagePickerController.InfoKey : Any]) {
        //获取视频路径(选择后视频会自动复制到app临时文件夹下)
        guard let videoURL = info[UIImagePickerController.InfoKey.mediaURL] as? URL else {
            return
        }
        let pathString = videoURL.relativePath
        print("视频地址:(pathString)")

        //图片控制器退出
        self.dismiss(animated: true, completion: {
            let editorVC = EditorVideoViewController.init(with: videoURL)

            editorVC.modalPresentationStyle = UIModalPresentationStyle.fullScreen
            self.present(editorVC, animated: true) {

            }
        })
    }
二、按帧获取缩略图初始化视频轨道
CMTime
在讲实现方法之前先介绍一下 CMTime,CMTime 可以用于描述更精确的时间,比如我们想表达视频中的一个瞬间例如 1:01 大多数时候你可以用 NSTimeInterval t = 61.0 这是没有什么大问题的,但浮点数有个比较严重的问题就是无法精确的表达10的-6次方比如将一百万个0.0000001相加,运算结果可能会变成1.0000000000079181,在视频流传输的过程中伴随着大量的数据加减,这样就会造成误差,所以我们需要另一种表达时间的方式,那就是 CMTime
CMTime是一种C函数结构体,有4个成员。
typedef struct {
CMTimeValue value; // 当前的CMTimeValue 的值
CMTimeScale timescale; // 当前的CMTimeValue 的参考标准 (比如:1000)
CMTimeFlags flags;
CMTimeEpoch epoch;
} CMTime;
比如说平时我们所说的如果 timescale = 1000,那么 CMTimeValue = 1000 * 1 = 100
CMTimeScale timescale: 当前的CMTimeValue 的参考标准,它表示1秒的时间被分成了多少份。因为整个CMTime的精度是由它控制的所以它显的尤为重要。例如,当timescale为1的时候,CMTime不能表示1秒一下的时间和1秒内的增长。相同的,当timescale为1000的时候,每秒钟便被分成了1000份,CMTime的value便代表了多少毫秒。
实现方法
调用方法 generateCGImagesAsynchronously(forTimes requestedTimes: [NSValue], completionHandler handler: @escaping AVAssetImageGeneratorCompletionHandler)
 /**
    	@method			generateCGImagesAsynchronouslyForTimes:completionHandler:
    	@abstract		Returns a series of CGImageRefs for an asset at or near the specified times.
    	@param			requestedTimes
    					An NSArray of NSValues, each containing a CMTime, specifying the asset times at which an image is requested.
    	@param			handler
    					A block that will be called when an image request is complete.
    	@discussion		Employs an efficient "batch mode" for getting images in time order.
    					The client will receive exactly one handler callback for each requested time in requestedTimes.
    					Changes to generator properties (snap behavior, maximum size, etc...) will not affect outstanding asynchronous image generation requests.
    					The generated image is not retained.  Clients should retain the image if they wish it to persist after the completion handler returns.
    */
    open func generateCGImagesAsynchronously(forTimes requestedTimes: [NSValue], completionHandler handler: @escaping AVAssetImageGeneratorCompletionHandler)
浏览官方的注释,可以看出需要传入两个参数 :
requestedTimes: [NSValue]:请求时间的数组(类型为 NSValue)每一个元素包含一个 CMTime,用于指定请求视频的时间。
completionHandler handler: @escaping AVAssetImageGeneratorCompletionHandler: 图像请求完成时将调用的块,由于方法是异步调用的,所以需要返回主线程更新 UI。
示例:
func splitVideoFileUrlFps(splitFileUrl:URL, fps:Float, splitCompleteClosure:@escaping (Bool, [UIImage]) -> Void) {
        var splitImages = [UIImage]()

		//初始化 Asset
        let optDict = NSDictionary(object: NSNumber(value: false), forKey: AVURLAssetPreferPreciseDurationAndTimingKey as NSCopying)
        let urlAsset = AVURLAsset(url: splitFileUrl, options: optDict as? [String : Any])

        let cmTime = urlAsset.duration
        let durationSeconds: Float64 = CMTimeGetSeconds(cmTime)

        var times = [NSValue]()
        let totalFrames: Float64 = durationSeconds * Float64(fps)
        var timeFrame: CMTime

		//定义 CMTime 即请求缩略图的时间间隔
        for i in 0...Int(totalFrames) {
            timeFrame = CMTimeMake(value: Int64(i), timescale: Int32(fps))
            let timeValue = NSValue(time: timeFrame)

            times.append(timeValue)
        }

        let imageGenerator = AVAssetImageGenerator(asset: urlAsset)
        imageGenerator.requestedTimeToleranceBefore = CMTime.zero
        imageGenerator.requestedTimeToleranceAfter = CMTime.zero

        let timesCount = times.count

		//调用获取缩略图的方法
        imageGenerator.generateCGImagesAsynchronously(forTimes: times) { (requestedTime, image, actualTime, result, error) in

        var isSuccess = false
        switch (result) {
        case AVAssetImageGenerator.Result.cancelled:
            print("cancelled------")

        case AVAssetImageGenerator.Result.failed:
            print("failed++++++")

        case AVAssetImageGenerator.Result.succeeded:

            let framImg = UIImage(cgImage: image!)

            splitImages.append(self.flipImage(image: framImg, orientaion: 1))
            if (Int(requestedTime.value) == (timesCount-1)) { //最后一帧时 回调赋值
                isSuccess = true
                splitCompleteClosure(isSuccess, splitImages)
                print("completed")
            }
        }
        }
    }

				//调用时利用回调更新 UI
self.splitVideoFileUrlFps(splitFileUrl: url, fps: 1) { [weak self](isSuccess, splitImgs) in
            if isSuccess {
                //由于方法是异步的,所以需要回主线程更新 UI
                DispatchQueue.main.async {

                    }
                print("图片总数目imgcount:(String(describing: self?.imageArr.count))")
            }
        }
三、视频指定时间跳转
 /**
     @method			seekToTime:toleranceBefore:toleranceAfter:
     @abstract			Moves the playback cursor within a specified time bound.
     @param				time
     @param				toleranceBefore
     @param				toleranceAfter
     @discussion		Use this method to seek to a specified time for the current player item.
    					The time seeked to will be within the range [time-toleranceBefore, time+toleranceAfter] and may differ from the specified time for efficiency.
    					Pass kCMTimeZero for both toleranceBefore and toleranceAfter to request sample accurate seeking which may incur additional decoding delay.
    					Messaging this method with beforeTolerance:kCMTimePositiveInfinity and afterTolerance:kCMTimePositiveInfinity is the same as messaging seekToTime: directly.
     */
    open func seek(to time: CMTime, toleranceBefore: CMTime, toleranceAfter: CMTime)
三个传入的参数 time: CMTime, toleranceBefore: CMTime, tolearnceAfter: CMTime ,time 参数很好理解,即为想要跳转的时间。那么后面两个参数,按照官方的注释理解,简单来说为“误差的容忍度”,他将会在你拟定的这个区间内跳转,即为 [time-toleranceBefore, time+toleranceAfter] ,当然如果你传 kCMTimeZero(在我当前的版本这个参数被被改为了 CMTime.zero),即为精确搜索,但是这会导致额外的解码时间。
示例:
	let totalTime = self.avPlayer.currentItem?.duration
	let scale = self.avPlayer.currentItem?.duration.timescale

	//width:跳转到的视频轨长度 videoWidth:视频轨总长度
 	let process = width / videoWidth

      //快进函数
 	self.avPlayer.seek(to: CMTimeMake(value: Int64(totalTime * process * scale!), timescale: scale!), toleranceBefore: CMTime.zero, toleranceAfter: CMTime.zero)
四、播放器监听
通过播放器的监听我们可以改变控制轨道的移动,达到视频播放器和视频轨道的联动
/**
    	@method			addPeriodicTimeObserverForInterval:queue:usingBlock:
    	@abstract		Requests invocation of a block during playback to report changing time.
    	@param			interval
    	  The interval of invocation of the block during normal playback, according to progress of the current time of the player.
    	@param			queue
    	  The serial queue onto which block should be enqueued.  If you pass NULL, the main queue (obtained using dispatch_get_main_queue()) will be used.  Passing a
    	  concurrent queue to this method will result in undefined behavior.
    	@param			block
    	  The block to be invoked periodically.
    	@result
    	  An object conforming to the NSObject protocol.  You must retain this returned value as long as you want the time observer to be invoked by the player.
    	  Pass this object to -removeTimeObserver: to cancel time observation.
    	@discussion		The block is invoked periodically at the interval specified, interpreted according to the timeline of the current item.
    					The block is also invoked whenever time jumps and whenever playback starts or stops.
    					If the interval corresponds to a very short interval in real time, the player may invoke the block less frequently
    					than requested. Even so, the player will invoke the block sufficiently often for the client to update indications
    					of the current time appropriately in its end-user interface.
    					Each call to -addPeriodicTimeObserverForInterval:queue:usingBlock: should be paired with a corresponding call to -removeTimeObserver:.
    					Releasing the observer object without a call to -removeTimeObserver: will result in undefined behavior.
    */
    open func addPeriodicTimeObserver(forInterval interval: CMTime, queue: DispatchQueue?, using block: @escaping (CMTime) -> Void) -> Any
比较重要的一个参数是 interval: CMTime 这决定了代码回调的间隔时间,同时如果你在这个回调里改变视频轨道的 frame 那么这也会决定视频轨道移动的流畅度
示例:
//player的监听
        self.avPlayer.addPeriodicTimeObserver(forInterval: CMTimeMake(value: 1, timescale: 120), queue: DispatchQueue.main) { [weak self](time) in
                //与轨道的联动操作
        }
与快进方法冲突的问题
这个监听方法和第三点中的快进方法会造成一个问题:当你拖动视频轨道并且去快进的时候也会触发这个回调于是就造成了 拖动视频轨道 frame (改变 frame) -> 快进方法 -> 触发回调 -> 改变 frame 这一个死循环。那么就得添加判断条件来不去触发这个回调。
快进方法与播放器联动带来的问题
播放视频是异步的,并且快进方法解码视频需要时间,所以就导致了在双方联动的过程中带来的时间差。并且当你认为视频已经快进完成的时候,想要去改变视频轨道的位置,由于解码带来的时间,导致了在回调的时候会传入几个错误的时间,使得视频轨道来回晃动。所以当前项目的做法是,回调时需要判断将要改变的 frame 是否合法(是否过大、过小)
ps:如果关于这两个问题有更好的解决办法,欢迎一起讨论!
五、导出视频
 /**
        @method         insertTimeRange:ofTrack:atTime:error:
        @abstract       Inserts a timeRange of a source track into a track of a composition.
        @param          timeRange
                        Specifies the timeRange of the track to be inserted.
        @param          track
                        Specifies the source track to be inserted. Only AVAssetTracks of AVURLAssets and AVCompositions are supported (AVCompositions starting in MacOS X 10.10 and iOS 8.0).
        @param          startTime
                        Specifies the time at which the inserted track is to be presented by the composition track. You may pass kCMTimeInvalid for startTime to indicate that the timeRange should be appended to the end of the track.
        @param          error
                        Describes failures that may be reported to the user, e.g. the asset that was selected for insertion in the composition is restricted by copy-protection.
        @result         A BOOL value indicating the success of the insertion.
        @discussion
          You provide a reference to an AVAssetTrack and the timeRange within it that you want to insert. You specify the start time in the target composition track at which the timeRange should be inserted.

          Note that the inserted track timeRange will be presented at its natural duration and rate. It can be scaled to a different duration (and presented at a different rate) via -scaleTimeRange:toDuration:.
    */
    open func insertTimeRange(_ timeRange: CMTimeRange, of track: AVAssetTrack, at startTime: CMTime) throws
传入的三个参数:
timeRange: CMTimeRange:指定要插入的视频的时间范围
track: AVAssetTrack:指定要插入的视频轨道。仅支持AVURLAssets和AVCompositions的AvassetTrack(从MacOS X 10.10和iOS 8.0开始的AVCompositions)。
starTime: CMTime: 指定合成视频插入的时间点。可以传递kCMTimeInvalid 参数,以指定视频应附加到前一个视频的末尾。
示例:
	let composition = AVMutableComposition()
            //合并视频、音频轨道
    let videoTrack = composition.addMutableTrack(
                        withMediaType: AVMediaType.video, preferredTrackID: CMPersistentTrackID())
  	let audioTrack = composition.addMutableTrack(
                        withMediaType: AVMediaType.audio, preferredTrackID: CMPersistentTrackID())


 	let asset = AVAsset.init(url: self.url)

	var insertTime: CMTime = CMTime.zero

 	let timeScale = self.avPlayer.currentItem?.duration.timescale

			//循环每个片段的信息
	for clipsInfo in self.clipsInfoArr {

            //片段的总时间
		let clipsDuration = Double(Float(clipsInfo.width) / self.videoWidth) * self.totalTime

            //片段的开始时间
		let startDuration = -Float(clipsInfo.offset) / self.perSecondLength

      	do {
           	try videoTrack?.insertTimeRange(CMTimeRangeMake(start: CMTimeMake(value: Int64(startDuration * Float(timeScale!)), timescale: timeScale!), duration:CMTimeMake(value: Int64(clipsDuration * Double(timeScale!)), timescale: timeScale!)), of: asset.tracks(withMediaType: AVMediaType.video)[0], at: insertTime)
                } catch _ {}

		do {
         	try audioTrack?.insertTimeRange(CMTimeRangeMake(start: CMTimeMake(value: Int64(startDuration * Float(timeScale!)), timescale: timeScale!), duration:CMTimeMake(value: Int64(clipsDuration * Double(timeScale!)), timescale: timeScale!)), of: asset.tracks(withMediaType: AVMediaType.audio)[0], at: insertTime)
      		 } catch _ {}
   		insertTime = CMTimeAdd(insertTime, CMTimeMake(value: Int64(clipsDuration * Double(timeScale!)), timescale: timeScale!))
            }

  		videoTrack?.preferredTransform = CGAffineTransform(rotationAngle: CGFloat.pi / 2)

            //获取合并后的视频路径
  		let documentsPath = NSSearchPathForDirectoriesInDomains(.documentDirectory,.userDomainMask,true)[0]

  		let destinationPath = documentsPath + "/mergeVideo-(arc4random()%1000).mov"
     	print("合并后的视频:(destinationPath)")
end:通过这几个 API 再加上交互的逻辑就能实现完整的剪辑功能啦!如果文中有不足的地方,欢迎指出!
到此这篇关于iOS基于AVFoundation 制作用于剪辑视频项目的文章就介绍到这了,更多相关iOS AVFoundation 剪辑视频内容请搜索服务器之家以前的文章或继续浏览下面的相关文章希望大家以后多多支持服务器之家!
原文链接:https://blog.csdn.net/bqiss/article/details/121772575


