一个app受欢迎的程度,一方面来源于它本身为用户提供便捷的功能,另一方面则来源于它的ui。ui是用户体验重要的组成部分,构成ui的的元素恰恰离不开那些看似独立的控件。在开发的过程中,大家对uitableview应该很熟悉吧!确实uitableview在处理数据显示方面有着很强大的功能,例如网红们使用的微博,微信社交软件的聊天界面等等,这种流式布局使用uitableview简直最合适不过了;但毕竟uitableview不是万能的,当需要显示横纵向的数据时它就显得捉襟见肘了,虽然这也难不倒我们程序猿但是何必要大费周章的去定义复杂的cell呢!uicollectionview就是专门用来应付这种布局的,使用uicollectionview可以给我们带来以下几点优势:1.可以高度的定制内容展示的样式 2.高效的管理大量的数据。
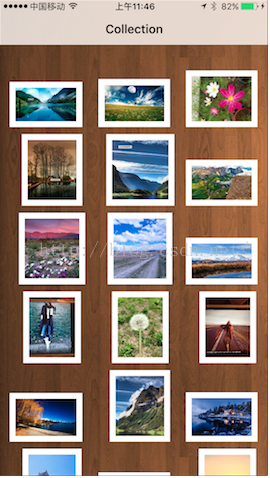
首先给大家看一下这个demo的效果图:

ios设备不知道现在有没有可以屏幕录制的app,这样我就可以把操作的动作用gif图片po上来了,大家如果有推荐可以告诉我哈!关于拖动,长按图片后就可以将图片拖到你想要的位置上,另外的图片则会依次排序,很顺畅的体验。
在使用uicollectionview的时后,我们的类需要实现这些协议:uicollectionviewdatasource,uicollectionviewdelegateflowlayout,
uicollectionviewdelegate,uigesturerecognizerdelegate。
uicollectionviewdatasource:和我们在uitableview中所需要实现的uitableviewdatasource是一个道理,它里面包括以下这些api:
|
1
2
3
4
5
6
7
8
9
10
11
12
13
14
15
16
17
18
19
|
@protocol uicollectionviewdatasource <nsobject> @required - (nsinteger)collectionview:(uicollectionview *)collectionview numberofitemsinsection:(nsinteger)section; // the cell that is returned must be retrieved from a call to -dequeuereusablecellwithreuseidentifier:forindexpath: - (uicollectionviewcell *)collectionview:(uicollectionview *)collectionview cellforitematindexpath:(nsindexpath *)indexpath; @optional - (nsinteger)numberofsectionsincollectionview:(uicollectionview *)collectionview; // the view that is returned must be retrieved from a call to -dequeuereusablesupplementaryviewofkind:withreuseidentifier:forindexpath: - (uicollectionreusableview *)collectionview:(uicollectionview *)collectionview viewforsupplementaryelementofkind:(nsstring *)kind atindexpath:(nsindexpath *)indexpath; - (bool)collectionview:(uicollectionview *)collectionview canmoveitematindexpath:(nsindexpath *)indexpath ns_available_ios(9_0); - (void)collectionview:(uicollectionview *)collectionview moveitematindexpath:(nsindexpath *)sourceindexpath toindexpath:(nsindexpath*)destinationindexpath ns_available_ios(9_0); @end |
uicollectionviewdelegateflowlayout:uicollectionviewflowlayout是一个专门用来管理collectionview布局的类,可以通过实现以下函数来调整我们界面的样式:
|
1
2
3
4
5
6
7
8
9
10
11
|
@protocol uicollectionviewdelegateflowlayout <uicollectionviewdelegate> @optional - (cgsize)collectionview:(uicollectionview *)collectionview layout:(uicollectionviewlayout*)collectionviewlayout sizeforitematindexpath:(nsindexpath *)indexpath; - (uiedgeinsets)collectionview:(uicollectionview *)collectionview layout:(uicollectionviewlayout*)collectionviewlayout insetforsectionatindex:(nsinteger)section; - (cgfloat)collectionview:(uicollectionview *)collectionview layout:(uicollectionviewlayout*)collectionviewlayout minimumlinespacingforsectionatindex:(nsinteger)section; - (cgfloat)collectionview:(uicollectionview *)collectionview layout:(uicollectionviewlayout*)collectionviewlayout minimuminteritemspacingforsectionatindex:(nsinteger)section; - (cgsize)collectionview:(uicollectionview *)collectionview layout:(uicollectionviewlayout*)collectionviewlayout referencesizeforheaderinsection:(nsinteger)section; - (cgsize)collectionview:(uicollectionview *)collectionview layout:(uicollectionviewlayout*)collectionviewlayout referencesizeforfooterinsection:(nsinteger)section; @end |
uicollectionviewdelegate:和uitableviewdelegate一样,这里就把它协议里面的的函数po出来了,通过重写里面的函数,我们可以实现cell的点击与拖动。
uigesturerecognizerdelegate:由于我们还有一个拖动的功能,所以需要实现用户手势的协议。
好了,基础的概念讲了,现在我们就开始动手实现他吧!老样子直接看源码:
|
1
2
3
4
5
6
7
8
9
10
11
12
13
14
15
16
17
18
19
20
21
22
23
24
25
26
27
28
29
30
|
- (void)viewdidload { [super viewdidload]; // do any additional setup after loading the view, typically from a nib. //设置背景色 [self.view setbackgroundcolor:[uicolor colorwithpatternimage:[uiimage imagenamed:@"back.jpg"]]]; //设置数据源 self.datasource = [[nsmutablearray alloc] initwithobjects: @"1.png",@"2.png",@"3.png", @"4.png", @"5.png", @"6.png", @"7.png", @"8.png", @"9.png", @"10.png", @"11.jpg", @"12.jpg", @"13.jpg", @"14.jpg", @"15.jpg", @"16.png", @"17.png", @"18.png", @"19.png", @"20.png", nil nil]; //初始化布局 self.flow = [[uicollectionviewflowlayout alloc] init]; self.collect = [[uicollectionview alloc] initwithframe:cgrectzero collectionviewlayout:self.flow]; [self.collect setbackgroundcolor:[uicolor clearcolor]]; //注册cell 这一步必须要实现 [self.collect registerclass:[customcollectioncell class] forcellwithreuseidentifier:@"customcell"]; self.collect.delegate = self; self.collect.datasource = self; [self.collect setframe:self.view.bounds]; //添加长按手势 self.longpressgesturerecognizer = [[uilongpressgesturerecognizer alloc] init]; [self.longpressgesturerecognizer addtarget:self action:@selector(handlelongpressrecognizer:)]; [self.collect addgesturerecognizer:self.longpressgesturerecognizer]; [self.view addsubview:self.collect]; } |
在viewdidload函数中,初始化了一个uicollectionviewflowlayout布局,并且需要配合uicollectionview来使用,两者加一起来使用才能“完美”,想比uitableview 中cell使用的不同,在uicollectionview中必须先对cell进行注册(registerclass),不然会在运行过程中报错。如何使排列的图片可以拖动呢,在这里我为uicollectionview添加了一个长按手势uilongpressgesturerecognizer。当我们长按时会触发handlelongpressrecognizer,代码如下:
|
1
2
3
4
5
6
7
8
9
10
11
12
13
14
15
16
17
18
19
20
21
22
|
- (void)handlelongpressrecognizer:(uilongpressgesturerecognizer *)gesture{ switch (gesture.state) { case uigesturerecognizerstatebegan:{ nsindexpath *path = [self.collect indexpathforitematpoint:[gesture locationinview:gesture.view]]; if(path == nil){ break; } [self.collect begininteractivemovementforitematindexpath:path]; } break; case uigesturerecognizerstatechanged: [self.collect updateinteractivemovementtargetposition:[gesture locationinview:gesture.view]]; break; case uigesturerecognizerstateended: [self.collect endinteractivemovement]; break; default: [self.collect cancelinteractivemovement]; break; } } |
好看的界面才能抓住用户的心,这里我自定义了cell继承自uicollectionviewcell,cell中展示的图片会根据自身图片的大小进行按比例缩放,这样我们的桌面看上去就会有横版图片与竖版图片,如果不自定义的话就都是方方正正的九宫格,还是花点心思自定义一下显示效果吧!customcollectioncell的的代码如下:
|
1
2
3
4
5
6
7
8
9
10
11
12
13
14
15
16
17
18
19
20
21
22
23
24
25
26
27
28
29
30
31
32
33
34
35
36
37
38
39
40
41
42
43
44
45
46
47
48
49
50
|
#import "customcollectioncell.h" @implementation customcollectioncell @synthesize imagev = _imagev; @synthesize labelv = _labelv; @synthesize boundview = _boundview; - (id)initwithframe:(cgrect) frame{ self = [super initwithframe:frame]; //init attributes if(self){ [self setbackgroundcolor:[uicolor clearcolor]]; self.imagev = [[uiimageview alloc] initwithframe:cgrectzero]; self.labelv = [[uilabel alloc] initwithframe:cgrectzero]; self.boundview = [[uiview alloc] initwithframe:cgrectzero]; [self.boundview setbackgroundcolor:[uicolor whitecolor]]; [self.boundview addsubview:self.imagev]; [self addsubview:self.boundview]; [self addsubview:self.labelv]; } return self; } - (void)setimagewithtext:(uiimage *)image text:(nsstring *)text{ if(!image){ return; } cgfloat imgwidth = image.size.width; cgfloat imgheight = image.size.height; cgfloat iconwidth = 0.0; cgfloat iconheight = 0.0; if(imgwidth > imgheight){ iconheight = roundf(((self.frame.size.width - 16)*imgheight)/imgwidth); iconwidth = self.frame.size.width - 16; [self.boundview setframe:cgrectmake(0, self.frame.size.height - iconheight - 16, iconwidth + 16, iconheight + 16)]; [self.imagev setframe:cgrectmake(8, 8, iconwidth, iconheight)]; }else{ iconwidth = roundf(((self.frame.size.width - 16) *imgwidth)/imgheight); iconheight = self.frame.size.height - 16; [self.boundview setframe:cgrectmake(roundf((self.frame.size.width - iconwidth)/2), 0, iconwidth + 16, iconheight + 16)]; [self.imagev setframe:cgrectmake(8, 8, iconwidth, iconheight)]; } [self.imagev setimage:image]; } @end |
以上这些就是构成该demo的重要组成部分了,uicollectionview还有很多的要素在这里面没有讲到,往后我还会再研究这个控件更加高级的的使用,本篇就好比是餐前的开胃小菜吧,希望大家喜欢。附上这个例子的源码:
|
1
2
3
4
5
6
7
8
9
10
11
12
13
14
15
16
17
18
19
20
21
22
23
24
25
26
27
28
29
30
31
32
33
34
35
36
37
38
39
40
41
42
43
44
45
46
47
48
49
50
51
52
53
54
55
56
57
58
59
60
61
62
63
64
65
66
67
68
69
70
71
72
73
74
75
76
77
78
79
80
81
82
83
84
85
86
87
88
89
90
91
92
93
94
95
96
97
98
99
100
101
102
103
104
105
106
107
108
109
110
111
112
113
114
115
116
117
118
119
120
121
122
123
124
125
126
127
128
129
130
131
132
133
134
135
136
137
138
139
140
141
142
143
144
145
146
147
148
149
150
151
152
153
154
155
|
@implementation viewcontroller @synthesize datasource = _datasource; @synthesize longpressgesturerecognizer = _longpressgesturerecognizer; @synthesize flow = _flow; @synthesize collect = _collect; - (void)viewdidload { [super viewdidload]; // do any additional setup after loading the view, typically from a nib. //设置背景色 [self.view setbackgroundcolor:[uicolor colorwithpatternimage:[uiimage imagenamed:@"back.jpg"]]]; //设置数据源 self.datasource = [[nsmutablearray alloc] initwithobjects: @"1.png",@"2.png",@"3.png", @"4.png", @"5.png", @"6.png", @"7.png", @"8.png", @"9.png", @"10.png", @"11.jpg", @"12.jpg", @"13.jpg", @"14.jpg", @"15.jpg", @"16.png", @"17.png", @"18.png", @"19.png", @"20.png", nil nil]; //初始化布局 self.flow = [[uicollectionviewflowlayout alloc] init]; self.collect = [[uicollectionview alloc] initwithframe:cgrectzero collectionviewlayout:self.flow]; [self.collect setbackgroundcolor:[uicolor clearcolor]]; //注册cell 这一步必须要实现 [self.collect registerclass:[customcollectioncell class] forcellwithreuseidentifier:@"customcell"]; self.collect.delegate = self; self.collect.datasource = self; [self.collect setframe:self.view.bounds]; //添加长按手势 self.longpressgesturerecognizer = [[uilongpressgesturerecognizer alloc] init]; [self.longpressgesturerecognizer addtarget:self action:@selector(handlelongpressrecognizer:)]; [self.collect addgesturerecognizer:self.longpressgesturerecognizer]; [self.view addsubview:self.collect]; } - (void)didreceivememorywarning { [super didreceivememorywarning]; // dispose of any resources that can be recreated. } - (void)handlelongpressrecognizer:(uilongpressgesturerecognizer *)gesture{ switch (gesture.state) { case uigesturerecognizerstatebegan:{ nsindexpath *path = [self.collect indexpathforitematpoint:[gesture locationinview:gesture.view]]; if(path == nil){ break; } [self.collect begininteractivemovementforitematindexpath:path]; } break; case uigesturerecognizerstatechanged: [self.collect updateinteractivemovementtargetposition:[gesture locationinview:gesture.view]]; break; case uigesturerecognizerstateended: [self.collect endinteractivemovement]; break; default: [self.collect cancelinteractivemovement]; break; } } #pragma mark uicollectionviewdatasource - (nsinteger)collectionview:(uicollectionview *)collectionview numberofitemsinsection:(nsinteger)section{ return self.datasource.count; } - (nsinteger)numberofsectionsincollectionview:(uicollectionview *)collectionview{ return 1; } - (uicollectionviewcell *)collectionview:(uicollectionview *)collectionview cellforitematindexpath:(nsindexpath *)indexpath{ customcollectioncell * cell = (customcollectioncell *)[collectionview dequeuereusablecellwithreuseidentifier:@"customcell" forindexpath:indexpath]; uiimage *image = [uiimage imagenamed:[self.datasource objectatindex:indexpath.row]]; [cell setimagewithtext:image text:@""]; return cell; } - (bool)collectionview:(uicollectionview *)collectionview canmoveitematindexpath:(nsindexpath *)indexpath{ return yes; } - (void)collectionview:(uicollectionview *)collectionview moveitematindexpath:(nsindexpath *)sourceindexpath toindexpath:(nsindexpath*)destinationindexpath{ id item = [self.datasource objectatindex:sourceindexpath.item]; [self.datasource removeobject:item]; [self.datasource insertobject:item atindex:destinationindexpath.item]; } #pragma mark uicollectionviewdelegate - (void)collectionview:(uicollectionview *)collectionview didselectitematindexpath:(nsindexpath *)indexpath{ testviewcontroller *test = [[testviewcontroller alloc] initwithnibname:@"testviewcontroller" bundle:nil]; nsstring *imagename = [self.datasource objectatindex:indexpath.row]; test.imagename = imagename; [self.navigationcontroller pushviewcontroller:test animated:yes]; } - (bool)collectionview:(uicollectionview *)collectionview shouldhighlightitematindexpath:(nsindexpath *)indexpath{ return yes; } //选中放大效果 - (void)collectionview:(uicollectionview *)collectionview didhighlightitematindexpath:(nsindexpath *)indexpath{ // customcollectioncell * cell = (customcollectioncell *)[collectionview cellforitematindexpath:indexpath]; // // [uiview animatewithduration:1 animations:^{ // cell.transform = cgaffinetransformmakescale(2.0f, 2.0f); // }]; } //缩小效果 - (void)collectionview:(uicollectionview *)collectionview didunhighlightitematindexpath:(nsindexpath *)indexpath{ // customcollectioncell * cell = (customcollectioncell *)[collectionview cellforitematindexpath:indexpath]; // // [uiview animatewithduration:1 animations:^{ // cell.transform = cgaffinetransformmakescale(1.0f, 1.0f); // }]; } #pragma mark uicollectionviewdelegateflowlayout - (cgsize)collectionview:(uicollectionview *)collectionview layout:(uicollectionviewlayout*)collectionviewlayout sizeforitematindexpath:(nsindexpath *)indexpath{ return cgsizemake(100, 100); } /* * 上左下右间距 */- (uiedgeinsets)collectionview:(uicollectionview *)collectionview layout:(uicollectionviewlayout*)collectionviewlayout insetforsectionatindex:(nsinteger)section{ return uiedgeinsetsmake(15, 15, 15, 15); } /* * item space */- (cgfloat)collectionview:(uicollectionview *)collectionview layout:(uicollectionviewlayout*)collectionviewlayout minimuminteritemspacingforsectionatindex:(nsinteger)section{ return 8; } /* * 行距 20 */- (cgfloat)collectionview:(uicollectionview *)collectionview layout:(uicollectionviewlayout*)collectionviewlayout minimumlinespacingforsectionatindex:(nsinteger)section{ return 10; } |
以上就是本文的全部内容,希望对大家的学习有所帮助,也希望大家多多支持服务器之家。
原文链接:http://blog.csdn.net/shenjie12345678/article/details/51671713


