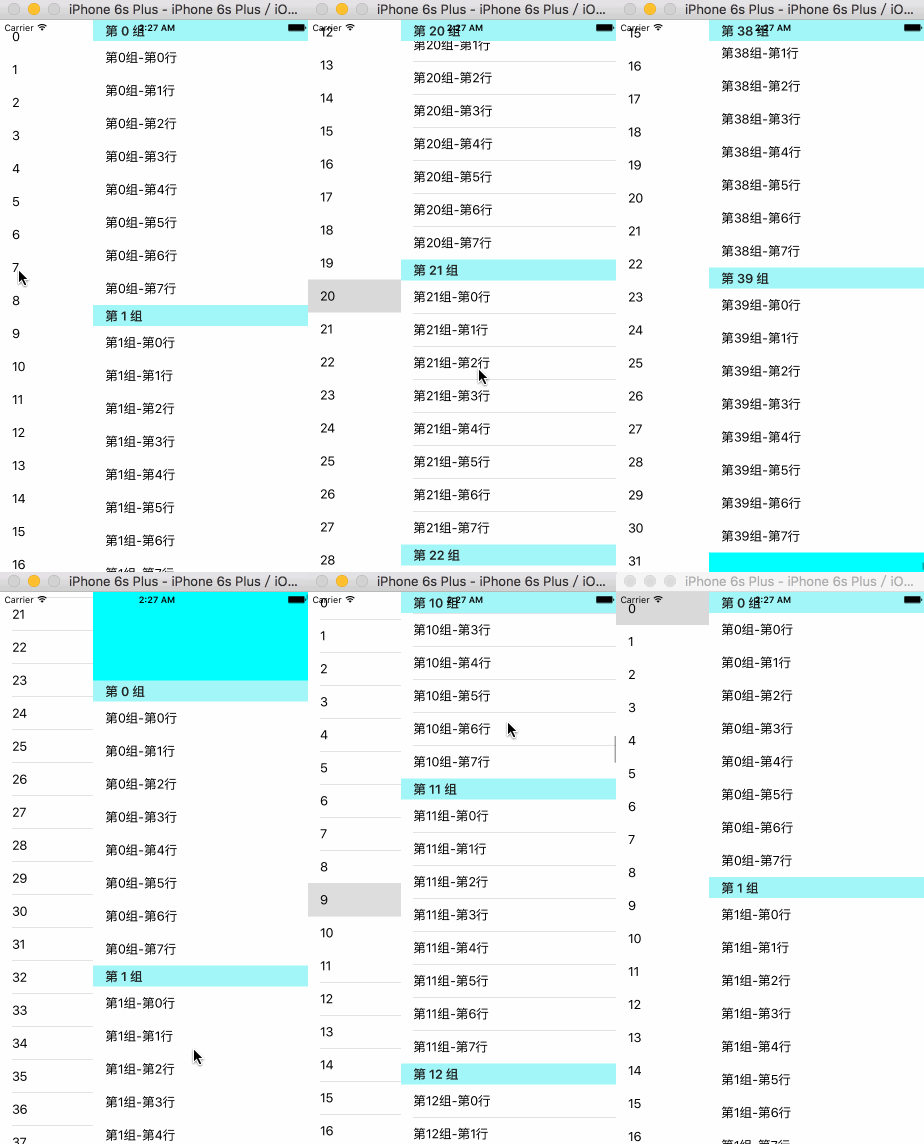
一、先来看看要实现的效果图

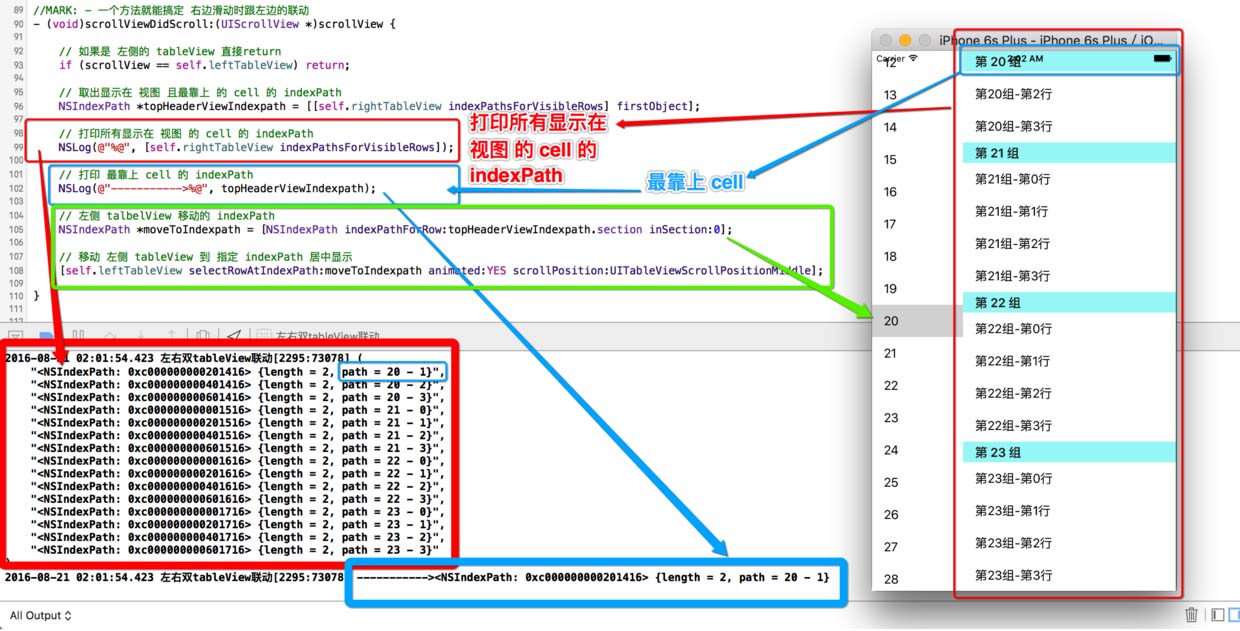
二、小解析,可以先看看后面的!

三、实现 tableview联动 主要分两种状况
1、点击 左侧 cell 让右侧 tableview 滚到对应位置
2、滑动 右侧 tableview 让左侧 tableview 滚到对应位置
1.先实现简单的:点击 左侧 cell 让右侧 tableview 滚到对应位置
|
1
2
3
4
5
6
7
8
9
10
11
12
13
14
15
16
|
//mark: - 点击 cell 的代理方法- (void)tableview:(uitableview *)tableview didselectrowatindexpath:(nsindexpath *)indexpath { // 判断是否为 左侧 的 tableview if (tableview == self.lefttableview) { // 计算出 右侧 tableview 将要 滚动的 位置 nsindexpath *movetoindexpath = [nsindexpath indexpathforrow:0 insection:indexpath.row]; // 将右侧 tableview 移动到指定位置 [self.righttableview selectrowatindexpath:movetoindexpath animated:yes scrollposition:uitableviewscrollpositiontop]; // 取消选中效果 [self.righttableview deselectrowatindexpath:movetoindexpath animated:yes]; }} |
左侧 按钮点击的联动 搞定!
2.滑动 右侧 tableview 让左侧 tableview 滚到对应位置
[self.righttableview indexpathsforvisiblerows] 返回 所有显示在界面的 cell 的 indexpath
|
1
2
3
4
5
6
7
8
9
10
11
12
13
14
15
16
|
//mark: - 一个方法就能搞定 右边滑动时跟左边的联动- (void)scrollviewdidscroll:(uiscrollview *)scrollview { // 如果是 左侧的 tableview 直接return if (scrollview == self.lefttableview) return; // 取出显示在 视图 且最靠上 的 cell 的 indexpath nsindexpath *topheaderviewindexpath = [[self.righttableview indexpathsforvisiblerows] firstobject]; // 左侧 talbelview 移动到的位置 indexpath nsindexpath *movetoindexpath = [nsindexpath indexpathforrow:topheaderviewindexpath.section insection:0]; // 移动 左侧 tableview 到 指定 indexpath 居中显示 [self.lefttableview selectrowatindexpath:movetoindexpath animated:yes scrollposition:uitableviewscrollpositionmiddle];} |
第二步 右侧 滑动 跟左侧 的联动 搞定! 对的 就是这么简单!!!
四、警告
看到别人通过这两个方法判断!!! 勿用!!!
会导致 tableview 的联动 不准确
|
1
2
3
4
5
6
7
8
9
10
11
|
#pragma mark - uitableviewdelegate 代理方法 -- (void)tableview:(uitableview *)tableview willdisplayheaderview:(uiview *)view forsection:(nsinteger)section {//// headerview 将要显示// 这两个方法都不准确}- (void)tableview:(uitableview *)tableview didenddisplayingheaderview:(uiview *)view forsection:(nsinteger)section {//// headerview 已经显示// 这两个方法都不准确} |
五、以下是所有示例代码
|
1
2
3
4
5
6
7
8
9
10
11
12
13
14
15
16
17
18
19
20
21
22
23
24
25
26
27
28
29
30
31
32
33
34
35
36
37
38
39
40
41
42
43
44
45
46
47
48
49
50
51
52
53
54
55
56
57
58
59
60
61
62
63
64
65
66
67
68
69
70
71
72
73
74
75
76
77
78
79
80
81
82
83
84
85
86
87
88
89
90
91
92
93
94
95
96
97
98
99
100
101
102
103
104
105
106
107
108
109
110
111
112
113
114
115
116
117
118
119
120
121
122
123
124
125
126
127
128
129
130
131
132
133
134
135
136
137
138
139
140
141
142
143
144
145
146
147
148
149
150
151
152
153
154
155
156
157
158
159
160
161
162
163
164
165
166
|
//// viewcontroller.m// 左右双tableview联动//// created by 阿酷 on 16/8/20.// copyright © 2016年 akuapp. all rights reserved.//#import "viewcontroller.h"#define lefttablewidth [uiscreen mainscreen].bounds.size.width * 0.3#define righttablewidth [uiscreen mainscreen].bounds.size.width * 0.7#define screenwidth [uiscreen mainscreen].bounds.size.width#define screenheight [uiscreen mainscreen].bounds.size.height#define leftcellidentifier @"leftcellidentifier"#define rightcellidentifier @"rightcellidentifier"@interface viewcontroller () <uitableviewdatasource, uitableviewdelegate>@property (nonatomic, weak) uitableview *lefttableview;@property (nonatomic, weak) uitableview *righttableview;@end@implementation viewcontroller- (void)viewdidload { [super viewdidload]; [self.view addsubview:self.lefttableview]; [self.view addsubview:self.righttableview];}#pragma mark - tableview 数据源代理方法 -- (nsinteger)tableview:(uitableview *)tableview numberofrowsinsection:(nsinteger)section { if (tableview == self.lefttableview) return 40; return 8;}- (nsinteger)numberofsectionsintableview:(uitableview *)tableview { if (tableview == self.lefttableview) return 1; return 40;}- (uitableviewcell *)tableview:(uitableview *)tableview cellforrowatindexpath:(nsindexpath *)indexpath { uitableviewcell *cell; // 左边的 view if (tableview == self.lefttableview) { cell = [tableview dequeuereusablecellwithidentifier:leftcellidentifier forindexpath:indexpath]; cell.textlabel.text = [nsstring stringwithformat:@"%ld", indexpath.row]; // 右边的 view } else { cell = [tableview dequeuereusablecellwithidentifier:rightcellidentifier forindexpath:indexpath]; cell.textlabel.text = [nsstring stringwithformat:@"第%ld组-第%ld行", indexpath.section, indexpath.row]; } return cell;}- (nsstring *)tableview:(uitableview *)tableview titleforheaderinsection:(nsinteger)section { if (tableview == self.righttableview) return [nsstring stringwithformat:@"第 %ld 组", section]; return nil;}#pragma mark - uitableviewdelegate 代理方法 -//- (void)tableview:(uitableview *)tableview didenddisplayingheaderview:(uiview *)view forsection:(nsinteger)section {//// 这两个方法都不准确//}////- (void)tableview:(uitableview *)tableview willdisplayheaderview:(uiview *)view forsection:(nsinteger)section {//// 这两个方法都不准确//}//mark: - 一个方法就能搞定 右边滑动时跟左边的联动- (void)scrollviewdidscroll:(uiscrollview *)scrollview { // 如果是 左侧的 tableview 直接return if (scrollview == self.lefttableview) return; // 取出显示在 视图 且最靠上 的 cell 的 indexpath nsindexpath *topheaderviewindexpath = [[self.righttableview indexpathsforvisiblerows] firstobject]; // 左侧 talbelview 移动的 indexpath nsindexpath *movetoindexpath = [nsindexpath indexpathforrow:topheaderviewindexpath.section insection:0]; // 移动 左侧 tableview 到 指定 indexpath 居中显示 [self.lefttableview selectrowatindexpath:movetoindexpath animated:yes scrollposition:uitableviewscrollpositionmiddle];}//mark: - 点击 cell 的代理方法- (void)tableview:(uitableview *)tableview didselectrowatindexpath:(nsindexpath *)indexpath { // 选中 左侧 的 tableview if (tableview == self.lefttableview) { nsindexpath *movetoindexpath = [nsindexpath indexpathforrow:0 insection:indexpath.row]; // 将右侧 tableview 移动到指定位置 [self.righttableview selectrowatindexpath:movetoindexpath animated:yes scrollposition:uitableviewscrollpositiontop]; // 取消选中效果 [self.righttableview deselectrowatindexpath:movetoindexpath animated:yes]; }}#pragma mark - 懒加载 tableview -// mark: - 左边的 tableview- (uitableview *)lefttableview { if (!_lefttableview) { uitableview *tableview = [[uitableview alloc] initwithframe:cgrectmake(0, 0, lefttablewidth, screenheight)]; [self.view addsubview:tableview]; _lefttableview = tableview; tableview.datasource = self; tableview.delegate = self; [tableview registerclass:[uitableviewcell class] forcellreuseidentifier:leftcellidentifier]; tableview.backgroundcolor = [uicolor redcolor]; tableview.tablefooterview = [[uiview alloc] init]; } return _lefttableview;}// mark: - 右边的 tableview- (uitableview *)righttableview { if (!_righttableview) { uitableview *tableview = [[uitableview alloc] initwithframe:cgrectmake(lefttablewidth, 0, righttablewidth, screenheight)]; [self.view addsubview:tableview]; _righttableview = tableview; tableview.datasource = self; tableview.delegate = self; [tableview registerclass:[uitableviewcell class] forcellreuseidentifier:rightcellidentifier]; tableview.backgroundcolor = [uicolor cyancolor]; tableview.tablefooterview = [[uiview alloc] init]; } return _righttableview;}@end |
六、总结
ios实现左右两个tableview联动效果的内容到这就结束了,这种的效果在我们平常的时候还是挺常见的,感兴趣的朋友们可以自己动手操作起来,希望对大家的学习工作能有所帮助。
原文链接:http://www.jianshu.com/p/b2589fff500a


