本文实例讲述了android开发之viewswitcher用法。分享给大家供大家参考,具体如下:
android.widget.viewswitcher是viewanimator的子类,用于在两个view之间切换,但每次只能显示一个view。
viewswitcher的addview函数的代码如下:
|
1
2
3
4
5
6
7
8
9
10
11
12
|
/** * {@inheritdoc} * * @throws illegalstateexception if this switcher already contains two children */@overridepublic void addview(view child, int index, viewgroup.layoutparams params) { if (getchildcount() >= 2) { throw new illegalstateexception("can't add more than 2 views to a viewswitcher"); } super.addview(child, index, params);} |
可以看出,若view的数量超过两个,会抛出异常:java.lang.illegalstateexception,打印 "can't add more than 2 views to a viewswitcher" 。你可以使用viewswitcher的factory创建view或添加自己创建的view。
下面用一个例子介绍一下viewswitcher的用法。
布局文件:activity_main.xml
|
1
2
3
4
5
6
7
8
9
10
11
12
13
14
15
16
17
18
19
20
21
22
23
24
25
26
27
28
29
30
31
32
33
34
35
36
37
38
39
40
41
42
43
44
45
46
47
48
|
<?xml version="1.0" encoding="utf-8"?><linearlayout xmlns:android="http://schemas.android.com/apk/res/android" xmlns:tools="http://schemas.android.com/tools" android:layout_width="match_parent" android:layout_height="match_parent" android:orientation="vertical" tools:context=".mainactivity" > <linearlayout android:layout_width="match_parent" android:layout_height="wrap_content" android:orientation="horizontal" > <button android:id="@+id/prev" android:layout_width="0dp" android:layout_height="wrap_content" android:layout_weight="1" android:text="previous" /> <button android:id="@+id/next" android:layout_width="0dp" android:layout_height="wrap_content" android:layout_weight="1" android:text="next" /> </linearlayout> <viewswitcher android:id="@+id/viewswitcher" android:layout_width="match_parent" android:layout_height="wrap_content" > <imageview android:layout_width="wrap_content" android:layout_height="wrap_content" android:src="@drawable/ic_launcher" /> <linearlayout android:layout_width="match_parent" android:layout_height="wrap_content" android:gravity="center" android:orientation="vertical" > <button android:layout_width="wrap_content" android:layout_height="wrap_content" android:text="- button 2 -" /> <textview android:layout_width="wrap_content" android:layout_height="wrap_content" android:text="linearlayout 2" /> </linearlayout> </viewswitcher></linearlayout> |
activity的代码:
|
1
2
3
4
5
6
7
8
9
10
11
12
13
14
15
16
17
18
19
20
21
22
23
24
25
26
27
28
29
30
31
32
33
34
35
36
37
38
39
40
|
package com.example.androidtest;import android.app.activity;import android.os.bundle;import android.view.view;import android.view.animation.animation;import android.view.animation.animationutils;import android.widget.button;import android.widget.viewswitcher;public class myactivity extends activity { button buttonprev, buttonnext; viewswitcher viewswitcher; animation slide_in_left, slide_out_right; @override protected void oncreate(bundle savedinstancestate) { super.oncreate(savedinstancestate); setcontentview(r.layout.activity_main); buttonprev = (button) findviewbyid(r.id.prev); buttonnext = (button) findviewbyid(r.id.next); viewswitcher = (viewswitcher) findviewbyid(r.id.viewswitcher); slide_in_left = animationutils.loadanimation(this, android.r.anim.slide_in_left); slide_out_right = animationutils.loadanimation(this, android.r.anim.slide_out_right); viewswitcher.setinanimation(slide_in_left); viewswitcher.setoutanimation(slide_out_right); buttonprev.setonclicklistener(new view.onclicklistener() { @override public void onclick(view arg0) { viewswitcher.showprevious(); } }); buttonnext.setonclicklistener(new view.onclicklistener() { @override public void onclick(view arg0) { viewswitcher.shownext(); } }); ; }} |
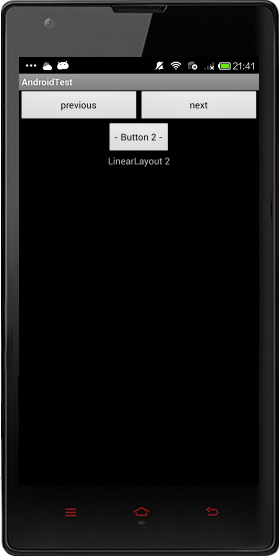
实现效果图:

使用viewswitcher的setfactory设置切换的view,分为两步。
第一步:获得viewswithcer的实例
|
1
|
switcher = (viewswitcher) findviewbyid(r.id.viewswitcher); |
第二部:实现接口viewfactory
|
1
2
3
4
5
6
7
8
|
switcher.setfactory(new viewfactory(){ @override public view makeview() { return inflater.inflate(r.layout.slidelistview, null); }}); |
希望本文所述对大家android程序设计有所帮助。


