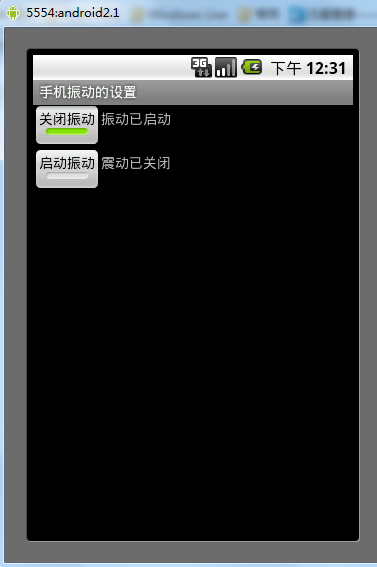
本文实例讲述了android实现手机振动设置的方法。分享给大家供大家参考。具体如下:
main.xml布局文件:
|
1
2
3
4
5
6
7
8
9
10
11
12
13
14
15
16
17
18
19
20
21
22
23
24
25
26
27
28
29
30
31
32
33
|
<?xml version="1.0" encoding="utf-8"?><linearlayout xmlns:android="http://schemas.android.com/apk/res/android" android:orientation="vertical" android:layout_width="fill_parent" android:layout_height="fill_parent"> <linearlayout android:orientation="horizontal" android:layout_width="fill_parent" android:layout_height="wrap_content"> <togglebutton android:id="@+id/tb1" android:texton="关闭振动" android:textoff="启动振动" android:checked="false" android:layout_width="wrap_content" android:layout_height="wrap_content" /> <textview android:id="@+id/tv1" android:text="振动已关闭" android:layout_width="wrap_content" android:layout_height="wrap_content" /> </linearlayout> <linearlayout android:orientation="horizontal" android:layout_width="fill_parent" android:layout_height="wrap_content"> <togglebutton android:id="@+id/tb2" android:texton="关闭振动" android:textoff="启动振动" android:checked="false" android:layout_width="wrap_content" android:layout_height="wrap_content" /> <textview android:id="@+id/tv2" android:text="振动已关闭" android:layout_width="wrap_content" android:layout_height="wrap_content" /> </linearlayout></linearlayout> |
清单文件:
|
1
2
3
4
5
6
7
8
9
10
11
12
13
14
15
16
17
18
19
|
<?xml version="1.0" encoding="utf-8"?><manifest xmlns:android="http://schemas.android.com/apk/res/android" package="com.ljq.activity" android:versioncode="1" android:versionname="1.0"> <application android:icon="@drawable/icon" android:label="@string/app_name"> <activity android:name=".vibrateactivity" android:label="@string/app_name"> <intent-filter> <action android:name="android.intent.action.main" /> <category android:name="android.intent.category.launcher" /> </intent-filter> </activity> </application> <uses-sdk android:minsdkversion="7" /> <!-- 设置手机震动权限 --> <uses-permission android:name="android.permission.vibrate" /></manifest> |
vibrateactivity类:
|
1
2
3
4
5
6
7
8
9
10
11
12
13
14
15
16
17
18
19
20
21
22
23
24
25
26
27
28
29
30
31
32
33
34
35
36
37
38
39
40
41
42
43
44
45
46
47
48
49
50
51
52
53
54
55
56
57
58
59
60
|
package com.ljq.activity;import android.app.activity;import android.app.service;import android.os.bundle;import android.os.vibrator;import android.widget.compoundbutton;import android.widget.textview;import android.widget.togglebutton;import android.widget.compoundbutton.oncheckedchangelistener;public class vibrateactivity extends activity { private vibrator vibrator=null; private togglebutton tb1=null, tb2=null; private textview tv1=null, tv2=null; @override public void oncreate(bundle savedinstancestate) { super.oncreate(savedinstancestate); setcontentview(r.layout.main); //注意模拟器是模拟不了震动的,得真机测试哦 //创建vibrator对象 vibrator=(vibrator)getsystemservice(service.vibrator_service); tv1=(textview)findviewbyid(r.id.tv1); tv2=(textview)findviewbyid(r.id.tv2); tb1=(togglebutton)findviewbyid(r.id.tb1); tb2=(togglebutton)findviewbyid(r.id.tb2); tb1.setoncheckedchangelistener(listener); tb2.setoncheckedchangelistener(listener); } oncheckedchangelistener listener=new oncheckedchangelistener(){ public void oncheckedchanged(compoundbutton buttonview, boolean ischecked) { togglebutton togglebutton=(togglebutton)buttonview; switch (togglebutton.getid()) { case r.id.tb1: if(ischecked){ //根据指定的模式进行震动 //第一个参数:该数组中第一个元素是等待多长的时间才启动震动, //之后将会是开启和关闭震动的持续时间,单位为毫秒 //第二个参数:重复震动时在pattern中的索引,如果设置为-1则表示不重复震动 vibrator.vibrate(new long[]{1000,50,50,100,50}, -1); tv1.settext("振动已启动"); }else { //关闭震动 vibrator.cancel(); tv1.settext("震动已关闭"); } break; case r.id.tb2: if(ischecked){ //启动震动,并持续指定的时间 vibrator.vibrate(3500); tv2.settext("振动已启动"); }else { //关闭启动 vibrator.cancel(); tv2.settext("震动已关闭"); } break; } } };} |
运行结果:

希望本文所述对大家的android程序设计有所帮助。


