Go 程序的性能优化及 pprof 的使用
程序的性能优化无非就是对程序占用资源的优化。对于服务器而言,最重要的两项资源莫过于 CPU 和内存。性能优化,就是在对于不影响程序数据处理能力的情况下,我们通常要求程序的 CPU 的内存占用尽量低。反过来说,也就是当程序 CPU 和内存占用不变的情况下,尽量地提高程序的数据处理能力或者说是吞吐量。
Go 的原生工具链中提供了非常多丰富的工具供开发者使用,其中包括 pprof。
对于 pprof 的使用要分成下面两部分来说。
Web 程序使用 pprof
先写一个简单的 Web 服务程序。程序在 9876 端口上接收请求。
|
1
2
3
4
5
6
7
8
9
10
11
12
13
14
15
16
17
18
19
20
21
22
23
24
25
26
27
28
29
30
31
32
33
34
35
36
37
38
39
40
41
42
43
44
45
46
47
48
|
package mainimport ( "bytes" "io/ioutil" "log" "math/rand" "net/http" _ "net/http/pprof")func main() { http.HandleFunc("/test", handler) log.Fatal(http.ListenAndServe(":9876", nil))}func handler(w http.ResponseWriter, r *http.Request) { err := r.ParseForm() if nil != err { w.Write([]byte(err.Error())) return } doSomeThingOne(10000) buff := genSomeBytes() b, err := ioutil.ReadAll(buff) if nil != err { w.Write([]byte(err.Error())) return } w.Write(b)}func doSomeThingOne(times int) { for i := 0; i < times; i++ { for j := 0; j < times; j++ { } }}func genSomeBytes() *bytes.Buffer { var buff bytes.Buffer for i := 1; i < 20000; i++ { buff.Write([]byte{'0' + byte(rand.Intn(10))}) } return &buff} |
可以看到我们只是简单地引入了 net/http/pprof ,并未显示地使用。
启动程序。
我们用 wrk 来简单地模拟请求。
wrk -c 400 -t 8 -d 3m http://localhost:9876/test
这时我们打开 http://localhost:9876/debug/pprof,会显示如下页面:
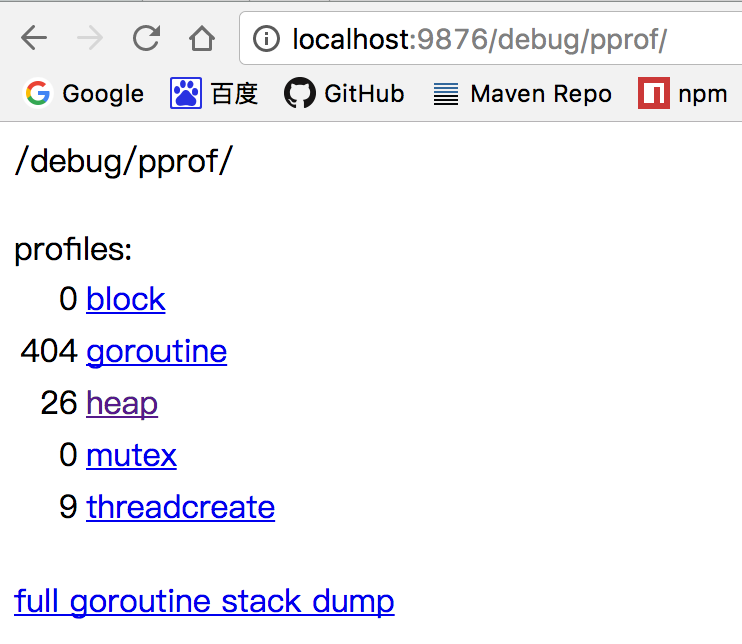
用户可以点击相应的链接浏览内容。不过这不是我们重点讲述的,而且这些内容看起来并不直观。
我们打开链接 http://localhost:9876/debug/pprof/profile 稍后片刻,可以下载到文件 profile。
使用 Go 自带的 pprof 工具打开。go tool pprof test profile。(proof 后跟的 test 为程序编译的可执行文件)
输入 top 命令得到:
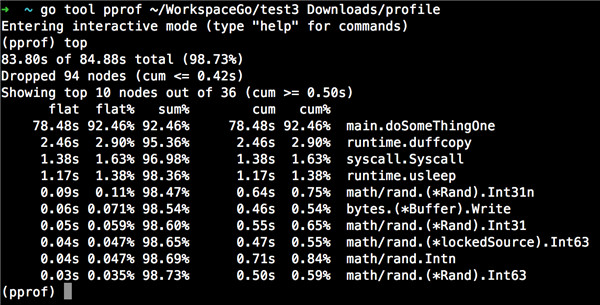
可以看到 cpu 占用前 10 的函数,我们可以对此分析进行优化。
只是这样可能还不是很直观。
我们输入命令 web(需要事先安装 graphviz,macOS 下可以 brew install graphviz),会在浏览器中打开界面如下:

可以看到 main.doSomeThingOne 占用了 92.46% 的 CPU 时间,需要对其进行优化。
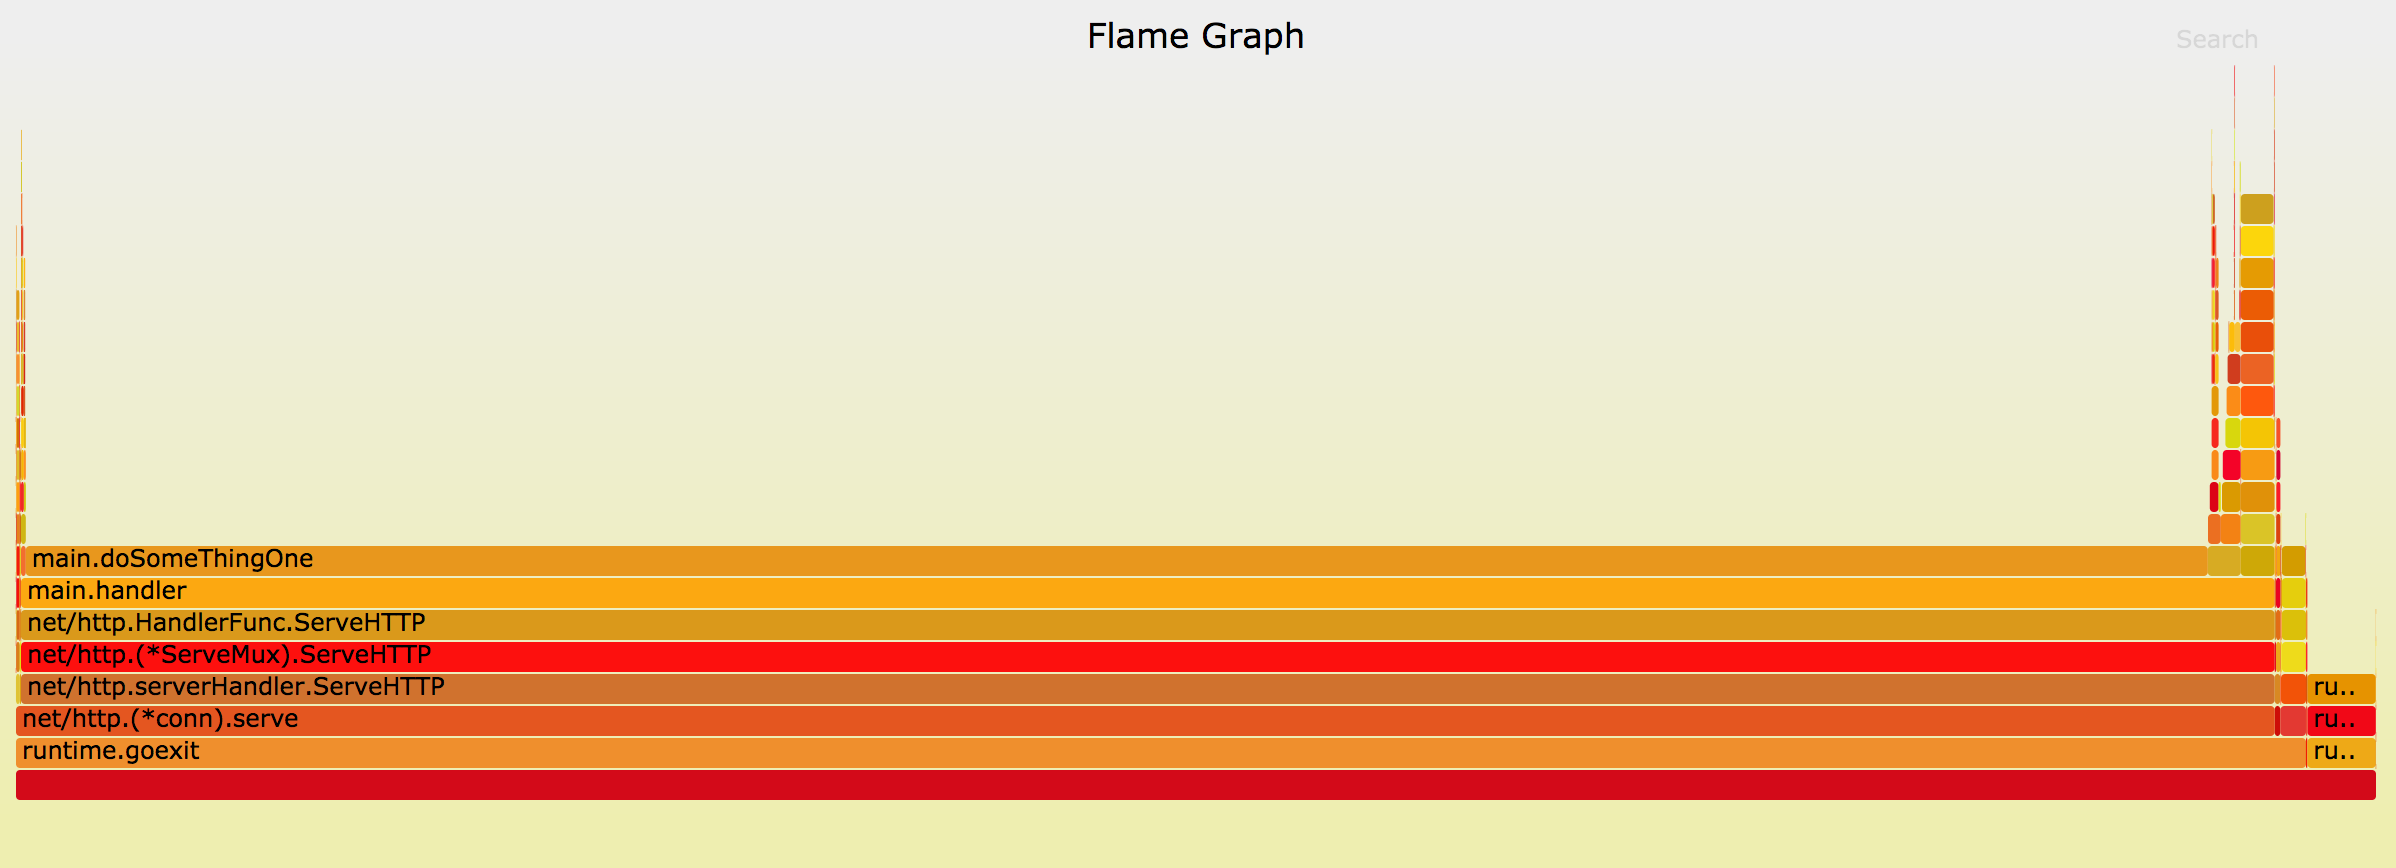
Web 形式的 CPU 时间图对于优化已经完全够用,这边再介绍一下火焰图的生成。macOS 推荐使用 go-torch 工具。使用方法和 go tool pprof 相似。
go-torch test profile 会生成 torch.svg 文件。可以用浏览器打开,如图。
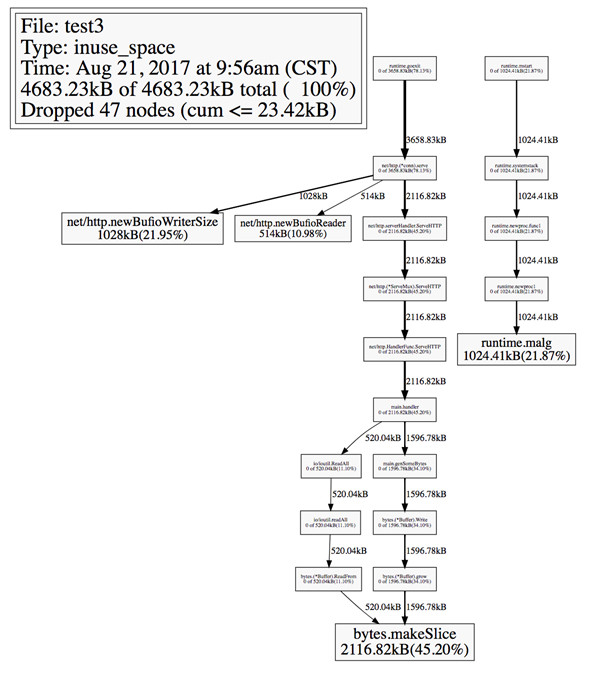
刚才只是讲了 CPU 的占用分析文件的生成查看,其实内存快照的生成相似。http://localhost:9876/debug/pprof/heap,会下载得到 heap.gz 文件。
我们同样可以使用 go tool pprof test heap.gz,然后输入 top 或 web 命令查看相关内容。

通用程序使用 pprof
我们写的 Go 程序并非都是 Web 程序,这时候再使用上面的方法就不行了。
我们仍然可以使用 pprof 工具,但引入的位置为 runtime/pprof 。
这里贴出两个函数,作为示例:
|
1
2
3
4
5
6
7
8
9
10
11
12
13
14
15
16
17
18
19
20
21
22
23
24
25
26
27
28
29
|
// 生成 CPU 报告func cpuProfile() { f, err := os.OpenFile("cpu.prof", os.O_RDWR|os.O_CREATE, 0644) if err != nil { log.Fatal(err) } defer f.Close() log.Println("CPU Profile started") pprof.StartCPUProfile(f) defer pprof.StopCPUProfile() time.Sleep(60 * time.Second) fmt.Println("CPU Profile stopped")}// 生成堆内存报告func heapProfile() { f, err := os.OpenFile("heap.prof", os.O_RDWR|os.O_CREATE, 0644) if err != nil { log.Fatal(err) } defer f.Close() time.Sleep(30 * time.Second) pprof.WriteHeapProfile(f) fmt.Println("Heap Profile generated")} |
两个函数分别会生成 cpu.prof 和 heap.prof 文件。仍然可以使用 go tool pprof 工具进行分析,在此就不赘述。
Trace 报告
直接贴代码:
|
1
2
3
4
5
6
7
8
9
10
11
12
13
14
15
|
// 生成追踪报告func traceProfile() { f, err := os.OpenFile("trace.out", os.O_RDWR|os.O_CREATE, 0644) if err != nil { log.Fatal(err) } defer f.Close() log.Println("Trace started") trace.Start(f) defer trace.Stop() time.Sleep(60 * time.Second) fmt.Println("Trace stopped")} |
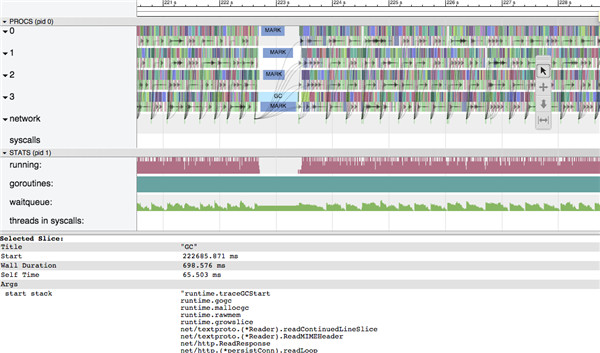
使用工具 go tool trace 进行分析,会得到非常详细的追踪报告,供更深入的程序分析优化。由于报告内容比较复杂,且使用方法类似,就不继续了。读者可自行尝试。
贴张网上的图给大家大概看一下:
参考:https://github.com/caibirdme/hand-to-hand-optimize-go
以上就是本文的全部内容,希望对大家的学习有所帮助,也希望大家多多支持服务器之家。
原文链接:http://www.cnblogs.com/snowInPluto/p/7403097.html


