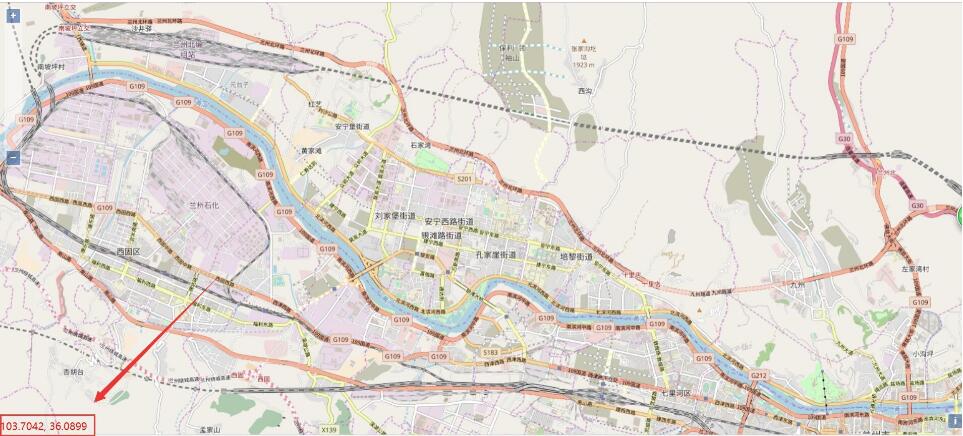
本文实例为大家分享了OpenLayers3实现鼠标移动显示坐标的具体代码,供大家参考,具体内容如下
1. 前言
鼠标移动显示坐标,OpenLayers 3 框架提供了鼠标移动显示坐标的控件(ol.control.MousePosition),默认显示在地图的右上角,其样式可以自定义。在这个例子中,我们通过前面的加载 OSM 加载瓦片图层,实现在地图容器的左下角显示坐标点的信息。
2. 实现思路
(1)新建一个网页,参考前面的加载 OSM 瓦片地图,实现加载瓦片地图。
(2)在地图容器中新建一个 div 用于显示坐标信息,并设置其样式,通过设置 z-index 让其显示到地图上面。
(3)实例化一个鼠标位置控件(ol.control.MousePosition),可以根基实际的需求设置其,参数,例如坐标系(projection)、坐标值的显示格式(coordinateFormat)、关联显示鼠标位置坐标点的目标容器(target)等。
(4)在地图容器中加载到地图容器中。可以在实例化地图容器 Map 的代码中,通过设置 controlas 参数加载鼠标位置控件,也可以调用 map 对象的 addControl 方法加载控件。
3. 实现代码如下:
html:
|
1
2
3
4
5
6
7
8
9
10
11
12
13
14
15
16
17
18
19
20
21
22
23
24
25
26
27
28
29
30
31
32
33
34
35
36
37
38
39
40
41
42
43
44
|
<!DOCTYPE html><html lang="en"><head> <meta charset="UTF-8"> <title>鼠标移动显示坐标信息</title> <link rel="stylesheet" href="css/bootstrap.min.css" > <link rel="stylesheet" href="css/ol.css" > <link rel="stylesheet" href="css/ZoomSlider.css" > <script src="js/ol.js"></script> <script src="js/MousePosition.js"></script> <style> #map { width: 100%; height: 100%; position: absolute; } #mouse-position { float: left; position: absolute; bottom: 5px; width: 200px; height: 20px; /* 将z-index设置为显示在地图上层 */ z-index: 2000; } /* 显示鼠标信息的自定义样式设置 */ .custom-mouse-position { color: red; font-size: 16px; font-family: "微软雅黑"; } </style></head><body onload="init()"> <div id="map"> <div id="mouse-position"></div> </div></body></html> |
代码解析:
在地图容器中创建一个 div 用于显示坐标信息,并设置其样式,这个 div 层是是鼠标位置控件的最外层容器,它所包含的内层为鼠标信息文本标签,默认类名为 ol-mouse-position,可以自行定义。例如我们修改了他的字体大小以及颜色等。
js代码:
|
1
2
3
4
5
6
7
8
9
10
11
12
13
14
15
16
17
18
19
20
21
22
23
24
25
26
27
28
29
|
function init() { // 实例化鼠标位置控件 var mousePositionControl = new ol.control.MousePosition({ coordinateFormat: ol.coordinate.createStringXY(4), //坐标格式 projection: 'EPSG:4326', //地图投影坐标系 className: 'custom-mouse-position', //坐标信息显示样式 // 显示鼠标位置信息的目标容器 target: document.getElementById('mouse-position'), undefinedHTML: ' ' //未定义坐标的标记 }); // 实例化Map对象加载地图 var map = new ol.Map({ target: 'map', //地图容器div的id layers: [ //地图容器加载的图层 new ol.layer.Tile({ //加载瓦片图层数据 source: new ol.source.OSM() //数据源,加载OSM数据 }) ], view: new ol.View({ center: [102, 35], zoom: 3 }), // 加载控件到地图容器中 // 加载鼠标位置控件 controls: ol.control.defaults().extend([mousePositionControl]) });} |
代码解析
(1)coordinateFormat:坐标值的显示格式。
(2)projection:投影坐标系,将当前鼠标位置的坐标点设置为当前坐标系下的相应值进行显示。
(3)target:关联显示其坐标点信息的目标容器,即最外层容器元素,就是我们创建的 id 为mouse-position 的 div 元素。
(4)className:坐标信息采用的显示样式的类名即坐标值文本的样式类名,就是我们自定义的样式类名 custom-mouse-position 。
实现效果如下:

以上就是本文的全部内容,希望对大家的学习有所帮助,也希望大家多多支持服务器之家。
原文链接:https://blog.csdn.net/cj9551/article/details/79120892


