之前因为项目组有自己的代码规范,为了约束平时的开发规范,于是基于2019.1.3版本开发了一个代码提示的插件。但是在把IDEA切换到2020.1版本的时候,却发现疯狂报错,但是网上关于IDEA插件开发的相关文章还是不够多,只能自己解决。于是根据官方的SDK文档,使用Gradle重新构建了一下项目,把代码拉了过来。下文会根据2020.1版本简单开发一个代码异常的提示插件,把容易踩坑的地方提示一下。
1、首先先根据IDEA插件开发官方文档,用Gradle新建一个project
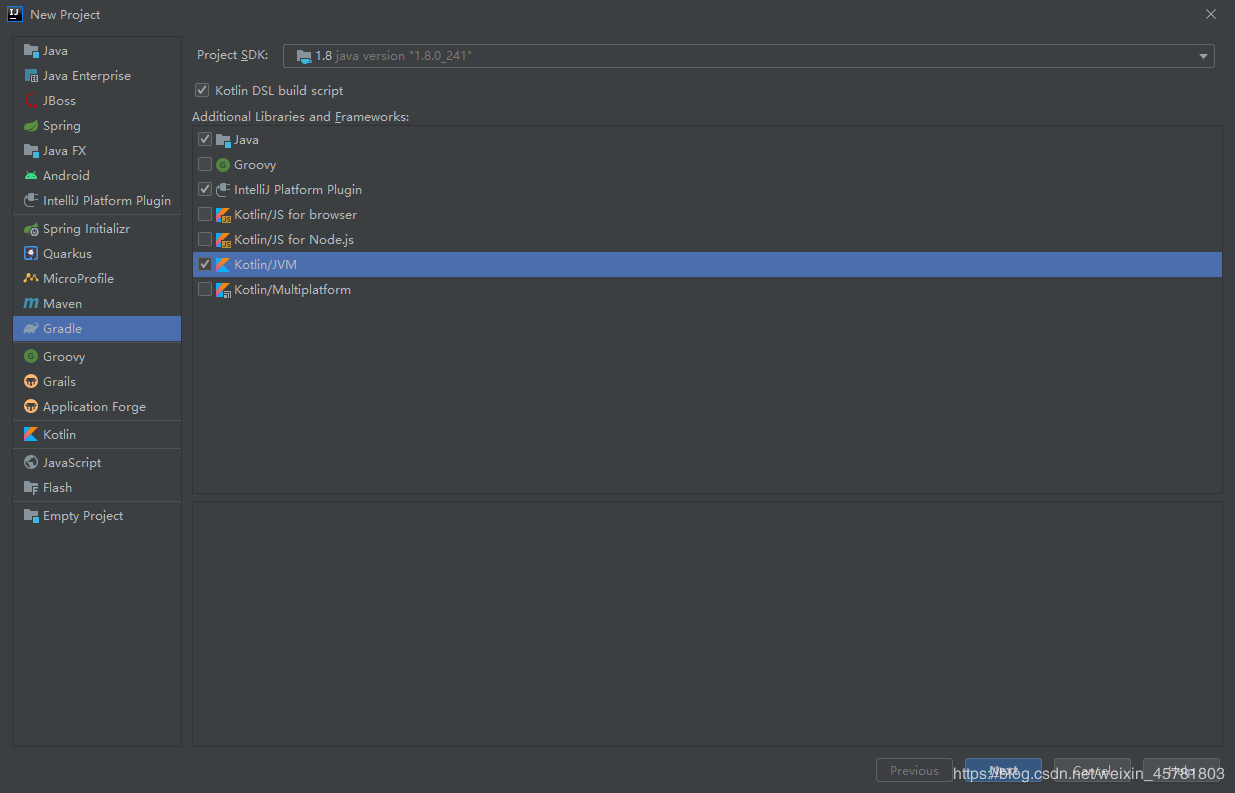
选中file -> new -> Project...,在弹出的窗口左侧选择Gradle,弹出以下界面:

默认勾选了Java,需要额外勾选IntelliJ Platform Plugin来表示这是一个IDEA插件项目,还需要勾选Kotlin/JVM这一项,为什么要勾选这一项呢,官网是这么介绍的:
To include support for the Kotlin language in the plugin, check the Kotlin/JVM box (circled in green below.) This option can be selected with or without the Java language.
也就是说,如果我们开发的插件需要对JAVA代码做支持的话,是要勾选这一项的。所有如果插件是基于JAVA代码检查的话,需要勾选这一个选项。
勾选完之后,点击next,之后的信息根据自己实际需要填写即可,然后点击finish,然后默默等待Gradle构建项目,如果可以的话挂个梯子,下载包什么的还是挺慢的。
构建完后的项目的目录结构以及每一个目录的作用,可以直接去看官方文档,里面有介绍。
https://www.jetbrains.org/intellij/sdk/docs/tutorials/build_system/prerequisites.html
2、 构建完项目后,需要修改build.gradle部分配制
构建完后,默认会打开build.gradle文件,内容如下:
|
1
2
3
4
5
6
7
8
9
10
11
12
13
14
15
16
17
18
19
20
21
22
23
24
25
26
27
28
29
30
31
32
33
|
plugins { id 'java' id 'org.jetbrains.intellij' version '0.4.19' id 'org.jetbrains.kotlin.jvm' version '1.3.71'}group 'org.example'version '1.0-SNAPSHOT'repositories { mavenCentral()}dependencies { implementation "org.jetbrains.kotlin:kotlin-stdlib-jdk8" testCompile group: 'junit', name: 'junit', version: '4.12'}intellij { version '2020.1'}compileKotlin { kotlinOptions.jvmTarget = "1.8"}compileTestKotlin { kotlinOptions.jvmTarget = "1.8"}patchPluginXml { changeNotes """ Add change notes here.<br> <em>most HTML tags may be used</em>"""} |
这里有个坑,构建完后,我把以前的代码复制过来,提醒我有部分类没有找到,也就是说没有引入对应的jar包。后来我在官网例子里面发现,它的build.gradle文件,和我的build文件有点不一样,具体不一样的地方如下:
|
1
2
3
4
5
6
|
intellij { version = '2020.1' plugins = ['java'] sameSinceUntilBuild = true} |
它在intellij里面,多了一个plugins = ['java']的选项,如果缺少这个选项的话,会缺少java-api.jar等jar等JAVA代码支持的jar包,导致一些类或者方法不可用。所以如果是JAVA代码支持的话,build.gradle文件需要加上plugins = ['java']这一行。
3、修改plugin.xml文件
plugin.xml文件是对于本插件的作用的一些描述,以及一些依赖关系配制,构建完后的plugin.xml文件内容如下:
|
1
2
3
4
5
6
7
8
9
10
11
12
13
14
15
16
17
18
19
20
21
22
23
24
25
26
27
28
29
30
31
|
<idea-plugin> <id>org.example.new-plugin-for-java</id> <name>Plugin display name here</name> <description><![CDATA[ Enter short description for your plugin here.<br> <em>most HTML tags may be used</em> ]]></description> <!-- please see https://www.jetbrains.org/intellij/sdk/docs/basics/getting_started/plugin_compatibility.html on how to target different products --> <depends>com.intellij.java</depends> <extensions defaultExtensionNs="com.intellij"> <!-- Add your extensions here --> <localInspection language="JAVA" displayName="test displayer" groupPath="Java" groupBundle="messages.InspectionsBundle" groupKey="group.names.probable.bugs" enabledByDefault="true" level="ERROR" implementationClass="com.nw.TestInsepction"/> </extensions> <actions> <!-- Add your actions here --> </actions></idea-plugin> |
这里有个坑,如果是IDEA2019.2以前的版本的话,这个文件不用其他东西,直接参考网上的插件开发教程,写好代码,就可以正常运行了。但是如果是IDEA2019.2的版本的话,运行的时候会疯狂报错,一开始不知道为什么,只能又去翻官方的例子,玩大家一起来找不同,结果发现官网的例子,下面的配置信息和默认构建的不一样:
|
1
2
|
<!-- Evaluates java PSI --><depends>com.intellij.modules.java</depends> |
原来这里的依赖还要改一下,改成上面这样,那为什么要改成这个依赖呢,这个时候,我才发现默认构建的plugin.xml里面,在depends上面有一段注释,大概意思就是,请前往注释里面的网站去找到如何根据产品去选择对应的depends,那就很简单了,直接上网页看,里面很多的介绍,以及各种不同的depends是干嘛的。网页里面有这么一段话:
(2) The Java language functionality was extracted as a plugin in version 2019.2 of the IntelliJ Platform. This refactoring separated the Java implementation from the other, non-language portions of the platform. Consequently, Java dependencies are expressed differently in plugin.xml depending on the version of the IntelliJ Platform being targeted:
Syntax required for releases prior to 2019.2, allowable in all releases:
-
plugin.xmlincludecom.intellij.modules.java
Syntax for 2019.2 and later releases:
-
plugin.xmlallowable alternative includecom.intellij.java -
build.gradlerequired to includeintellij.plugins 'java'
大概意思是,从2019.2版本开始后,java代码相关的支持抽成了一个插件,不包含在默认构建的包里面了,所以从2019.2版本开始后,plugin.xml和build.gradle需要修改成相关的配置。这也是为什么我们第二步要改build.gradle的原因。
4、参考网上的例子,编写第一个代码提示插件
新建一个java类,内容如下,这是一个测试用的提示插件,在所有变量上面提示"this is error"
|
1
2
3
4
5
6
7
8
9
10
11
12
13
14
15
16
17
18
19
20
21
22
23
24
25
26
27
28
29
30
31
32
|
package com;import com.intellij.codeInspection.AbstractBaseJavaLocalInspectionTool;import com.intellij.codeInspection.ProblemsHolder;import com.intellij.psi.JavaElementVisitor;import com.intellij.psi.PsiElementVisitor;import com.intellij.psi.PsiField;import org.jetbrains.annotations.NotNull;/** * 这是一个测试用的提示插件,在所有变量上面提示"this is an error" * @author LiuYeFeng * @date 2020/5/5 * @e-mail nightwind666@163.com */public class TestInspectionTool extends AbstractBaseJavaLocalInspectionTool { @NotNull @Override public PsiElementVisitor buildVisitor(@NotNull ProblemsHolder holder, boolean isOnTheFly) { // 返回一个java元素的访问器,重写当访问变量的时候,需要做的操作 return new JavaElementVisitor() { @Override public void visitField(PsiField field) { super.visitField(field); // 注册问题,也就是在变量上面显示异常红色下划线,并提示"this is an error" // 如果可以的话,这里也可以附带上快速修复问题的方法 holder.registerProblem(field, "this is an error"); } }; }} |
然后在plugin.xml里面的extensions添加上面编写的插件,如下;
|
1
2
3
4
5
6
7
8
9
10
11
12
|
<extensions defaultExtensionNs="com.intellij"> <!-- Add your extensions here --> <localInspection language="JAVA" displayName="Test field error" groupPath="Java" groupBundle="messages.InspectionsBundle" groupKey="group.names.probable.bugs" enabledByDefault="true" level="ERROR" implementationClass="com.TestInspectionTool"/> </extensions> |
以上配置大致是注册一个代码提示组件,里面的参数会决定你的提示配置在IDEA的哪个分类里面,以及提示的等级,例子里面用ERROR级别,可以查看的简单一点。
5、开始看代码提示插件的效果
点击右上角的debug,等待编译运行。运行后会弹出一个新的IDEA,这个IDEA会加载了我们编写的插件,同时在我们原来编写插件的IDEA可以看到日志输出等东西,也可以断点。可以简单理解为新的IDEA是一个浏览器,我们在用网页调试后端接口。
因为我们编写的插件是新写一个变量,不管三七二十一就会报错,提示this is an error,效果如下;

到此,一个完成的代码异常提示插件,就简单完成了。
6、代码提示插件还可以做到的
我们编写的这个插件,其实是比较简单的,并没有做逻辑分析。我们是可以根据实际需要,去编写一些项目组本身特有的功能的,例如某些继承自特殊类的所有字段,必须要有注释。在Service里面的方法,异常返回之前必须要记录日志或者一些其他操作等,都是可以做到的,还可以做一些快速修复(quick fix),例如字段没有注释可以快速生成注释。
这就需要对IDEA语法树相关有了解,IDEA把代码抽象成了Psi语法树,根据不同的代码功能划分为不同的PsiElement,例如注释是PsiComment,字段是PsiField,方法是PsiMethod,类是PsiClass。IDEA本身也提供了相当多的工具类,例如ReferencesSearch可以寻找类或者方法的引用点,PsiTreeUtil可以处理代码语法树上面的一些操作,例如获取变量所在的方法,ControlFlowUtil可以对代码进行解析等,还有PsiClassUtil和PsiFieldUtil等各种相关性的工具类可以提供各种便捷的操作,这就需要插件开发者自己去摸索。遇到问题可以去IDEA官方问答论坛去找一下,说不定别人已经帮你解决了这个问题了。
附加:
https://www.jetbrains.org/intellij/sdk/docs/intro/welcome.html
https://intellij-support.jetbrains.com/hc/en-us/community/topics/200366979-IntelliJ-IDEA-Open-API-and-Plugin-Development
到此这篇关于详解基于IDEA2020.1的JAVA代码提示插件开发例子的文章就介绍到这了,更多相关IDEA2020.1 JAVA代码提示插件内容请搜索服务器之家以前的文章或继续浏览下面的相关文章希望大家以后多多支持服务器之家!
原文链接:https://blog.csdn.net/weixin_45781803/article/details/105935826


