添加商品部分原理和添加商品类别是一样的,参考文章:添加和更新商品类别,不过要比商品类别复杂,因为商品的属性有很多,对应的数据库中的字段也就多了,添加商品还有个选项是上传图片,这一小块内容会在下一篇文章中单独说明,因为这涉及到一个知识点,就是Struts2实现文件上传功能。其他废话不多说了,现在开始完善添加商品部分的代码:
1. 添加商品
1.1 添加商品的UI实现
首先完成query.jsp中添加商品部分的代码:

接下来我们看save.jsp中的具体实现:
|
1
2
3
4
5
6
7
8
9
10
11
12
13
14
15
16
17
18
19
20
21
22
23
24
25
26
27
28
29
30
31
32
33
34
35
36
37
38
39
40
41
42
43
44
45
46
47
48
49
50
51
52
53
54
55
56
57
58
59
60
61
62
63
64
65
66
67
68
69
70
71
72
73
74
75
76
77
78
79
80
81
82
83
84
85
86
87
88
89
90
91
92
93
94
95
96
97
98
99
100
101
102
103
104
105
106
107
108
109
110
111
112
113
114
115
116
117
118
119
120
121
122
123
124
125
126
127
128
129
130
131
132
133
134
135
136
137
138
139
140
141
142
143
144
145
146
147
148
149
150
151
152
153
|
<%@ page language="java" import="java.util.*" pageEncoding="UTF-8"%> <!DOCTYPE HTML PUBLIC "-//W3C//DTD HTML 4.01 Transitional//EN"> <html> <head> <%@ include file="/public/head.jspf" %> <style type="text/css"> form div { margin:10px; } </style> <script type="text/javascript"> $(function(){ //自定义验证方法向validatebox.defaults.rules中注册新函数 $.extend($.fn.validatebox.defaults.rules,{ //函数的名称:{函数的实现体(又是一个json对象,里面包括函数的实现,和错误消息的设置)} format:{ //函数实现,如果返回为false,则验证失败 validator: function(value,param){ //获取当前文件的后缀名 var ext = value.substring(value.lastIndexOf('.') + 1); //获取支持的文件后缀名,然后比较即可 var arr = param[0].split(","); for(var i = 0; i < arr.length; i++) { if(ext == arr[i]) return true; } return false; }, //错误消息 message: '文件后缀必须为:{0}' } }); //对商品类别的下拉列表框进行远程加载 $("#cc").combobox({ //将请求发送给categoryAction中的query方法处理,这里需要将处理好的数据返回到这边来显示了 ,所以后台需要将数据打包成json格式发过来 url:'category_query.action', valueField:'id', textField:'type', //我们下拉列表中显示的是所有的商品类别 panelHeight:'auto', //自适应高度 panelWidth:120,//下拉列表是两个组件组成的 width:120, //要同时设置两个宽度才行 editable:false, //下拉框不允许编辑 //combobox继承combo继承validatebox,所以可以直接在这里设置验证 required:true, missingMessage:'请选择所属类别' }); $("input[name=name]").validatebox({ required:true, missingMessage:'请输入商品名称' }); $("input[name=price]").numberbox({ required:true, missingMessage:'请输入商品价格', min:0, precision:2, //保留两位小数 prefix:'$' }); $("input[name='fileImage.upload']").validatebox({ required:true, missingMessage:'请上传商品图片', //设置自定义方法 validType:"format['gif,jpg,jpeg,png']"//中括号里面是参数 }); $("textarea[name=remark]").validatebox({ required:true, missingMessage:'请输入商品的简单描述' }); $("textarea[name=xremark]").validatebox({ required:true, missingMessage:'请输入商品的简单描述' }); //窗体弹出默认时禁用验证 $("#ff").form("disableValidation"); //注册button的事件 $("#submit").click(function(){ //开启验证 $("#ff").form("enableValidation"); //如果验证成功,则提交数据 if($("#ff").form("validate")) { //调用submit方法提交数据 $("#ff").form('submit', { url: 'product_save.action', success: function(){ //如果成功了,关闭当前窗口 parent.$("#win").window("close"); parent.$("iframe[title='商品管理']").get(0).contentWindow.$("#dg").datagrid("reload"); } }); } }); //注册button的事件 $("#reset").click(function(){ $("#ff").form("disableValidation");//重置不需要表单验证 //重置当前表单数据 $("#ff").form("reset"); }); }); </script> </head> <body> <form title="添加商品" id="ff" method="post" enctype="multipart/form-data"> <div> <label>商品名称:</label> <input type="text" name="name" /> </div> <div> <label>商品价格:</label> <input type="text" name="price" /> </div> <div> <label>图片上传:</label> <input type="file" name="fileImage.upload" /> </div> <div> <label>所属类别:</label> <input id="cc" name="category.id"/> </div> <div> <label>加入推荐:</label> 推荐:<input type="radio" name="commend" checked="checked" value="true" /> 不推荐:<input type="radio" name="commend" value="false" /> </div> <div> <label>是否有效:</label> 上架:<input type="radio" name="open" checked="checked"value="true" /> 下架:<input type="radio" name="open" value="false" /> </div> <div> <label>简单描述:</label> <textarea name="remark" cols="40" rows="4"></textarea> </div> <div> <label>详细描述:</label> <textarea name="xremark" cols="40" rows="8"></textarea> </div> <div> <a id="submit" href="#" class="easyui-linkbutton">添 加</a> <a id="reset" href="#" class="easyui-linkbutton">重 置</a> </div> </form> </body> </html> |
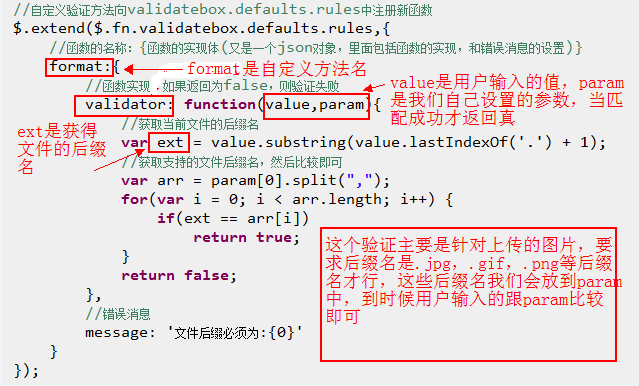
我们主要来看一下上面js代码中中自定义方法部分,主要是定义对上传的图片的验证,具体分析如下:

然后在图片验证这块就可以使用自定义的方法了:

1.2 添加商品的后台实现
|
1
2
3
4
5
6
7
8
9
10
11
12
13
14
15
|
@Controller("productAction") @Scope("prototype") public class ProductAction extends BaseAction<Product> { //省略其他代码…… public void save() throws Exception { //处理上传的图片,下一篇博客专门分析struts2文件上传 model.setDate(new Date()); //设置一下当前时间,因为前台没有把时间字段传进来,这里自己设置一下即可 System.out.println(model); //商品信息入库 productService.save(model); } } |
2. 更新商品
2.1 更新商品的UI实现
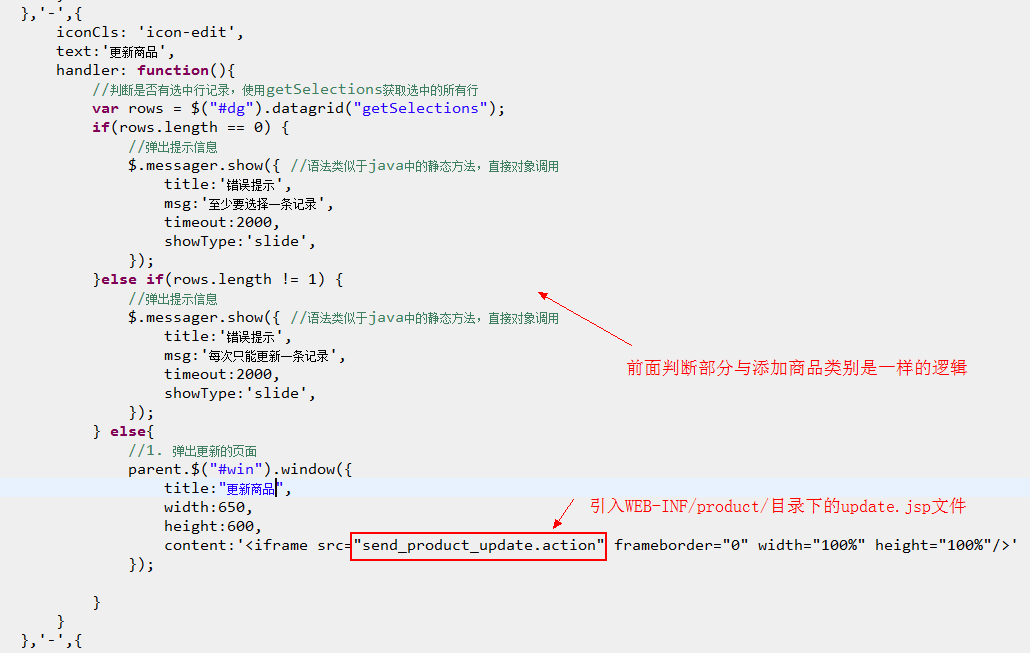
首先看下query.jsp中更新商品部分的代码:

接下来看看update.jsp的内容:
|
1
2
3
4
5
6
7
8
9
10
11
12
13
14
15
16
17
18
19
20
21
22
23
24
25
26
27
28
29
30
31
32
33
34
35
36
37
38
39
40
41
42
43
44
45
46
47
48
49
50
51
52
53
54
55
56
57
58
59
60
61
62
63
64
65
66
67
68
69
70
71
72
73
74
75
76
77
78
79
80
81
82
83
84
85
86
87
88
89
90
91
92
93
94
95
96
97
98
99
100
101
102
103
104
105
106
107
108
109
110
111
112
113
114
115
116
117
118
119
120
121
122
123
124
125
126
127
128
129
130
131
132
133
134
135
136
137
138
|
<%@ page language="java" import="java.util.*" pageEncoding="UTF-8"%> <!DOCTYPE HTML PUBLIC "-//W3C//DTD HTML 4.01 Transitional//EN"> <html> <head> <%@ include file="/public/head.jspf" %> <style type="text/css"> form div { margin:5px; } </style> <script type="text/javascript"> $(function(){ //iframe中的datagrid对象 var dg = parent.$("iframe[title='商品管理']").get(0).contentWindow.$("#dg"); //对商品类的下拉列表框进行远程加载 $("#cc").combobox({ //将请求发送给categoryAction中的query方法处理,这里需要将处理好的数据返回到这边来显示了 ,所以后台需要将数据打包成json格式发过来 url:'category_query.action', valueField:'id', textField:'type', //我们下拉列表中显示的是商品的类别名 panelHeight:'auto', //自适应高度 panelWidth:120,//下拉列表是两个组件组成的 width:120, //要同时设置两个宽度才行 editable:false, //下拉框不允许编辑 //combobox继承combo继承validatebox,所以可以直接在这里设置验证 required:true, missingMessage:'请选择所属类别' }); // 完成数据的回显,更新时,用户肯定先选择了要更新的那一行,首先我们得拿到那一行 var rows = dg.datagrid("getSelections"); //将拿到的那一行对应的数据字段加载到表单里,实现回显 $("#ff").form('load',{ id:rows[0].id, name:rows[0].name, price:rows[0].price, remark:rows[0].remark, xremark:rows[0].xremark, commend:rows[0].commend, open:rows[0].open, 'category.id':rows[0].category.id //EasyUI不支持account.id这种点操作,所以要加个引号 }); //回显完了数据后,设置一下验证功能 $("input[name=name]").validatebox({ required:true, missingMessage:'请输入类别名称' }); $("input[name=price]").numberbox({ required:true, missingMessage:'请输入商品价格', min:0, precision:2, //保留两位小数 prefix:'$' }); $("input[name='fileImage.upload']").validatebox({ required:true, missingMessage:'请上传商品图片', //设置自定义方法 validType:"format['gif,jpg,jpeg,png']"//中括号里面是参数 }); $("textarea[name=remark]").validatebox({ required:true, missingMessage:'请输入商品的简单描述' }); $("textarea[name=xremark]").validatebox({ required:true, missingMessage:'请输入商品的简单描述' }); //窗体弹出默认时禁用验证 $("#ff").form("disableValidation"); //注册button的事件 $("#btn").click(function(){ //开启验证 $("#ff").form("enableValidation"); //如果验证成功,则提交数据 if($("#ff").form("validate")) { //调用submit方法提交数据 $("#ff").form('submit', { url: 'product_update.action', //提交时将请求传给productAction的update方法执行 success: function(){ //如果成功了,关闭当前窗口,并刷新页面 parent.$("#win").window("close"); dg.datagrid("reload"); } }); } }); }); </script> </head> <body> <form title="更新商品" id="ff" method="post" enctype="multipart/form-data"> <div> <label for="name">商品名称:</label> <input type="text" name="name" /> </div> <div> <label for="price">商品价格:</label> <input type="text" name="price" /> </div> <div> <label>更新图片:</label> <input type="file" name="fileImage.upload" /> </div> <div> <label for="account">所属商品类:</label> <!-- 远程加载管理员数据 --> <input id="cc" name="category.id" /> </div> <div> <label for="remark">简单描述:</label> <textarea name="remark" cols="40" rows="4"></textarea> </div> <div> <label for="xremark">详细描述:</label> <textarea name="xremark" cols="40" rows="8"></textarea> </div> <div> <label for="commend">推荐商品:</label> 是:<input type="radio" name="commend" value="true" /> 否:<input type="radio" name="commend" value="false" /> </div> <div> <label for="open">有效商品:</label> 上架:<input type="radio" name="open" value="true" /> 下架:<input type="radio" name="open" value="false" /> </div> <div> <a id="btn" href="#" class="easyui-linkbutton" data-options="iconCls:'icon-edit'">更新</a> <input type="hidden" name="id" /> </div> ` </form> </body> </html> |
更新部分与商品类别的更新基本相同,不再赘述,下面是后台更新部分的实现:
2.2 更新商品的后台实现
|
1
2
3
4
5
6
7
8
9
10
11
12
13
14
15
|
@Controller("productAction") @Scope("prototype") public class ProductAction extends BaseAction<Product> { //省略其他代码…… public void update() throws Exception { //处理上传的图片,下一篇博客专门分析struts2文件上传 model.setDate(new Date()); //设置一下当前时间,因为前台没有把时间字段传进来,这里自己设置一下即可 System.out.println(model); //更新商品 productService.update(model); } } |
跟更新商品类别相比,唯一多了个图片上传的操作,要在后台处理上传的图片,我们在下一篇文章详细分析struts2的文件上传功能。
以上就是本文的全部内容,希望对大家的学习有所帮助,也希望大家多多支持服务器之家。


