整体效果:
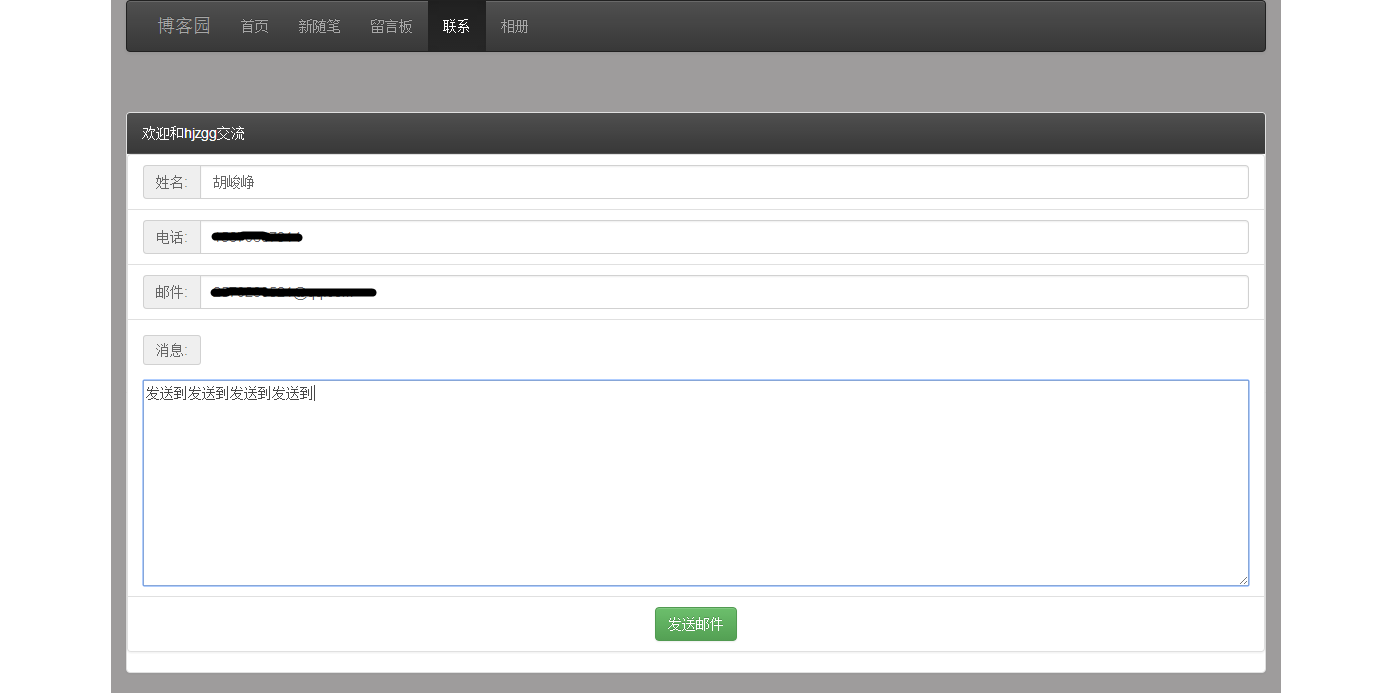
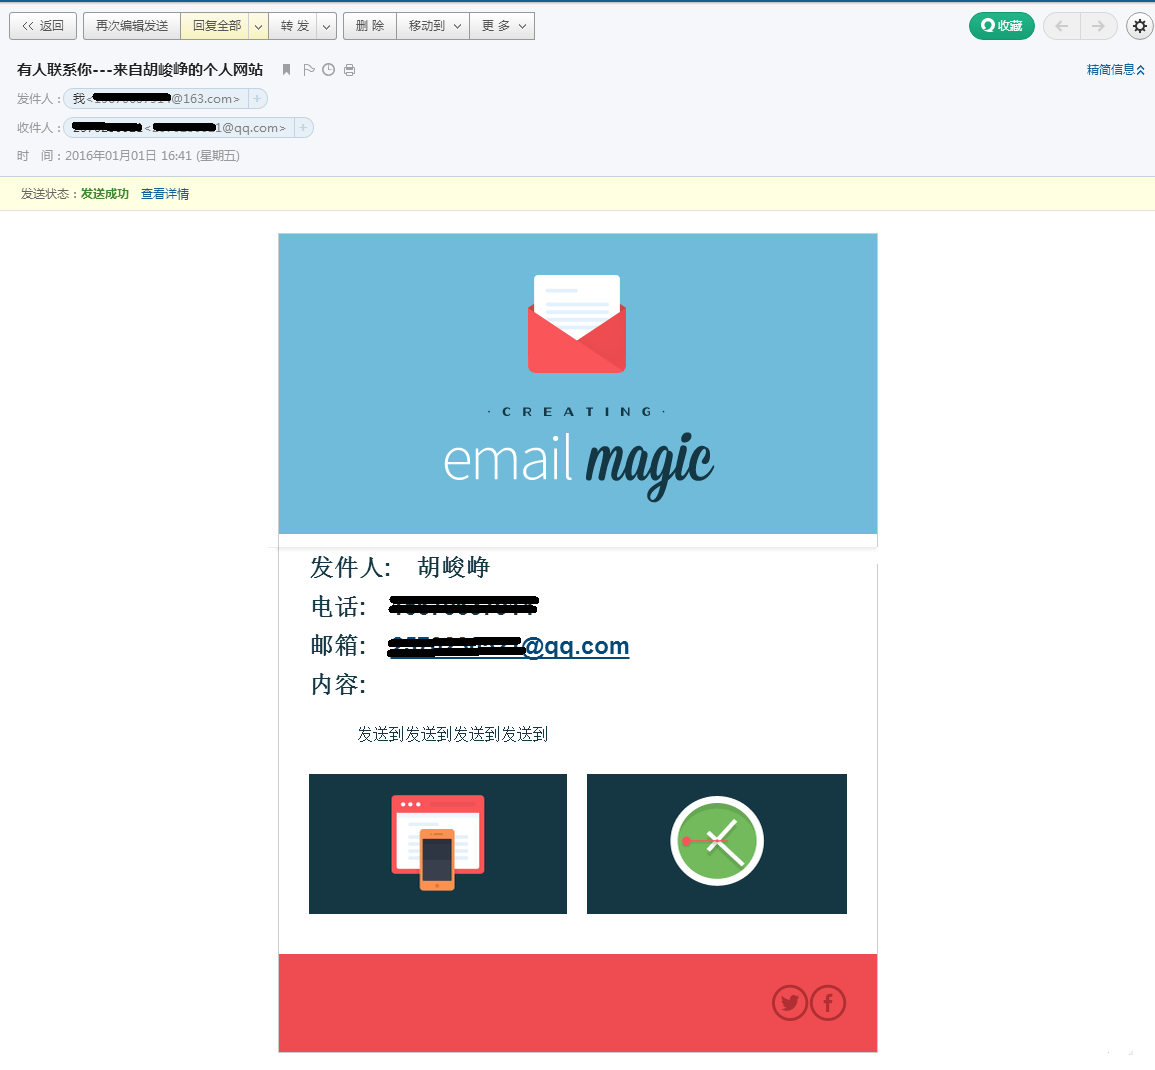
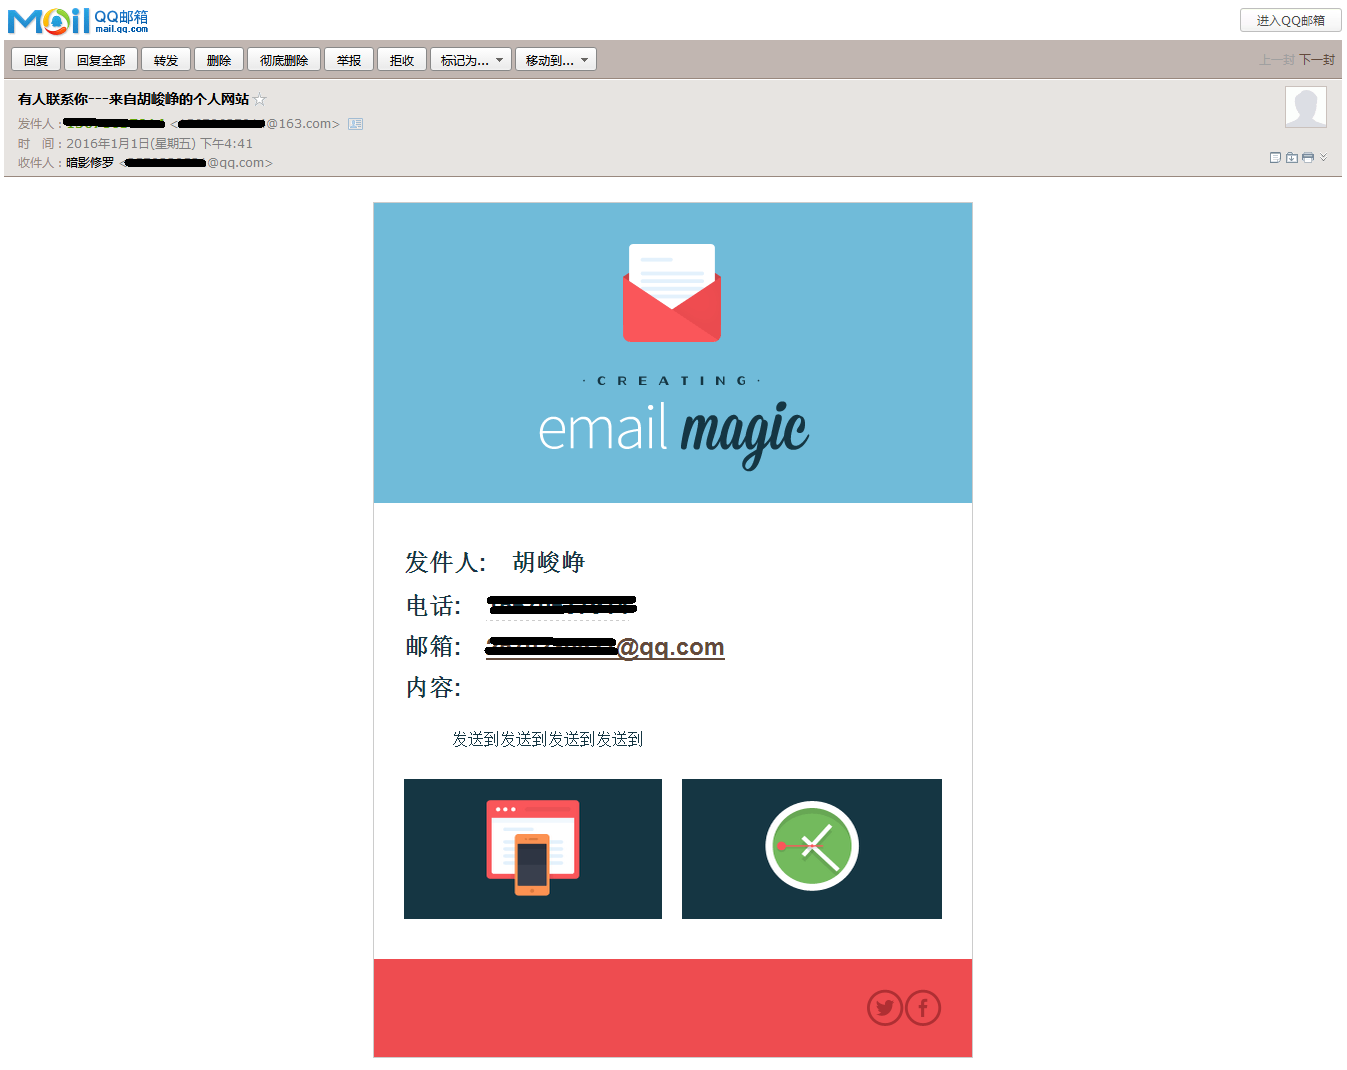
发送端:网易邮箱;接收端:qq邮箱。
1.web前端

2.在网易邮箱“已发送”中可以看见通过java代码发送的邮件

3.同样在qq邮箱中也可以看到这样的效果

实现过程:
1.web前端(bootstrap布局)
|
1
2
3
4
5
6
7
8
9
10
11
12
13
14
15
16
17
18
19
20
21
22
23
24
25
26
27
28
29
30
31
32
33
34
|
<form action="mailAction!sendMail" method="post" name="mailForm" id="mailFormId"> <ul class="list-group"> <li class="list-group-item"> <div class="input-group"> <span class="input-group-addon" id="basic-addon1">姓名:</span> <input type="text" class="form-control" placeholder="your name" name="mailForm.name" aria-describedby="basic-addon1"> </div> </li> <li class="list-group-item"> <div class="input-group"> <span class="input-group-addon" id="basic-addon2">电话:</span> <input type="text" class="form-control" placeholder="your phone" name="mailForm.phone" aria-describedby="basic-addon1"> </div> </li> <li class="list-group-item"> <div class="input-group"> <span class="input-group-addon" id="basic-addon2">邮件:</span> <input type="text" class="form-control" placeholder="your e-mail" name="mailForm.e_mail" aria-describedby="basic-addon1"> </div> </li> <li class="list-group-item" style="padding-top: 20px;"> <span class="label label-default blog-label-1">消息:</span> <br><br> <textarea rows="10" style="width:100%" name="mailForm.content" placeholder="请输入消息(不要超过500个字符)"></textarea> </li> <li class="list-group-item"> <center><button onclick="$('#mailFormId').submit();" type="button" class="btn btn-success">发送邮件</button></center> </li> </ul></form> |
2.首先准备一个XML的模板(<xml-body>包含的是邮件的html格式的文本)。
|
1
2
3
4
5
6
7
8
9
10
11
12
13
14
15
16
17
18
19
20
21
22
23
24
25
26
27
28
29
30
31
32
33
34
35
36
37
38
39
40
41
42
43
44
45
46
47
48
49
50
51
52
53
54
55
56
57
58
59
60
61
62
63
64
65
66
67
68
69
70
71
72
73
74
75
76
77
78
79
80
81
82
83
84
85
86
87
88
89
90
91
92
93
94
95
|
<?xml version="1.0" encoding="UTF-8"?><!-- 将空格换成全角的空格,就可以保证html不会将空格过滤掉 --><xml-body> <html> <head> </head> <body style="margin: 0; padding: 0;"> <table border="0" cellpadding="0" cellspacing="0" width="100%"> <tbody><tr> <td style="padding: 10px 0 30px 0;"> <table align="center" border="0" cellpadding="0" cellspacing="0" width="600" style="border: 1px solid #cccccc; border-collapse: collapse;"> <tbody><tr> <td align="center" bgcolor="#70bbd9" style="padding: 40px 0 30px 0; color: #153643; font-size: 28px; font-weight: bold; font-family: Arial, sans-serif;"> <img src="cid:{4}" alt="Creating Email Magic" width="300" height="230" style="display: block;"/> </td> </tr> <tr> <td bgcolor="#ffffff" style="padding: 40px 30px 40px 30px;"> <table border="0" cellpadding="0" cellspacing="0" width="100%"> <tbody><tr> <td style="color: #153643; font-family: Arial, sans-serif; font-size: 24px;"> <b> 发件人: {0} <br/> 电话: {1} <br/> 邮箱: {2} <br/> 内容:<br/> </b> </td> </tr> <tr> <td style="padding: 20px 0 30px 0; color: #153643; font-family: Arial, sans-serif; font-size: 16px; line-height: 20px;"> {3} </td> </tr> <tr> <td> <table border="0" cellpadding="0" cellspacing="0" width="100%"> <tbody><tr> <td width="260" valign="top"> <table border="0" cellpadding="0" cellspacing="0" width="100%"> <tbody><tr> <td> <img src="cid:{5}" alt="" width="100%" height="140" style="display: block;"/> </td> </tr> </tbody></table> </td> <td style="font-size: 0; line-height: 0;" width="20"> </td> <td width="260" valign="top"> <table border="0" cellpadding="0" cellspacing="0" width="100%"> <tbody><tr> <td> <img src="cid:{6}" alt="" width="100%" height="140" style="display: block;"/> </td> </tr> </tbody></table> </td> </tr> </tbody></table> </td> </tr> </tbody></table> </td> </tr> <tr> <td bgcolor="#ee4c50" style="padding: 30px 30px 30px 30px;"> <table border="0" cellpadding="0" cellspacing="0" width="100%"> <tbody><tr> <td align="right" width="25%"> <table border="0" cellpadding="0" cellspacing="0"> <tbody><tr> <td style="font-family: Arial, sans-serif; font-size: 12px; font-weight: bold;"> <img src="cid:{7}" alt="Twitter" width="38" height="38" style="display: block;" border="0"/> </td> <td style="font-family: Arial, sans-serif; font-size: 12px; font-weight: bold;"> <img src="cid:{8}" alt="Facebook" width="38" height="38" style="display: block;" border="0"/> </td> </tr> </tbody></table> </td> </tr> </tbody></table> </td> </tr> </tbody></table> </td> </tr> </tbody></table> </body> </html></xml-body> |
其中模板中会有一些标识符,如{i},表还是字符串的预留位置,然后通过MessageFormat格式化这样的消息,然后将格式化后的字符串插入到模式中的适当位置。
|
1
2
3
4
5
6
|
//得到XML的模板String XML_path = ServletActionContext.getServletContext().getRealPath("/mailTemplate")+"/myMailTemplete.xml"; String str=new ReaderXML().read(XML_path); Object[] obj=new Object[]{mailForm.getName(), mailForm.getPhone(), mailForm.getE_mail(), mailForm.getContent(), "e_mail", "left", "right", "tw", "fb"}; //MessageFormat可以格式化这样的消息,然后将格式化后的字符串插入到模式中的适当位置String tcontent = MessageFormat.format(str, obj); |
最终XML模板中的{i}分别被obj[i]替换了。
3.写一个对XML模板的类ReaderXML
|
1
2
3
4
5
6
7
8
9
10
11
12
13
14
15
16
17
18
19
20
|
public class ReaderXML { public String read(String path){ String str=null; str=reader(path); return str; } private String reader(String path){ SAXReader reader=new SAXReader(); String str=null; try { Document d=reader.read(new File(path)); Element e=d.getRootElement(); Element htmle=e.element("html"); str=htmle.asXML(); } catch (DocumentException e) { e.printStackTrace(); } return str; }} |
4.最后就是我们的控制器类MailAction
在 HTML 格式的正文中内含图片是使用MimeBodyPart类的setContentID() 方法设置对应的资源文件的唯一标识符,即 MIME 协议对于邮件的结构组织格式中的 Content-ID 头字段,对应着XML模板中的cid:{i}标识, 如<img src="cid:{8}"/>(注:{i}会通过MessageFormat.format替换成对应的字符串)
|
1
2
3
4
5
6
7
8
9
10
11
12
13
14
15
16
17
18
19
20
21
22
23
24
25
26
27
28
29
30
31
32
33
34
35
36
37
38
39
40
41
42
43
44
45
46
47
48
49
50
51
52
53
54
55
56
57
58
59
60
61
62
63
64
65
66
67
68
69
70
71
72
73
74
75
76
77
78
79
80
81
82
83
84
85
86
87
88
|
public class MailAction extends ActionSupport{ private MailForm mailForm; public MailForm getMailForm() { return mailForm; } public void setMailForm(MailForm mailForm) { this.mailForm = mailForm; } //添加内嵌图片 private MimeBodyPart createImageMimeBodyPart(String imageName) throws MessagingException, UnsupportedEncodingException{ FileDataSource fds=new FileDataSource(ServletActionContext.getServletContext().getRealPath("/image")+"/" + imageName + ".gif"); MimeBodyPart mbp=new MimeBodyPart(); DataHandler dh=new DataHandler(fds); mbp.setDataHandler(dh); //设置对应的资源文件的唯一标识符,即 MIME 协议对于邮件的结构组织格式中的 Content-ID 头字段; mbp.setHeader("Content-ID", imageName); mbp.setFileName(MimeUtility.encodeText(fds.getName())); return mbp; } public String sendMail(){ try { HttpServletRequest request = ServletActionContext.getRequest(); String pwd = "************";//发件人邮箱密码 String mailfrom = "***********@163.com"; //网易的邮箱 String wangyiFrom = mailfrom.substring(0, mailfrom.indexOf('@'));//网易邮箱的用户名 String tu = "163.com"; //发件人邮箱的后缀域名 String tto= "**********@qq.com"; //接收邮件的邮箱 String ttitle= "有人联系你---来自胡峻峥的个人网站"; //根据其物理路径,得到XML的模板 String XML_path = ServletActionContext.getServletContext().getRealPath("/mailTemplate")+"/myMailTemplete.xml"; String str=new ReaderXML().read(XML_path); Object[] obj=new Object[]{mailForm.getName(), mailForm.getPhone(), mailForm.getE_mail(), mailForm.getContent(), "e_mail", "left", "right", "tw", "fb"}; //MessageFormat可以格式化这样的消息,然后将格式化后的字符串插入到模式中的适当位置 String tcontent = MessageFormat.format(str, obj); Properties props=new Properties(); props.put("mail.smtp.host","smtp."+tu);//邮箱SMTP服务器地址端口 props.put("mail.smtp.auth","true");//这样才能通过验证 Session s=Session.getInstance(props); s.setDebug(true); MimeMessage message=new MimeMessage(s); //给消息对象设置发件人/收件人/主题/发信时间 InternetAddress from; from = new InternetAddress(mailfrom);//发件人的qq邮箱 message.setFrom(from); InternetAddress to=new InternetAddress(tto);//收件人的邮箱 message.setRecipient(Message.RecipientType.TO,to); message.setSubject(ttitle); message.setSentDate(new Date()); //给消息对象设置内容 BodyPart mbp=new MimeBodyPart();//新建一个存放信件内容的BodyPart对象 mbp.setContent(tcontent,"text/html;charset=gb2312");//给BodyPart对象设置内容和格式/编码方式 // 用于组合文本和图片,"related"型的MimeMultipart对象 Multipart mm=new MimeMultipart("related");//新建一个MimeMultipart对象用来存放BodyPart对象(事实上可以存放多个) mm.addBodyPart(mbp);//将BodyPart加入到MimeMultipart对象中(可以加入多个BodyPart) //添加图片 mm.addBodyPart(createImageMimeBodyPart("e_mail")); mm.addBodyPart(createImageMimeBodyPart("left")); mm.addBodyPart(createImageMimeBodyPart("right")); mm.addBodyPart(createImageMimeBodyPart("tw")); mm.addBodyPart(createImageMimeBodyPart("fb")); message.setContent(mm);//把mm作为消息对象的内容 message.saveChanges(); Transport transport=s.getTransport("smtp"); transport.connect("smtp."+tu, wangyiFrom, pwd); //这里的wangyiFrom为发件人网易账号 transport.sendMessage(message,message.getAllRecipients()); transport.close(); ActionContext.getContext().getSession().put("operations", "邮件发送成功, 请耐心等待回复!"); } catch (Exception e) { System.out.println(e.toString()); ActionContext.getContext().getSession().put("errors", e.toString()); return "errors"; } return "sendMail"; }} |
以上就是本文的全部内容,希望对大家的学习有所帮助。


