简述
该工具类主要是为了将各类音频转为wav标准格式,其中可以调节采样率、声道数等指标。主要是使用ffmpeg命令进行转换。
环境依赖
maven依赖
|
1
2
3
4
5
|
<dependency> <groupId>org.bytedeco</groupId> <artifactId>javacv-platform</artifactId> <version>1.5.5</version></dependency> |
这个包是个全能包,很大,具体可以自己查查它的作用。
ffmpeg依赖
这里要做两点说明:
1、如果你是本机运行,需要在你运行的机器上安装ffmpeg,并且将命令配置到环境变量中。
2、如果你是在docker运行,那么在容器内也需要安装ffmpeg,所以给一个建议,可以将带有ffmpeg命令和jdk8环境的docker打包为一个专门的ffmpeg运行镜像。以便以后还有使用的场景。
工具类代码
|
1
2
3
4
5
6
7
8
9
10
11
12
13
14
15
16
17
18
19
20
21
22
23
24
25
26
27
28
29
30
31
32
33
34
35
36
37
38
39
40
41
42
43
44
45
46
47
48
49
50
51
52
53
54
55
56
57
58
59
60
61
62
|
import lombok.extern.slf4j.Slf4j;import org.bytedeco.javacpp.Loader; import java.io.IOException;import java.util.Optional; /** @Author huyi @Date 2021/10/15 10:20 @Description: 音频转换为wav格式工具类 */@Slf4jpublic class AudioTransforWavUtils { /** * 音频转换 * * @param localPath 本地音频 * @param fileName 文件名 * @return 转换后的地址 * @throws Exception 异常 */ public static String transforAudio(String localPath, String fileName) throws Exception { // 这个本地转换路径可以自己调整 String transforPath = "D:" + "/" + fileName + ".wav"; Optional<String> transPath = Optional.empty(); try { transPath = transforWavStandard(localPath, transforPath); } catch (Exception exception) { exception.printStackTrace(); } if (transPath.isPresent()) { return transPath.get(); } else { throw new Exception("音频转换失败失败"); } } /** * wav音频转换为标准音频 * * @param oldFilePath 老地址 * @param newFilePath 新地址 * @return 转换完成后的地址 */ public static Optional<String> transforWavStandard(String oldFilePath, String newFilePath) { // 获取本地ffmpeg执行器 String ffmpeg = Loader.load(org.bytedeco.ffmpeg.ffmpeg.class); // 生成转换命令管道 ProcessBuilder transforBuilder = new ProcessBuilder( ffmpeg, "-i", oldFilePath, "-f", "wav", "-ar", "16000", "-ac", "1", "-y", newFilePath); try { // inheritIO是指将 子流程的IO与当前java流程的IO设置为相同 transforBuilder.inheritIO().start().waitFor(); } catch (InterruptedException | IOException e) { log.error("ffmpeg转换wav为标准格式异常", e); return Optional.empty(); } // 返回pcm文件路径 return Optional.of(newFilePath); } public static void main(String[] args) throws Exception { transforAudio("C:\\Users\\huyi\\Desktop\\测试.mp3", "new"); }} |
测试数据为MP3音频

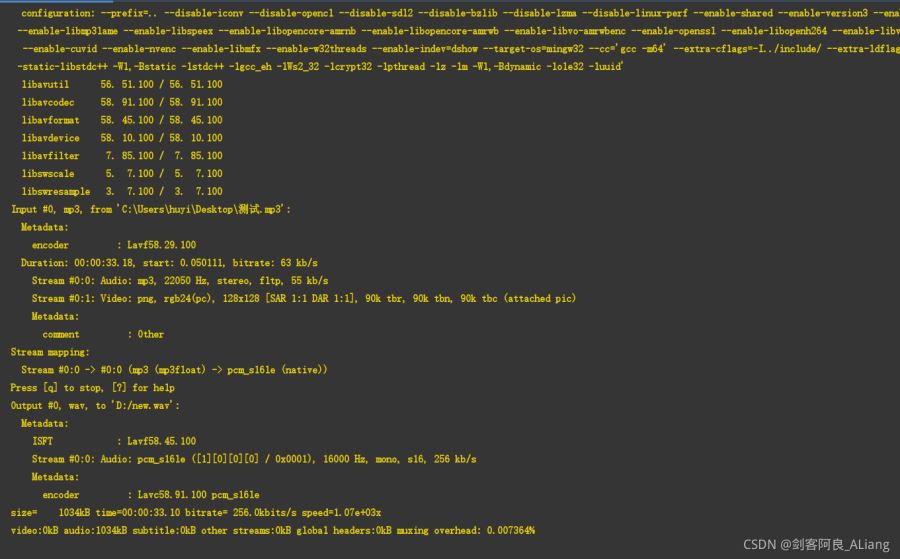
执行打印,会出现ffmpeg的执行打印。

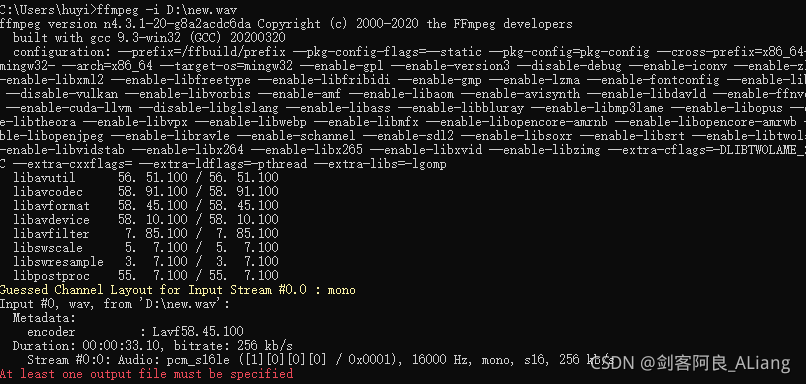
执行结果。

说明:我们看到已经转换为wav格式。 具体的采样率、声道等,可以按照自己的需求配置或者变量化。
总结
没什么好总结的,整就完了。
到此这篇关于java 音频转为wav格式标准音频的文章就介绍到这了,更多相关java 音频转为wav格式内容请搜索服务器之家以前的文章或继续浏览下面的相关文章希望大家以后多多支持服务器之家!
原文链接:https://blog.csdn.net/zhiweihongyan1/article/details/120779902


