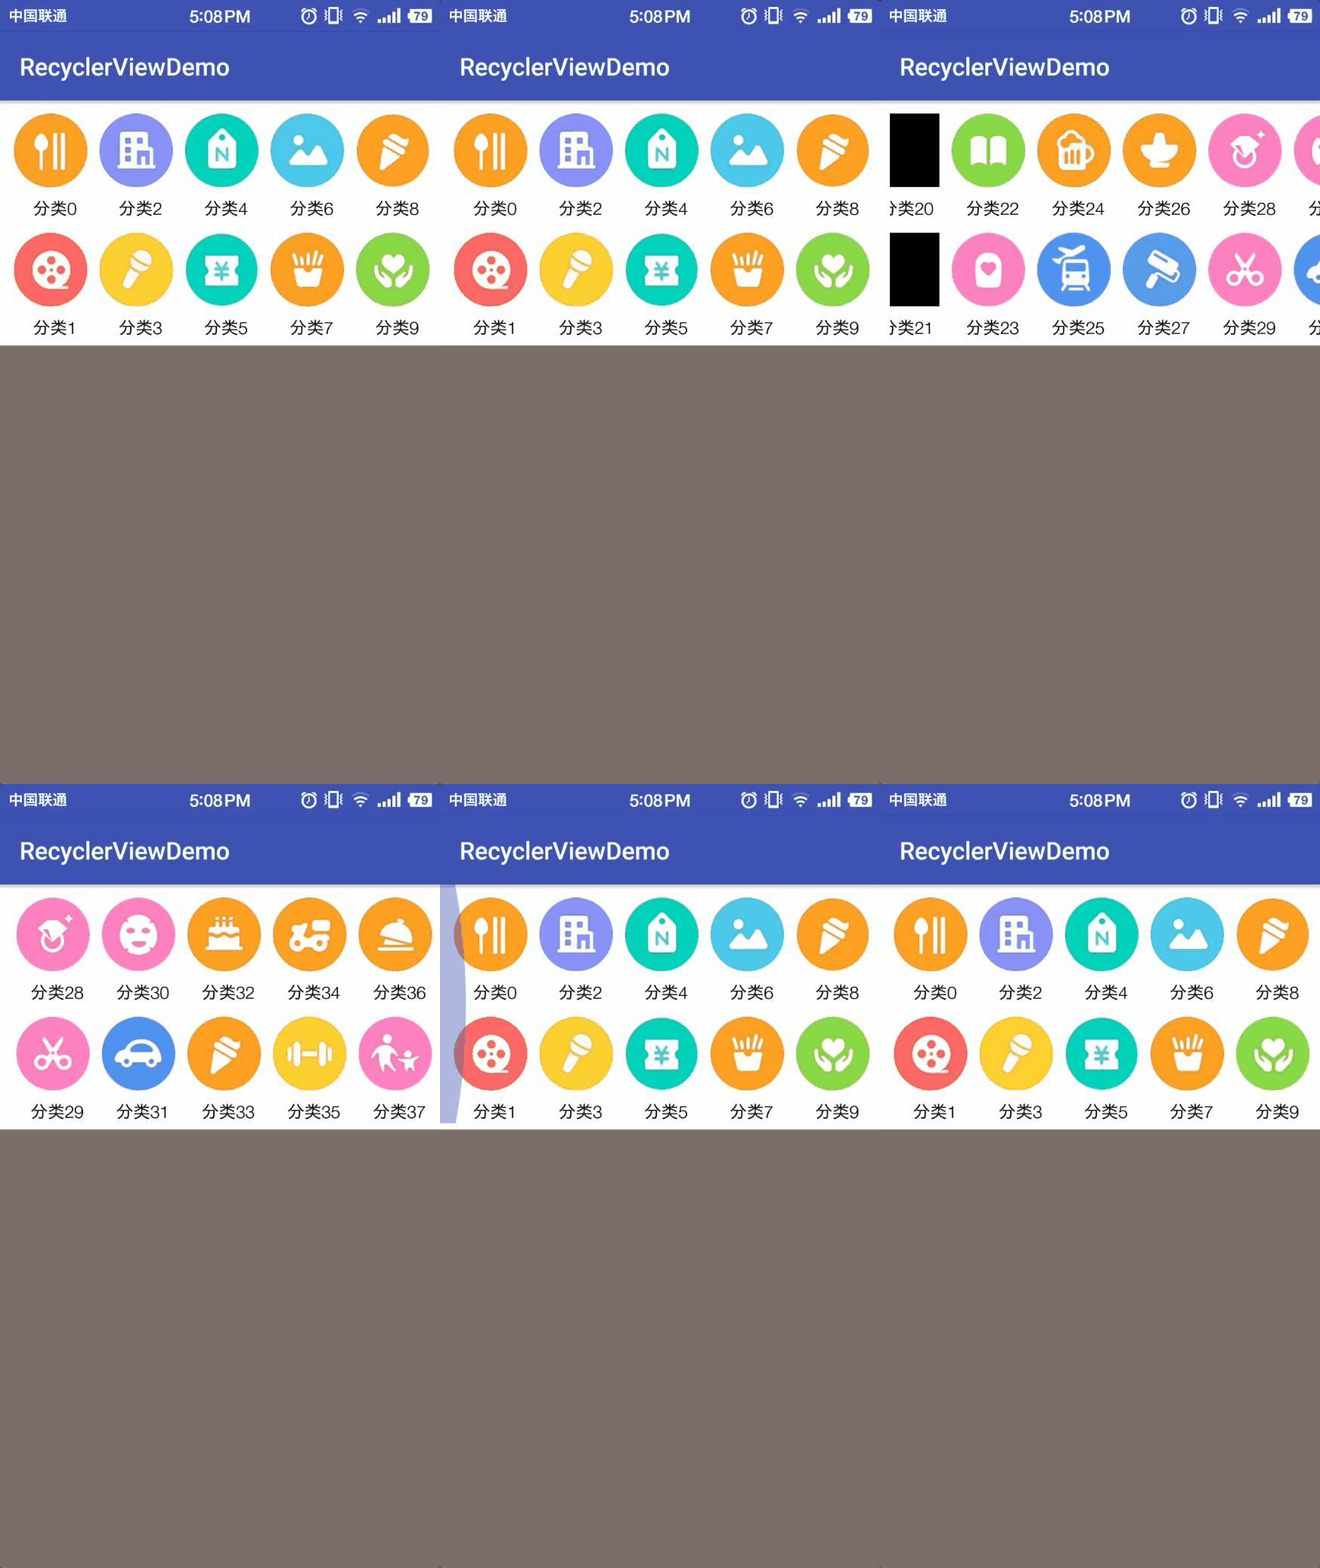
RecyclerView目前来说对大家可能不陌生了。由于在公司的项目中,我们一直用的listview和gridview。某天产品设计仿照美团的分类界面设计了一个界面,我发现用gridview不能实现这样的效果,所以就想到了RecyclerView,确实是一个很好的控件。和大家分享一下。
效果图


简介
RecyclerView与ListView原理是类似的:都是仅仅维护少量的View并且可以展示大量的数据集。RecyclerView用以下两种方式简化了数据的展示和处理:
* 使用LayoutManager来确定每一个item的排列方式。
* 为增加和删除项目提供默认的动画效果
用法须知
LayoutManager:用来确定每一个item如何进行排列摆放,何时展示和隐藏。回收或重用一个View的时候,LayoutManager会向适配器请求新的数据来替换旧的数据,这种机制避免了创建过多的View和频繁的调用findViewById方法(与ListView原理类似)。
目前SDK中提供了三种自带的LayoutManager:
- LinearLayoutManager
- GridLayoutManager
- StaggeredGridLayoutManager
代码
布局文件
activity_main.xml
|
1
2
3
4
5
6
7
8
9
10
11
12
13
14
15
16
17
18
|
<?xml version="1.0" encoding="utf-8"?><RelativeLayout xmlns:android="http://schemas.android.com/apk/res/android" xmlns:tools="http://schemas.android.com/tools" android:id="@+id/activity_main" android:layout_width="match_parent" android:layout_height="match_parent" android:background="#7e6c6c" tools:context="cn.bluemobi.dylan.recyclerviewdemo.MainActivity"> <android.support.v7.widget.RecyclerView android:id="@+id/rv" android:background="#FFFFFF" android:paddingLeft="8dp" android:paddingBottom="5dp" android:layout_width="match_parent" android:layout_height="200dp" /></RelativeLayout> |
item.xml
|
1
2
3
4
5
6
7
8
9
10
11
12
13
14
15
16
17
18
19
20
21
22
23
|
<?xml version="1.0" encoding="utf-8"?><LinearLayout xmlns:android="http://schemas.android.com/apk/res/android" xmlns:app="http://schemas.android.com/apk/res-auto" android:layout_width="70dp" android:layout_height="match_parent" android:orientation="vertical"> <ImageView android:id="@+id/iv" android:layout_width="60dp" android:layout_height="75dp" app:srcCompat="@mipmap/ic_category_0" /> <TextView android:id="@+id/tv" android:layout_width="match_parent" android:gravity="center" android:layout_gravity="center" android:layout_height="wrap_content" android:textColor="#000000" android:text="TextView" /></LinearLayout> |
Activity中的代码
RvAdpter.java
|
1
2
3
4
5
6
7
8
9
10
11
12
13
14
15
16
17
18
19
20
21
22
23
24
25
26
27
28
29
30
31
32
33
34
35
36
37
38
39
40
41
42
43
44
45
46
47
48
49
50
51
52
53
54
|
package cn.bluemobi.dylan.recyclerviewdemo;import android.content.Context;import android.support.v7.widget.RecyclerView;import android.view.LayoutInflater;import android.view.View;import android.view.ViewGroup;import android.widget.ImageView;import android.widget.TextView;import java.util.List;/** * Created by yuandl on 2016-11-01. */public class RvAdpter extends RecyclerView.Adapter<RvAdpter.MyViewHolder> { private Context context; private List<Integer> datas; public RvAdpter(Context context, List<Integer> datas) { this.context = context; this.datas = datas; } @Override public MyViewHolder onCreateViewHolder(ViewGroup parent, int viewType) { View contentView= LayoutInflater.from(context).inflate(R.layout.item,parent,false); MyViewHolder viewHolder=new MyViewHolder(contentView); return viewHolder; } @Override public void onBindViewHolder(MyViewHolder holder, int position) { holder.imageView.setImageResource(datas.get(position)); holder.tv.setText("分类"+position); } @Override public int getItemCount() { return datas==null?0:datas.size(); } public class MyViewHolder extends RecyclerView.ViewHolder { private ImageView imageView; public TextView tv; public MyViewHolder(View itemView) { super(itemView); imageView = (ImageView) itemView.findViewById(R.id.iv); tv = (TextView) itemView.findViewById(R.id.tv); } }} |
MainActivity.java
|
1
2
3
4
5
6
7
8
9
10
11
12
13
14
15
16
17
18
19
20
21
22
23
24
25
26
27
28
29
30
31
32
33
34
35
36
37
38
39
40
41
42
43
44
45
46
47
48
49
50
51
52
53
54
55
|
package cn.bluemobi.dylan.recyclerviewdemo;import android.content.res.Resources;import android.graphics.Canvas;import android.graphics.Rect;import android.support.v7.app.AppCompatActivity;import android.os.Bundle;import android.support.v7.widget.RecyclerView;import android.support.v7.widget.StaggeredGridLayoutManager;import android.view.View;import java.lang.reflect.Field;import java.util.ArrayList;import java.util.List;public class MainActivity extends AppCompatActivity { private RecyclerView rv; @Override protected void onCreate(Bundle savedInstanceState) { super.onCreate(savedInstanceState); setContentView(R.layout.activity_main); rv = (RecyclerView) findViewById(R.id.rv); initData(); } /** * 初始化数据 */ private void initData() { List<Integer> datas = new ArrayList<>(); for (int i = 0; i < 38; i++) { Resources res = getResources(); datas.add(res.getIdentifier("ic_category_" + i, "mipmap", getPackageName())); } /** *用来确定每一个item如何进行排列摆放 * LinearLayoutManager 相当于ListView的效果 GridLayoutManager相当于GridView的效果 StaggeredGridLayoutManager 瀑布流 */ rv.setLayoutManager(new StaggeredGridLayoutManager(2, StaggeredGridLayoutManager.HORIZONTAL)); rv.addItemDecoration(new RecyclerView.ItemDecoration() { @Override public void getItemOffsets(Rect outRect, View view, RecyclerView parent, RecyclerView.State state) { outRect.left = 10; outRect.top = 10; outRect.top = 10; } }); rv.setAdapter(new RvAdpter(this, datas)); }} |
以上就是本文的全部内容,希望对大家的学习有所帮助,也希望大家多多支持服务器之家。
原文链接:https://blog.csdn.net/linglongxin24/article/details/52997986


