前言
前一篇我们讲解了View的Measure过程,那今天我们来讲解下Layout;
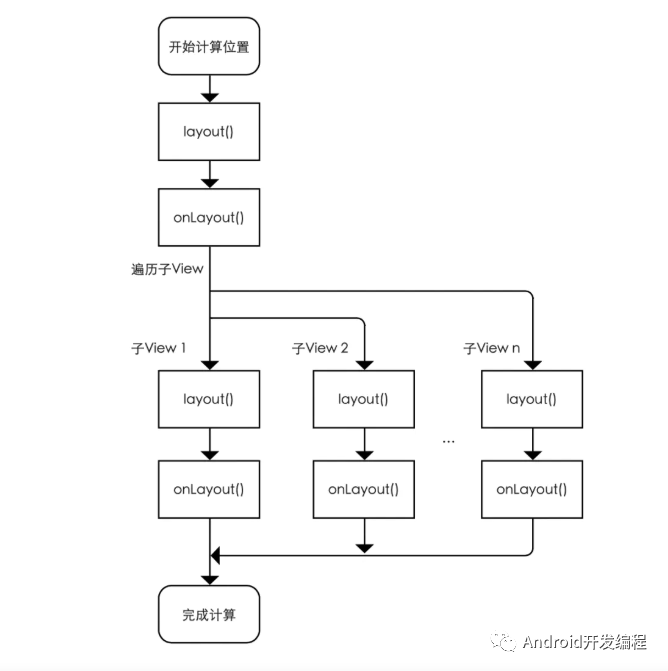
View的layout方法作用是确定View的位置,ViewGroup的layout方法不仅要确定自身的位置,还有确定子View的位置;
Android进阶之深入理解View的测量(Measure)流程机制
一、Layout流程源码详解

1、performLayout
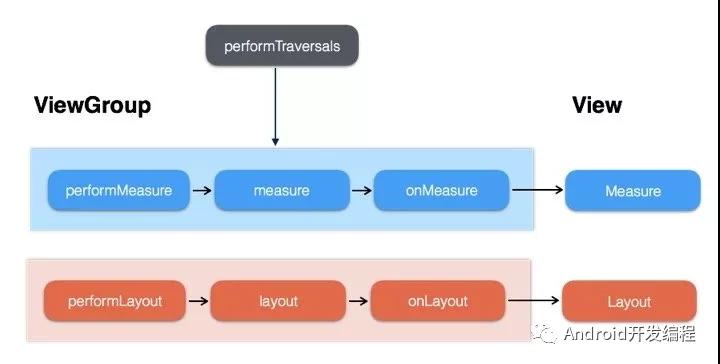
View三大工作流程是从ViewRootImpl#performTraversals开始的,其中performMeasure、performLayout、performDraw方法分别对应了View的测量、布局、绘制;
从performLayout开始分析View布局流程;
- privatevoidperformLayout(WindowManager.LayoutParamslp,intdesiredWindowWidth,
- intdesiredWindowHeight){
- mLayoutRequested=false;
- mScrollMayChange=true;
- mInLayout=true;
- finalViewhost=mView;
- Trace.traceBegin(Trace.TRACE_TAG_VIEW,"layout");
- try{
- host.layout(0,0,host.getMeasuredWidth(),host.getMeasuredHeight());
- //省略...
- }finally{
- Trace.traceEnd(Trace.TRACE_TAG_VIEW);
- }
- mInLayout=false;
- }
方法中的mView其实就是DecorView,那么host也就代表了DecorView,DecorView其实是个FrameLayout,ViewGroup并没有重写layout方法,所以我们来看下View#layout方法
2、layout
- /**
- *源码分析起始点:layout()
- *作用:确定View本身的位置,即设置View本身的四个顶点位置
- */
- publicvoidlayout(intl,intt,intr,intb){
- //当前视图的四个顶点
- intoldL=mLeft;
- intoldT=mTop;
- intoldB=mBottom;
- intoldR=mRight;
- //1.确定View的位置:setFrame()/setOpticalFrame()
- //即初始化四个顶点的值、判断当前View大小和位置是否发生了变化&返回
- //setFrame()->分析1
- //setOpticalFrame()->分析2
- booleanchanged=isLayoutModeOptical(mParent)?setOpticalFrame(l,t,r,b):setFrame(l,t,r,b);
- //2.若视图的大小&位置发生变化
- //会重新确定该View所有的子View在父容器的位置:onLayout()
- if(changed||(mPrivateFlags&PFLAG_LAYOUT_REQUIRED)==PFLAG_LAYOUT_REQUIRED){
- onLayout(changed,l,t,r,b);
- //对于单一View的laytou过程:由于单一View是没有子View的,故onLayout()是一个空实现->分析3
- //对于ViewGroup的laytou过程:由于确定位置与具体布局有关,所以onLayout()在ViewGroup为1个抽象方法,需自定义重写实现(下面的章节会详细说明)
- }
- /**
- *分析1:setFrame()
- *作用:根据传入的4个位置值,设置View本身的四个顶点位置
- *即:最终确定View本身的位置
- */
- protectedbooleansetFrame(intleft,inttop,intright,intbottom){
- //通过以下赋值语句记录下了视图的位置信息,即确定View的四个顶点
- //从而确定了视图的位置
- mLeft=left;
- mTop=top;
- mRight=right;
- mBottom=bottom;
- mRenderNode.setLeftTopRightBottom(mLeft,mTop,mRight,mBottom);
- }
- /**
- *分析2:setOpticalFrame()
- *作用:根据传入的4个位置值,设置View本身的四个顶点位置
- *即:最终确定View本身的位置
- */
- privatebooleansetOpticalFrame(intleft,inttop,intright,intbottom){
- InsetsparentInsets=mParentinstanceofView?
- ((View)mParent).getOpticalInsets():Insets.NONE;
- InsetschildInsets=getOpticalInsets();
- //内部实际上是调用setFrame()
- returnsetFrame(
- left+parentInsets.left-childInsets.left,
- top+parentInsets.top-childInsets.top,
- right+parentInsets.left+childInsets.right,
- bottom+parentInsets.top+childInsets.bottom);
- }
- //回到调用原处
- /**
- *分析3:onLayout()
- *注:对于单一View的laytou过程
- *1.由于单一View是没有子View的,故onLayout()是一个空实现
- *2.由于在layout()中已经对自身View进行了位置计算:setFrame()/setOpticalFrame()
- *3.所以单一View的layout过程在layout()后就已完成了
- */
- protectedvoidonLayout(booleanchanged,intleft,inttop,intright,intbottom){
- //参数说明
- //changed当前View的大小和位置改变了
- //left左部位置
- //top顶部位置
- //right右部位置
- //bottom底部位置
- }
3、setFrame
layout方法是用来确定自身位置的,其内部调用了setOpticalFrame、setFrame和onLayout方法,setOpticalFrame内部又会调用setFrame。所以我们先来看setFrame方法,如下
- protectedbooleansetFrame(intleft,inttop,intright,intbottom){
- booleanchanged=false;
- if(mLeft!=left||mRight!=right||mTop!=top||mBottom!=bottom){
- //判断View的位置是否发生改变
- changed=true;
- //Rememberourdrawnbit
- intdrawn=mPrivateFlags&PFLAG_DRAWN;
- intoldWidth=mRight-mLeft;//获取原来的宽度
- intoldHeight=mBottom-mTop;//获取原来的高度
- intnewWidth=right-left;//获取新的宽度
- intnewHeight=bottom-top;//获取新的高度
- //判断View的尺寸是否发生改变
- booleansizeChanged=(newWidth!=oldWidth)||(newHeight!=oldHeight);
- //Invalidateouroldposition
- invalidate(sizeChanged);
- //对mLeft、mTop、mRight、mBottom初始化,View自身的位置也就确定了。
- mLeft=left;
- mTop=top;
- mRight=right;
- mBottom=bottom;
- mRenderNode.setLeftTopRightBottom(mLeft,mTop,mRight,mBottom);
- mPrivateFlags|=PFLAG_HAS_BOUNDS;
- //如果View尺寸发生改变,将执行View#sizeChange方法,在sizeChange方法内部会调用View#onSizeChanged方法。
- if(sizeChanged){
- sizeChange(newWidth,newHeight,oldWidth,oldHeight);
- }
- //省略...
- }
- returnchanged;
- }
在setFrame方法中对mLeft、mTop、mRight 、mBottom进行初始化,mLeft、mTop分别对应View左上角的横坐标和纵坐标,mRight 、mBottom分别对应了View右下角的横坐标和纵坐标,View的四个顶点的坐标确定了,View自身的位置也就确定了;

4、FrameLayout#onLayout
再回到layout方法,在通过setFrame方法确定了自身位置后,接下来会调用onLayout方法,这个方法其实用来确定子View的位置的;
不过View和ViewGroup都没有真正实现onLayout,因为onLayout和onMeasure类似,其过程都与具体的布局有关;
以FrameLayout为例来分析onLayout过程,FrameLayout#onLayout
- @Override
- protectedvoidonLayout(booleanchanged,intleft,inttop,intright,intbottom){
- layoutChildren(left,top,right,bottom,false/*noforceleftgravity*/);
- }
- 其内部调用了layoutChildren方法
- voidlayoutChildren(intleft,inttop,intright,intbottom,
- booleanforceLeftGravity){
- finalintcount=getChildCount();//获取子View的数量
- //parentLeft、parentTop分别代表子View所占区域左上角的横坐标和纵坐标
- //parentRight、parentBottom分别代表子View所占区域右下角的横坐标和纵坐标
- finalintparentLeft=getPaddingLeftWithForeground();
- finalintparentRight=right-left-getPaddingRightWithForeground();
- finalintparentTop=getPaddingTopWithForeground();
- finalintparentBottom=bottom-top-getPaddingBottomWithForeground();
- mForegroundBoundsChanged=true;
- //遍历子View
- for(inti=0;i<count;i++){
- finalViewchild=getChildAt(i);
- if(child.getVisibility()!=GONE){
- finalLayoutParamslp=(LayoutParams)child.getLayoutParams();
- //获取子View的测量宽、高
- finalintwidth=child.getMeasuredWidth();
- finalintheight=child.getMeasuredHeight();
- intchildLeft;
- intchildTop;
- //获取子View设置的Gravity,如果子View没有设置Gravity,则用默认的Gravity:DEFAULT_CHILD_GRAVITY。
- intgravity=lp.gravity;
- if(gravity==-1){
- gravity=DEFAULT_CHILD_GRAVITY;
- }
- finalintlayoutDirection=getLayoutDirection();
- finalintabsoluteGravity=Gravity.getAbsoluteGravity(gravity,layoutDirection);
- finalintverticalGravity=gravity&Gravity.VERTICAL_GRAVITY_MASK;
- //水平方向上,通过设置的Gravity,来确定childLeft,即每个子View左上角的横坐标
- switch(absoluteGravity&Gravity.HORIZONTAL_GRAVITY_MASK){
- caseGravity.CENTER_HORIZONTAL:
- childLeft=parentLeft+(parentRight-parentLeft-width)/2+
- lp.leftMargin-lp.rightMargin;
- break;
- caseGravity.RIGHT:
- if(!forceLeftGravity){
- childLeft=parentRight-width-lp.rightMargin;
- break;
- }
- caseGravity.LEFT:
- default:
- childLeft=parentLeft+lp.leftMargin;
- }
- //竖直方向上,通过设置的Gravity,来确定childTop,即每个子View左上角的纵坐标
- switch(verticalGravity){
- caseGravity.TOP:
- childTop=parentTop+lp.topMargin;
- break;
- caseGravity.CENTER_VERTICAL:
- childTop=parentTop+(parentBottom-parentTop-height)/2+
- lp.topMargin-lp.bottomMargin;
- break;
- caseGravity.BOTTOM:
- childTop=parentBottom-height-lp.bottomMargin;
- break;
- default:
- childTop=parentTop+lp.topMargin;
- }
- //调用子View的layout方法
- child.layout(childLeft,childTop,childLeft+width,childTop+height);
- }
- }
- }
在该方法内部遍历所有子View过程中,通过子View设置的Gravity,获去其childLeft、childTop即子View的左上角的横坐标和纵坐标,最后执行子View的layout方法,来确定子View的位置
5、LinearLayout#onLayout
LinearLayout复写的onLayout()分析
- /**
- *源码分析:LinearLayout复写的onLayout()
- *注:复写的逻辑和LinearLayoutmeasure过程的onMeasure()类似
- */
- @Override
- protectedvoidonLayout(booleanchanged,intl,intt,intr,intb){
- //根据自身方向属性,而选择不同的处理方式
- if(mOrientation==VERTICAL){
- layoutVertical(l,t,r,b);
- }else{
- layoutHorizontal(l,t,r,b);
- }
- }
- //由于垂直/水平方向类似,所以此处仅分析垂直方向(Vertical)的处理过程->分析1
- /**
- *分析1:layoutVertical(l,t,r,b)
- */
- voidlayoutVertical(intleft,inttop,intright,intbottom){
- //子View的数量
- finalintcount=getVirtualChildCount();
- //1.遍历子View
- for(inti=0;i<count;i++){
- finalViewchild=getVirtualChildAt(i);
- if(child==null){
- childTop+=measureNullChild(i);
- }elseif(child.getVisibility()!=GONE){
- //2.计算子View的测量宽/高值
- finalintchildWidth=child.getMeasuredWidth();
- finalintchildHeight=child.getMeasuredHeight();
- //3.确定自身子View的位置
- //即:递归调用子View的setChildFrame(),实际上是调用了子View的layout()->分析2
- setChildFrame(child,childLeft,childTop+getLocationOffset(child),
- childWidth,childHeight);
- //childTop逐渐增大,即后面的子元素会被放置在靠下的位置
- //这符合垂直方向的LinearLayout的特性
- childTop+=childHeight+lp.bottomMargin+getNextLocationOffset(child);
- i+=getChildrenSkipCount(child,i);
- }
- }
- }
- /**
- *分析2:setChildFrame()
- */
- privatevoidsetChildFrame(Viewchild,intleft,inttop,intwidth,intheight){
- child.layout(left,top,left++width,top+height);
- //setChildFrame()仅仅只是调用了子View的layout()而已
- //在子View的layout()又通过调用setFrame()确定View的四个顶点
- //即确定了子View的位置
- //如此不断循环确定所有子View的位置,最终确定ViewGroup的位置
- }
总结
View的layout流程核心在于覆写ViewGroup的onLayout方法,它的流程是拿到子View的宽高,然后实现自己的布局子View的逻辑,它一般结合onMeasure方法使用。
原文链接:https://mp.weixin.qq.com/s/tJwWblrSglqBpY54FbHewQ


