一、引言
登陆权限控制是每个系统都应必备的功能,实现方法也有好多种。下面使用Token认证来实现系统的权限访问。
功能描述:
用户登录成功后,后台返回一个token给调用者,同时自定义一个@AuthToken注解,被该注解标注的API请求都需要进行token效验,效验通过才可以正常访问,实现接口级的鉴权控制。
同时token具有生命周期,在用户持续一段时间不进行操作的话,token则会过期,用户一直操作的话,则不会过期。
二、环境
SpringBoot
Redis(Docke中镜像)
MySQL(Docker中镜像)
三、流程分析
1、流程分析
(1)、客户端登录,输入用户名和密码,后台进行验证,如果验证失败则返回登录失败的提示。
如果验证成功,则生成 token 然后将 username 和 token 双向绑定 (可以根据 username 取出 token 也可以根据 token 取出username)存入redis,同时使用 token+username 作为key把当前时间戳也存入redis。并且给它们都设置过期时间。
(2)、每次请求接口都会走拦截器,如果该接口标注了@AuthToken注解,则要检查客户端传过来的Authorization字段,获取 token。
由于 token 与 username 双向绑定,可以通过获取的 token 来尝试从 redis 中获取 username,如果可以获取则说明 token 正确,反之,说明错误,返回鉴权失败。
(3)、token可以根据用户使用的情况来动态的调整自己过期时间。
在生成 token 的同时也往 redis 里面存入了创建 token 时的时间戳,每次请求被拦截器拦截 token 验证成功之后,将当前时间与存在 redis 里面的 token 生成时刻的时间戳进行比较,当当前时间的距离创建时间快要到达设置的redis过期时间的话,就重新设置token过期时间,将过期时间延长。
如果用户在设置的 redis 过期时间的时间长度内没有进行任何操作(没有发请求),则token会在redis中过期。
四、具体代码实现
1、自定义注解
|
1
2
3
4
|
@Target({ElementType.METHOD, ElementType.TYPE})@Retention(RetentionPolicy.RUNTIME)public @interface AuthToken {} |
2、登陆控制器
|
1
2
3
4
5
6
7
8
9
10
11
12
13
14
15
16
17
18
19
20
21
22
23
24
25
26
27
28
29
30
31
32
33
34
35
36
37
38
39
40
41
42
43
44
45
46
47
48
49
50
51
52
|
@RestControllerpublic class welcome { Logger logger = LoggerFactory.getLogger(welcome.class); @Autowired Md5TokenGenerator tokenGenerator; @Autowired UserMapper userMapper; @GetMapping("/welcome") public String welcome(){ return "welcome token authentication"; } @RequestMapping(value = "/login", method = RequestMethod.GET) public ResponseTemplate login(String username, String password) { logger.info("username:"+username+" password:"+password); User user = userMapper.getUser(username,password); logger.info("user:"+user); JSONObject result = new JSONObject(); if (user != null) { Jedis jedis = new Jedis("192.168.1.106", 6379); String token = tokenGenerator.generate(username, password); jedis.set(username, token); //设置key生存时间,当key过期时,它会被自动删除,时间是秒 jedis.expire(username, ConstantKit.TOKEN_EXPIRE_TIME); jedis.set(token, username); jedis.expire(token, ConstantKit.TOKEN_EXPIRE_TIME); Long currentTime = System.currentTimeMillis(); jedis.set(token + username, currentTime.toString()); //用完关闭 jedis.close(); result.put("status", "登录成功"); result.put("token", token); } else { result.put("status", "登录失败"); } return ResponseTemplate.builder() .code(200) .message("登录成功") .data(result) .build(); } //测试权限访问 @RequestMapping(value = "test", method = RequestMethod.GET) @AuthToken public ResponseTemplate test() { logger.info("已进入test路径"); return ResponseTemplate.builder() .code(200) .message("Success") .data("test url") .build(); }} |
3、拦截器
|
1
2
3
4
5
6
7
8
9
10
11
12
13
14
15
16
17
18
19
20
21
22
23
24
25
26
27
28
29
30
31
32
33
34
35
36
37
38
39
40
41
42
43
44
45
46
47
48
49
50
51
52
53
54
55
56
57
58
59
60
61
62
63
64
65
66
67
68
69
70
71
72
73
74
|
@Slf4jpublic class AuthorizationInterceptor implements HandlerInterceptor { //存放鉴权信息的Header名称,默认是Authorization private String httpHeaderName = "Authorization"; //鉴权失败后返回的错误信息,默认为401 unauthorized private String unauthorizedErrorMessage = "401 unauthorized"; //鉴权失败后返回的HTTP错误码,默认为401 private int unauthorizedErrorCode = HttpServletResponse.SC_UNAUTHORIZED; //存放登录用户模型Key的Request Key public static final String REQUEST_CURRENT_KEY = "REQUEST_CURRENT_KEY"; @Override public boolean preHandle(HttpServletRequest request, HttpServletResponse response, Object handler) throws Exception { if (!(handler instanceof HandlerMethod)) { return true; } HandlerMethod handlerMethod = (HandlerMethod) handler; Method method = handlerMethod.getMethod(); // 如果打上了AuthToken注解则需要验证token if (method.getAnnotation(AuthToken.class) != null || handlerMethod.getBeanType().getAnnotation(AuthToken.class) != null) { String token = request.getParameter(httpHeaderName); log.info("Get token from request is {} ", token); String username = ""; Jedis jedis = new Jedis("192.168.1.106", 6379); if (token != null && token.length() != 0) { username = jedis.get(token); log.info("Get username from Redis is {}", username); } if (username != null && !username.trim().equals("")) { Long tokeBirthTime = Long.valueOf(jedis.get(token + username)); log.info("token Birth time is: {}", tokeBirthTime); Long diff = System.currentTimeMillis() - tokeBirthTime; log.info("token is exist : {} ms", diff); if (diff > ConstantKit.TOKEN_RESET_TIME) { jedis.expire(username, ConstantKit.TOKEN_EXPIRE_TIME); jedis.expire(token, ConstantKit.TOKEN_EXPIRE_TIME); log.info("Reset expire time success!"); Long newBirthTime = System.currentTimeMillis(); jedis.set(token + username, newBirthTime.toString()); } //用完关闭 jedis.close(); request.setAttribute(REQUEST_CURRENT_KEY, username); return true; } else { JSONObject jsonObject = new JSONObject(); PrintWriter out = null; try { response.setStatus(unauthorizedErrorCode); response.setContentType(MediaType.APPLICATION_JSON_VALUE); jsonObject.put("code", ((HttpServletResponse) response).getStatus()); jsonObject.put("message", HttpStatus.UNAUTHORIZED); out = response.getWriter(); out.println(jsonObject); return false; } catch (Exception e) { e.printStackTrace(); } finally { if (null != out) { out.flush(); out.close(); } } } } request.setAttribute(REQUEST_CURRENT_KEY, null); return true; } @Override public void postHandle(HttpServletRequest request, HttpServletResponse response, Object handler, ModelAndView modelAndView) throws Exception { } @Override public void afterCompletion(HttpServletRequest request, HttpServletResponse response, Object handler, Exception ex) throws Exception { }} |
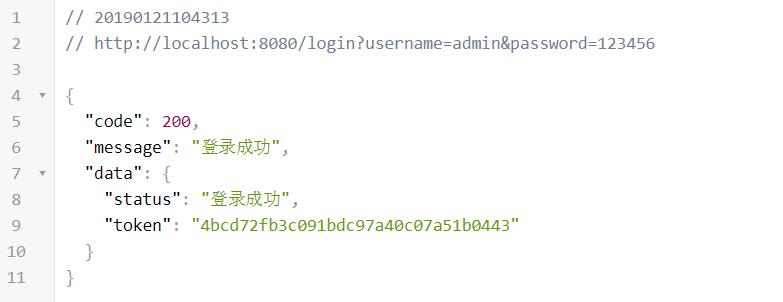
4、测试结果


五、小结
登陆权限控制,实际上利用的就是拦截器的拦截功能。因为每一次请求都要通过拦截器,只有拦截器验证通过了,才能访问想要的请求路径,所以在拦截器中做校验Token校验。
想要代码,可以去GitHub上查看。
https://github.com/Hofanking/token-authentication.git
拦截器介绍,可以参考 这篇文章
补充:springboot+spring security+redis实现登录权限管理
笔者负责的电商项目的技术体系是基于SpringBoot,为了实现一套后端能够承载ToB和ToC的业务,需要完善现有的权限管理体系。
在查看Shiro和Spring Security对比后,笔者认为Spring Security更加适合本项目使用,可以总结为以下2点:
1、基于拦截器的权限校验逻辑,可以针对ToB的业务接口来做相关的权限校验,以笔者的项目为例,ToB的接口请求路径以/openshop/api/开头,可以根据接口请求路径配置全局的ToB的拦截器;
2、Spring Security的权限管理模型更简单直观,对权限、角色和用户做了很好的解耦。
以下介绍本项目的实现步骤
一、在项目中添加Spring相关依赖
|
1
2
3
4
5
6
7
8
9
10
|
<dependency> <groupId>org.springframework.boot</groupId> <artifactId>spring-boot-starter-security</artifactId> <version>1.5.3.RELEASE</version> </dependency> <dependency> <groupId>org.springframework</groupId> <artifactId>spring-webmvc</artifactId> <version>4.3.8.RELEASE</version> </dependency> |
二、使用模板模式定义权限管理拦截器抽象类
|
1
2
3
4
5
6
7
8
9
10
11
12
13
14
15
16
17
18
19
20
21
22
23
24
25
26
27
28
29
|
public abstract class AbstractAuthenticationInterceptor extends HandlerInterceptorAdapter implements InitializingBean { @Resource private AccessDecisionManager accessDecisionManager; @Override public boolean preHandle(HttpServletRequest request, HttpServletResponse response, Object handler) throws Exception { //检查是否登录 String userId = null; try { userId = getUserId(); }catch (Exception e){ JsonUtil.renderJson(response,403,"{}"); return false; } if(StringUtils.isEmpty(userId)){ JsonUtil.renderJson(response,403,"{}"); return false; } //检查权限 Collection<? extends GrantedAuthority> authorities = getAttributes(userId); Collection<ConfigAttribute> configAttributes = getAttributes(request); return accessDecisionManager.decide(authorities,configAttributes); } //获取用户id public abstract String getUserId(); //根据用户id获取用户的角色集合 public abstract Collection<? extends GrantedAuthority> getAttributes(String userId); //查询请求需要的权限 public abstract Collection<ConfigAttribute> getAttributes(HttpServletRequest request);} |
三、权限管理拦截器实现类 AuthenticationInterceptor
|
1
2
3
4
5
6
7
8
9
10
11
12
13
14
15
16
17
18
19
20
21
22
|
@Componentpublic class AuthenticationInterceptor extends AbstractAuthenticationInterceptor { @Resource private SessionManager sessionManager; @Resource private UserPermissionService customUserService; @Override public String getUserId() { return sessionManager.obtainUserId(); } @Override public Collection<? extends GrantedAuthority> getAttributes(String s) { return customUserService.getAuthoritiesById(s); } @Override public Collection<ConfigAttribute> getAttributes(HttpServletRequest request) { return customUserService.getAttributes(request); } @Override public void afterPropertiesSet() throws Exception { }} |
四、用户Session信息管理类
集成redis维护用户session信息
|
1
2
3
4
5
6
7
8
9
10
11
12
13
14
15
16
17
18
19
20
21
22
23
24
25
26
27
28
29
30
31
32
33
34
35
36
37
38
39
40
41
42
43
44
45
46
47
48
49
|
@Componentpublic class SessionManager { private static final Logger logger = LoggerFactory.getLogger(SessionManager.class); @Autowired private RedisUtils redisUtils; public SessionManager() { } public UserInfoDTO obtainUserInfo() { UserInfoDTO userInfoDTO = null; try { String token = this.obtainToken(); logger.info("=======token=========", token); if (StringUtils.isEmpty(token)) { LemonException.throwLemonException(AccessAuthCode.sessionExpired.getCode(), AccessAuthCode.sessionExpired.getDesc()); } userInfoDTO = (UserInfoDTO)this.redisUtils.obtain(this.obtainToken(), UserInfoDTO.class); } catch (Exception var3) { logger.error("obtainUserInfo ex:", var3); } if (null == userInfoDTO) { LemonException.throwLemonException(AccessAuthCode.sessionExpired.getCode(), AccessAuthCode.sessionExpired.getDesc()); } return userInfoDTO; } public String obtainUserId() { return this.obtainUserInfo().getUserId(); } public String obtainToken() { HttpServletRequest request = ((ServletRequestAttributes)RequestContextHolder.getRequestAttributes()).getRequest(); String token = request.getHeader("token"); return token; } public UserInfoDTO createSession(UserInfoDTO userInfoDTO, long expired) { String token = UUIDUtil.obtainUUID("token."); userInfoDTO.setToken(token); if (expired == 0L) { this.redisUtils.put(token, userInfoDTO); } else { this.redisUtils.put(token, userInfoDTO, expired); } return userInfoDTO; } public void destroySession() { String token = this.obtainToken(); if (StringUtils.isNotBlank(token)) { this.redisUtils.remove(token); } }} |
五、用户权限管理service
|
1
2
3
4
5
6
7
8
9
10
11
12
13
14
15
16
17
18
19
20
21
22
23
24
25
26
27
28
29
30
31
32
33
34
35
36
37
38
39
40
41
42
43
44
45
46
47
48
49
50
51
52
53
54
55
56
57
58
59
60
61
62
63
64
|
@Servicepublic class UserPermissionService { @Resource private SysUserDao userDao; @Resource private SysPermissionDao permissionDao; private HashMap<String, Collection<ConfigAttribute>> map =null; /** * 加载资源,初始化资源变量 */ public void loadResourceDefine(){ map = new HashMap<>(); Collection<ConfigAttribute> array; ConfigAttribute cfg; List<SysPermission> permissions = permissionDao.findAll(); for(SysPermission permission : permissions) { array = new ArrayList<>(); cfg = new SecurityConfig(permission.getName()); array.add(cfg); map.put(permission.getUrl(), array); } }/** * @Author zhangs * @Description 获取用户权限列表 * @Date 18:56 2019/11/11 **/ public List<GrantedAuthority> getAuthoritiesById(String userId) { SysUserRspDTO user = userDao.findById(userId); if (user != null) { List<SysPermission> permissions = permissionDao.findByAdminUserId(user.getUserId()); List<GrantedAuthority> grantedAuthorities = new ArrayList <>(); for (SysPermission permission : permissions) { if (permission != null && permission.getName()!=null) { GrantedAuthority grantedAuthority = new SimpleGrantedAuthority(permission.getName()); grantedAuthorities.add(grantedAuthority); } } return grantedAuthorities; } return null; } /* * * @Author zhangs * @Description 获取当前请求所需权限 * @Date 18:57 2019/11/11 **/ public Collection<ConfigAttribute> getAttributes(HttpServletRequest request) throws IllegalArgumentException { if(map !=null) map.clear(); loadResourceDefine(); AntPathRequestMatcher matcher; String resUrl; for(Iterator<String> iter = map.keySet().iterator(); iter.hasNext(); ) { resUrl = iter.next(); matcher = new AntPathRequestMatcher(resUrl); if(matcher.matches(request)) { return map.get(resUrl); } } return null; }} |
六、权限校验类 AccessDecisionManager
通过查看authorities中的权限列表是否含有configAttributes中所需的权限,判断用户是否具有请求当前资源或者执行当前操作的权限。
|
1
2
3
4
5
6
7
8
9
10
11
12
13
14
15
16
17
18
19
20
|
@Servicepublic class AccessDecisionManager { public boolean decide(Collection<? extends GrantedAuthority> authorities, Collection<ConfigAttribute> configAttributes) throws AccessDeniedException, InsufficientAuthenticationException { if(null== configAttributes || configAttributes.size() <=0) { return true; } ConfigAttribute c; String needRole; for(Iterator<ConfigAttribute> iter = configAttributes.iterator(); iter.hasNext(); ) { c = iter.next(); needRole = c.getAttribute(); for(GrantedAuthority ga : authorities) { if(needRole.trim().equals(ga.getAuthority())) { return true; } } } return false; }} |
七、配置拦截规则
|
1
2
3
4
5
6
7
8
9
10
11
12
13
14
|
@Configurationpublic class WebAppConfigurer extends WebMvcConfigurerAdapter { @Resource private AbstractAuthenticationInterceptor authenticationInterceptor; @Override public void addInterceptors(InterceptorRegistry registry) { // 多个拦截器组成一个拦截器链 // addPathPatterns 用于添加拦截规则 // excludePathPatterns 用户排除拦截 //对来自/openshop/api/** 这个链接来的请求进行拦截 registry.addInterceptor(authenticationInterceptor).addPathPatterns("/openshop/api/**"); super.addInterceptors(registry); }} |
八 相关表说明
用户表 sys_user
|
1
2
3
4
5
6
7
8
9
10
11
|
CREATE TABLE `sys_user` ( `user_id` varchar(64) NOT NULL COMMENT '用户ID', `username` varchar(255) DEFAULT NULL COMMENT '登录账号', `first_login` datetime(6) NOT NULL COMMENT '首次登录时间', `last_login` datetime(6) NOT NULL COMMENT '上次登录时间', `pay_pwd` varchar(100) DEFAULT NULL COMMENT '支付密码', `chant_id` varchar(64) NOT NULL DEFAULT '-1' COMMENT '关联商户id', `create_time` datetime DEFAULT NULL COMMENT '创建时间', `modify_time` datetime DEFAULT NULL COMMENT '修改时间', PRIMARY KEY (`user_id`)) ENGINE=InnoDB DEFAULT CHARSET=utf8mb4 |
角色表 sys_role
|
1
2
3
4
5
6
7
|
CREATE TABLE `sys_role` ( `role_id` int(11) NOT NULL AUTO_INCREMENT, `name` varchar(255) DEFAULT NULL, `create_time` datetime DEFAULT NULL COMMENT '创建时间', `modify_time` datetime DEFAULT NULL COMMENT '修改时间', PRIMARY KEY (`role_id`)) ENGINE=InnoDB DEFAULT CHARSET=utf8mb4 |
用户角色关联表 sys_role_user
|
1
2
3
4
5
6
|
CREATE TABLE `sys_role_user` ( `id` int(11) NOT NULL AUTO_INCREMENT, `sys_user_id` varchar(64) DEFAULT NULL, `sys_role_id` int(11) DEFAULT NULL, PRIMARY KEY (`id`)) ENGINE=InnoDB DEFAULT CHARSET=utf8mb4 |
权限表 sys_premission
|
1
2
3
4
5
6
7
8
9
10
11
|
CREATE TABLE `sys_permission` ( `permission_id` int(11) NOT NULL, `name` varchar(255) DEFAULT NULL COMMENT '权限名称', `description` varchar(255) DEFAULT NULL COMMENT '权限描述', `url` varchar(255) DEFAULT NULL COMMENT '资源url', `check_pwd` int(2) NOT NULL DEFAULT '1' COMMENT '是否检查支付密码:0不需要 1 需要', `check_sms` int(2) NOT NULL DEFAULT '1' COMMENT '是否校验短信验证码:0不需要 1 需要', `create_time` datetime DEFAULT NULL COMMENT '创建时间', `modify_time` datetime DEFAULT NULL COMMENT '修改时间', PRIMARY KEY (`permission_id`)) ENGINE=InnoDB DEFAULT CHARSET=utf8mb4 |
角色权限关联表 sys_permission_role
|
1
2
3
4
5
6
|
CREATE TABLE `sys_permission_role` ( `id` int(11) NOT NULL AUTO_INCREMENT, `role_id` int(11) DEFAULT NULL, `permission_id` int(11) DEFAULT NULL, PRIMARY KEY (`id`)) ENGINE=InnoDB DEFAULT CHARSET=utf8mb4 |
以上为个人经验,希望能给大家一个参考,也希望大家多多支持服务器之家。如有错误或未考虑完全的地方,望不吝赐教。
原文链接:https://blog.csdn.net/zxd1435513775/article/details/86555130


