1 、构造手机验证码:使用 random 对象生成要求的随机数作为验证码,例如 4 位验证码: 1000~9999 之间随机数;
2 、使用接口向短信平台发送手机号和验证码数据,然后短信平台再把验证码发送到制定手机号上,接口参数一般包括:目标手机号,随机验证码 (或包含失效时间),平台接口地址,平台口令;
3 、保存接口返回的信息(一般为 json 文本数据,然后需转换为 json 对象格式);
4 、将手机号 — 验证码、操作时间存入 Session 中,作为后面验证使用;
5 、接收用户填写的验证码及其他数据;
6 、对比提交的验证码与 Session 中的验证码是否一致,同时判断提交动作是否在有效期内;
7 、验证码正确且在有效期内,请求通过,处理相应的业务。
一,首先添加一个 jar 包,工具类会用到。
- <!--秒滴云的jar包-->
- <dependency>
- <groupId>commons-codec</groupId>
- <artifactId>commons-codec</artifactId>
- <version>1.11</version>
- </dependency>
二、我这里只是编写一个简单的短信验证功能,要是用其他的语音验证。
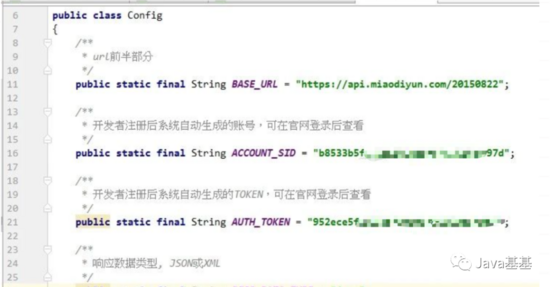
等等需要去秒滴云官方下载文档,下面是编写的一个 config 文档,专门存放一些参数

三、编写 http 请求工具类
- public class HttpUtil
- {
- /**
- * 构造通用参数timestamp、sig和respDataType
- *
- * @return
- */
- public static String createCommonParam()
- {
- // 时间戳
- SimpleDateFormat sdf = new SimpleDateFormat("yyyyMMddHHmmss");
- String timestamp = sdf.format(new Date());
- // 签名
- String sig = DigestUtils.md5Hex(Config.ACCOUNT_SID + Config.AUTH_TOKEN + timestamp);
- return "×tamp=" + timestamp + "&sig=" + sig + "&respDataType=" + Config.RESP_DATA_TYPE;
- }
- /**
- * post请求
- *
- * @param url
- * 功能和操作
- * @param body
- * 要post的数据
- * @return
- * @throws IOException
- */
- public static String post(String url, String body)
- {
- System.out.println("url:" + System.lineSeparator() + url);
- System.out.println("body:" + System.lineSeparator() + body);
- String result = "";
- try
- {
- OutputStreamWriter out = null;
- BufferedReader in = null;
- URL realUrl = new URL(url);
- URLConnection conn = realUrl.openConnection();
- // 设置连接参数
- conn.setDoOutput(true);
- conn.setDoInput(true);
- conn.setConnectTimeout(5000);
- conn.setReadTimeout(20000);
- conn.setRequestProperty("Content-Type", "application/x-www-form-urlencoded");
- // 提交数据
- out = new OutputStreamWriter(conn.getOutputStream(), "UTF-8");
- out.write(body);
- out.flush();
- // 读取返回数据
- in = new BufferedReader(new InputStreamReader(conn.getInputStream(), "UTF-8"));
- String line = "";
- boolean firstLine = true; // 读第一行不加换行符
- while ((line = in.readLine()) != null)
- {
- if (firstLine)
- {
- firstLine = false;
- } else
- {
- result += System.lineSeparator();
- }
- result += line;
- }
- } catch (Exception e)
- {
- e.printStackTrace();
- }
- return result;
- }
- /**
- * 回调测试工具方法
- *
- * @param url
- * @param reqStr
- * @return
- */
- public static String postHuiDiao(String url, String body)
- {
- String result = "";
- try
- {
- OutputStreamWriter out = null;
- BufferedReader in = null;
- URL realUrl = new URL(url);
- URLConnection conn = realUrl.openConnection();
- // 设置连接参数
- conn.setDoOutput(true);
- conn.setDoInput(true);
- conn.setConnectTimeout(5000);
- conn.setReadTimeout(20000);
- // 提交数据
- out = new OutputStreamWriter(conn.getOutputStream(), "UTF-8");
- out.write(body);
- out.flush();
- // 读取返回数据
- in = new BufferedReader(new InputStreamReader(conn.getInputStream(), "UTF-8"));
- String line = "";
- boolean firstLine = true; // 读第一行不加换行符
- while ((line = in.readLine()) != null)
- {
- if (firstLine)
- {
- firstLine = false;
- } else
- {
- result += System.lineSeparator();
- }
- result += line;
- }
- } catch (Exception e)
- {
- e.printStackTrace();
- }
- return result;
- }
- }
四、生成四位数的方法
- public static String runNumber() {
- String str="ABCDEFGHIJKLMNOPQRSTUVWXYZ0123456789";
- StringBuilder sb=new StringBuilder(4);
- for(int i=0;i<4;i++)
- {
- char ch=str.charAt(new Random().nextInt(str.length()));
- sb.append(ch);
- }
- System.out.println(sb.toString());
- String code = sb.toString();
- return code;
- }
执行方法 execute(),便会发送成功
- public class IndustrySMS
- {
- private static String operation = "/industrySMS/sendSMS";
- private static String accountSid = Config.ACCOUNT_SID;
- private static String to = "15342349382";
- private static String smsContent = "【小陶科技】登录验证码:{"+runNumber().toString()+"},如非本人操作,请忽略此短信。";
- /**
- * 验证码通知短信
- */
- public static void execute()
- {
- String tmpSmsContent = null;
- try{
- tmpSmsContent = URLEncoder.encode(smsContent, "UTF-8");
- }catch(Exception e){
- }
- String url = Config.BASE_URL + operation;
- String body = "accountSid=" + accountSid + "&to=" + to + "&smsContent=" + tmpSmsContent
- + HttpUtil.createCommonParam();
- // 提交请求
- String result = HttpUtil.post(url, body);
- System.out.println("result:" + System.lineSeparator() + result);
- }
到此这篇关于springboot短信验证码登录功能的实现的文章就介绍到这了,更多相关springboot短信验证码登录内容请搜索服务器之家以前的文章或继续浏览下面的相关文章希望大家以后多多支持服务器之家!


