文件的上传及下载功能是开发人员在日常应用及编程开发中经常会遇到的。正好最近开发需要用到此功能,虽然本人是 android 开发人员,但还是业余客串了一下后台开发。
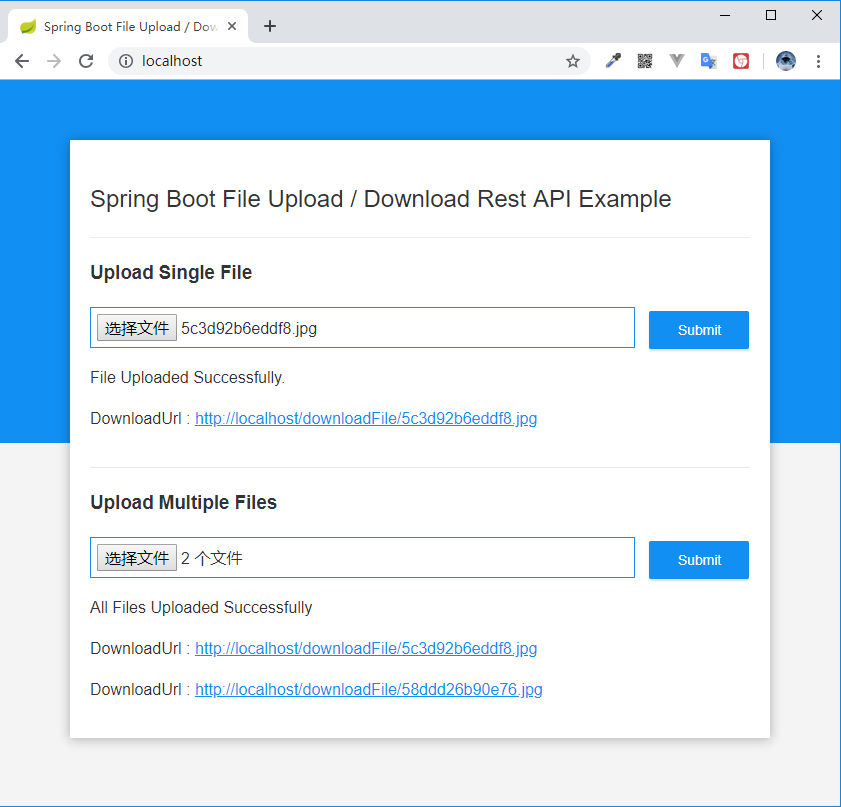
在本文中,您将学习如何使用 spring boot 实现 web 服务中的文件上传和下载功能。首先会构建一个 rest apis 实现上传及下载的功能,然后使用 postman 工具来测试这些接口,最后创建一个 web 界面使用 javascript 调用接口演示完整的功能。最终界面及功能如下:

项目环境
- spring boot : 2.1.3.release
- gredle : 5.2.1
- java : 1.8
- intellij idea : 2018.3.3
项目创建
开发环境为 intellij idea,项目创建很简单,按照下面的步骤创建即可:
- file -> new -> project...
- 选择 spring initializr,点击 next
- 填写 group (项目域名) 和 artifact (项目别名)
- 构建类型可以选择 maven 或 gradle, 看个人习惯
- 添加 web 依赖
- 输入项目名称及保存路径,完成创建
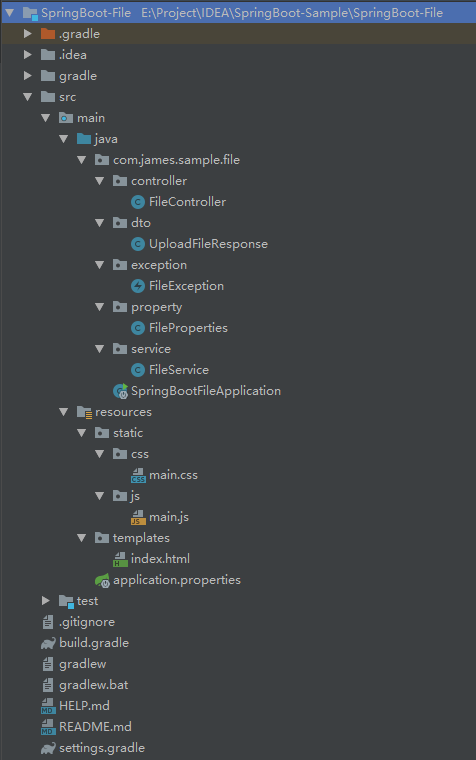
项目创建完毕之后就可以进行开发,项目的完整结构如下图所示:

参数配置
项目创建完成之后,需要设置一些必要的参数,打开项目resources目录下配置文件application.properties,在其中添加以下参数:
|
1
2
3
4
5
6
7
8
9
10
11
12
13
14
15
|
server.port=80## multipart (multipartproperties)# 开启 multipart 上传功能spring.servlet.multipart.enabled=true# 文件写入磁盘的阈值spring.servlet.multipart.file-size-threshold=2kb# 最大文件大小spring.servlet.multipart.max-file-size=200mb# 最大请求大小spring.servlet.multipart.max-request-size=215mb## 文件存储所需参数# 所有通过 rest apis 上传的文件都将存储在此目录下file.upload-dir=./uploads |
其中file.upload-dir=./uploads参数为自定义的参数,创建fileproperties.javapojo类,使配置参数可以自动绑定到pojo类。
|
1
2
3
4
5
6
7
8
9
10
11
12
13
|
import org.springframework.boot.context.properties.configurationproperties;@configurationproperties(prefix = "file")public class fileproperties { private string uploaddir; public string getuploaddir() { return uploaddir; } public void setuploaddir(string uploaddir) { this.uploaddir = uploaddir; }} |
然后在@springbootapplication注解的类中添加@enableconfigurationproperties注解以开启configurationproperties功能。
springbootfileapplication.java
|
1
2
3
4
5
6
7
8
9
10
|
@springbootapplication@enableconfigurationproperties({ fileproperties.class})public class springbootfileapplication { public static void main(string[] args) { springapplication.run(springbootfileapplication.class, args); }} |
配置完成,以后若有file前缀开头的参数需要配置,可直接在application.properties配置文件中配置并更新fileproperties.java即可。
另外再创建一个上传文件成功之后的response响应实体类uploadfileresponse.java及异常类fileexception.java来处理异常信息。
uploadfileresponse.java
|
1
2
3
4
5
6
7
8
9
10
11
12
13
14
|
public class uploadfileresponse { private string filename; private string filedownloaduri; private string filetype; private long size; public uploadfileresponse(string filename, string filedownloaduri, string filetype, long size) { this.filename = filename; this.filedownloaduri = filedownloaduri; this.filetype = filetype; this.size = size; } // getter and setter ...} |
fileexception.java
|
1
2
3
4
5
6
7
8
9
|
public class fileexception extends runtimeexception{ public fileexception(string message) { super(message); } public fileexception(string message, throwable cause) { super(message, cause); }} |
创建接口
下面需要创建文件上传下载所需的 rest apis 接口。创建文件filecontroller.java。
|
1
2
3
4
5
6
7
8
9
10
11
12
13
14
15
16
17
18
19
20
21
22
23
24
25
26
27
28
29
30
31
32
33
34
35
36
37
38
39
40
41
42
43
44
45
46
47
48
49
50
51
52
53
54
55
56
57
58
59
60
61
62
63
64
65
66
67
68
69
70
71
72
|
import com.james.sample.file.dto.uploadfileresponse;import com.james.sample.file.service.fileservice;import org.slf4j.logger;import org.slf4j.loggerfactory;import org.springframework.beans.factory.annotation.autowired;import org.springframework.core.io.resource;import org.springframework.http.httpheaders;import org.springframework.http.mediatype;import org.springframework.http.responseentity;import org.springframework.web.bind.annotation.*;import org.springframework.web.multipart.multipartfile;import org.springframework.web.servlet.support.servleturicomponentsbuilder;import javax.servlet.http.httpservletrequest;import java.io.ioexception;import java.util.arrays;import java.util.list;import java.util.stream.collectors;@restcontrollerpublic class filecontroller { private static final logger logger = loggerfactory.getlogger(filecontroller.class); @autowired private fileservice fileservice; @postmapping("/uploadfile") public uploadfileresponse uploadfile(@requestparam("file") multipartfile file){ string filename = fileservice.storefile(file); string filedownloaduri = servleturicomponentsbuilder.fromcurrentcontextpath() .path("/downloadfile/") .path(filename) .touristring(); return new uploadfileresponse(filename, filedownloaduri, file.getcontenttype(), file.getsize()); } @postmapping("/uploadmultiplefiles") public list<uploadfileresponse> uploadmultiplefiles(@requestparam("files") multipartfile[] files) { return arrays.stream(files) .map(this::uploadfile) .collect(collectors.tolist()); } @getmapping("/downloadfile/{filename:.+}") public responseentity<resource> downloadfile(@pathvariable string filename, httpservletrequest request) { // load file as resource resource resource = fileservice.loadfileasresource(filename); // try to determine file's content type string contenttype = null; try { contenttype = request.getservletcontext().getmimetype(resource.getfile().getabsolutepath()); } catch (ioexception ex) { logger.info("could not determine file type."); } // fallback to the default content type if type could not be determined if(contenttype == null) { contenttype = "application/octet-stream"; } return responseentity.ok() .contenttype(mediatype.parsemediatype(contenttype)) .header(httpheaders.content_disposition, "attachment; filename=\"" + resource.getfilename() + "\"") .body(resource); }} |
filecontroller类在接收到用户的请求后,使用fileservice类提供的storefile()方法将文件写入到系统中进行存储,其存储目录就是之前在application.properties配置文件中的file.upload-dir参数的值./uploads。
下载接口downloadfile()在接收到用户请求之后,使用fileservice类提供的loadfileasresource()方法获取存储在系统中文件并返回文件供用户下载。
fileservice.java
|
1
2
3
4
5
6
7
8
9
10
11
12
13
14
15
16
17
18
19
20
21
22
23
24
25
26
27
28
29
30
31
32
33
34
35
36
37
38
39
40
41
42
43
44
45
46
47
48
49
50
51
52
53
54
55
56
57
58
59
60
61
62
63
64
65
66
67
68
69
70
71
72
73
74
75
76
|
import com.james.sample.file.exception.fileexception;import com.james.sample.file.property.fileproperties;import org.springframework.beans.factory.annotation.autowired;import org.springframework.core.io.resource;import org.springframework.core.io.urlresource;import org.springframework.stereotype.service;import org.springframework.util.stringutils;import org.springframework.web.multipart.multipartfile;import java.io.ioexception;import java.net.malformedurlexception;import java.nio.file.files;import java.nio.file.path;import java.nio.file.paths;import java.nio.file.standardcopyoption;@servicepublic class fileservice { private final path filestoragelocation; // 文件在本地存储的地址 @autowired public fileservice(fileproperties fileproperties) { this.filestoragelocation = paths.get(fileproperties.getuploaddir()).toabsolutepath().normalize(); try { files.createdirectories(this.filestoragelocation); } catch (exception ex) { throw new fileexception("could not create the directory where the uploaded files will be stored.", ex); } } /** * 存储文件到系统 * * @param file 文件 * @return 文件名 */ public string storefile(multipartfile file) { // normalize file name string filename = stringutils.cleanpath(file.getoriginalfilename()); try { // check if the file's name contains invalid characters if(filename.contains("..")) { throw new fileexception("sorry! filename contains invalid path sequence " + filename); } // copy file to the target location (replacing existing file with the same name) path targetlocation = this.filestoragelocation.resolve(filename); files.copy(file.getinputstream(), targetlocation, standardcopyoption.replace_existing); return filename; } catch (ioexception ex) { throw new fileexception("could not store file " + filename + ". please try again!", ex); } } /** * 加载文件 * @param filename 文件名 * @return 文件 */ public resource loadfileasresource(string filename) { try { path filepath = this.filestoragelocation.resolve(filename).normalize(); resource resource = new urlresource(filepath.touri()); if(resource.exists()) { return resource; } else { throw new fileexception("file not found " + filename); } } catch (malformedurlexception ex) { throw new fileexception("file not found " + filename, ex); } }} |
接口测试
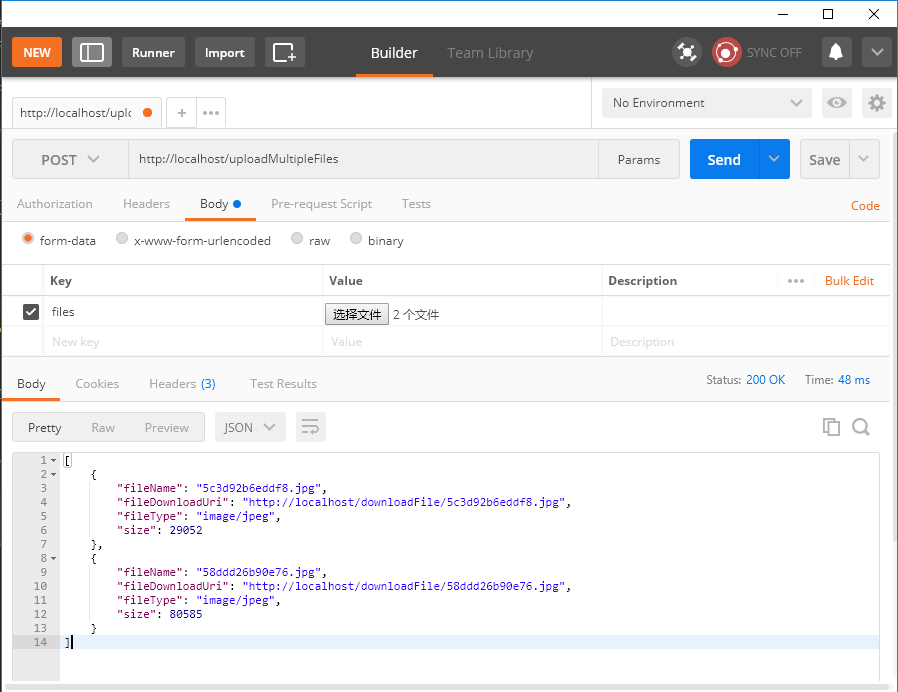
在完成上述的代码之后,打开springbootfileapplication.java并运行,运行完成之后就可以使用 postman 进行测试了。
单个文件上传结果:

多个文件上传结果:

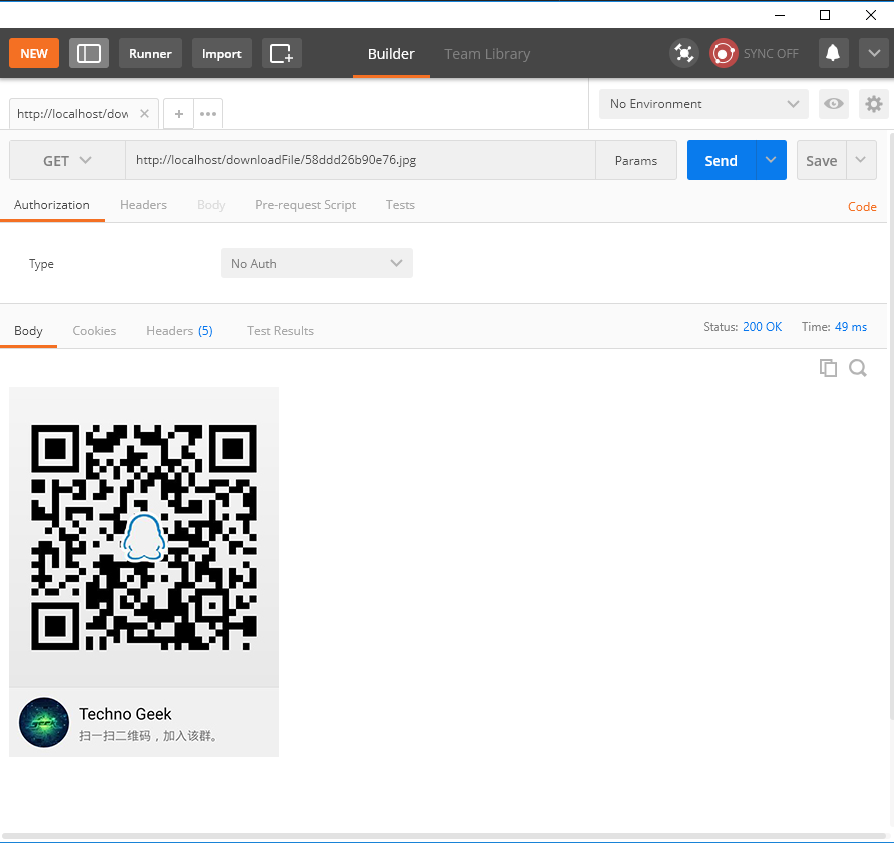
文件下载结果:

web 前端开发
index.html
|
1
2
3
4
5
6
7
8
9
10
11
12
13
14
15
16
17
18
19
20
21
22
23
24
25
26
27
28
29
30
31
32
33
34
35
36
37
38
39
40
41
42
43
44
45
46
47
48
49
50
51
52
|
<!doctype html><html lang="zh-cn"><head> <!-- required meta tags --> <meta charset="utf-8"> <meta http-equiv="x-ua-compatible" content="ie=edge"> <meta name="viewport" content="width=device-width, initial-scale=1, shrink-to-fit=no"> <title>spring boot file upload / download rest api example</title> <!-- bootstrap css --> <link href="/css/main.css" rel="external nofollow" rel="stylesheet"/></head><body><noscript> <h2>sorry! your browser doesn't support javascript</h2></noscript><div class="upload-container"> <div class="upload-header"> <h2>spring boot file upload / download rest api example</h2> </div> <div class="upload-content"> <div class="single-upload"> <h3>upload single file</h3> <form id="singleuploadform" name="singleuploadform"> <input id="singlefileuploadinput" type="file" name="file" class="file-input" required/> <button type="submit" class="primary submit-btn">submit</button> </form> <div class="upload-response"> <div id="singlefileuploaderror"></div> <div id="singlefileuploadsuccess"></div> </div> </div> <div class="multiple-upload"> <h3>upload multiple files</h3> <form id="multipleuploadform" name="multipleuploadform"> <input id="multiplefileuploadinput" type="file" name="files" class="file-input" multiple required/> <button type="submit" class="primary submit-btn">submit</button> </form> <div class="upload-response"> <div id="multiplefileuploaderror"></div> <div id="multiplefileuploadsuccess"></div> </div> </div> </div></div><!-- optional javascript --><script src="/js/main.js"></script></body></html> |
main.css
|
1
2
3
4
5
6
7
8
9
10
11
12
13
14
15
16
17
18
19
20
21
22
23
24
25
26
27
28
29
30
31
32
33
34
35
36
37
38
39
40
41
42
43
44
45
46
47
48
49
50
51
52
53
54
55
56
57
58
59
60
61
62
63
64
65
66
67
68
69
70
71
72
73
74
75
76
77
78
79
80
81
82
83
84
85
86
87
88
89
90
91
92
93
94
95
96
97
98
99
100
101
102
103
104
105
106
107
108
109
110
111
112
113
114
115
116
117
118
119
120
121
122
123
124
125
126
127
128
129
130
131
|
* { -webkit-box-sizing: border-box; -moz-box-sizing: border-box; box-sizing: border-box;}body { margin: 0; padding: 0; font-weight: 400; font-family: "helvetica neue", helvetica, arial, sans-serif; font-size: 1rem; line-height: 1.58; color: #333; background-color: #f4f4f4;}body:before { height: 50%; width: 100%; position: absolute; top: 0; left: 0; background: #128ff2; content: ""; z-index: 0;}.clearfix:after { display: block; content: ""; clear: both;}h1, h2, h3, h4, h5, h6 { margin-top: 20px; margin-bottom: 20px;}h1 { font-size: 1.7em;}a { color: #128ff2;}button { box-shadow: none; border: 1px solid transparent; font-size: 14px; outline: none; line-height: 100%; white-space: nowrap; vertical-align: middle; padding: 0.6rem 1rem; border-radius: 2px; transition: all 0.2s ease-in-out; cursor: pointer; min-height: 38px;}button.primary { background-color: #128ff2; box-shadow: 0 2px 2px 0 rgba(0, 0, 0, 0.12); color: #fff;}input { font-size: 1rem;}input[type="file"] { border: 1px solid #128ff2; padding: 6px; max-width: 100%;}.file-input { width: 100%;}.submit-btn { display: block; margin-top: 15px; min-width: 100px;}@media screen and (min-width: 500px) { .file-input { width: calc(100% - 115px); } .submit-btn { display: inline-block; margin-top: 0; margin-left: 10px; }}.upload-container { max-width: 700px; margin-left: auto; margin-right: auto; background-color: #fff; box-shadow: 0 1px 11px rgba(0, 0, 0, 0.27); margin-top: 60px; min-height: 400px; position: relative; padding: 20px;}.upload-header { border-bottom: 1px solid #ececec;}.upload-header h2 { font-weight: 500;}.single-upload { padding-bottom: 20px; margin-bottom: 20px; border-bottom: 1px solid #e8e8e8;}.upload-response { overflow-x: hidden; word-break: break-all;} |
main.js
|
1
2
3
4
5
6
7
8
9
10
11
12
13
14
15
16
17
18
19
20
21
22
23
24
25
26
27
28
29
30
31
32
33
34
35
36
37
38
39
40
41
42
43
44
45
46
47
48
49
50
51
52
53
54
55
56
57
58
59
60
61
62
63
64
65
66
67
68
69
70
71
72
73
74
75
76
77
78
79
80
81
82
83
|
'use strict';var singleuploadform = document.queryselector('#singleuploadform');var singlefileuploadinput = document.queryselector('#singlefileuploadinput');var singlefileuploaderror = document.queryselector('#singlefileuploaderror');var singlefileuploadsuccess = document.queryselector('#singlefileuploadsuccess');var multipleuploadform = document.queryselector('#multipleuploadform');var multiplefileuploadinput = document.queryselector('#multiplefileuploadinput');var multiplefileuploaderror = document.queryselector('#multiplefileuploaderror');var multiplefileuploadsuccess = document.queryselector('#multiplefileuploadsuccess');function uploadsinglefile(file) { var formdata = new formdata(); formdata.append("file", file); var xhr = new xmlhttprequest(); xhr.open("post", "/uploadfile"); xhr.onload = function() { console.log(xhr.responsetext); var response = json.parse(xhr.responsetext); if(xhr.status == 200) { singlefileuploaderror.style.display = "none"; singlefileuploadsuccess.innerhtml = "<p>file uploaded successfully.</p><p>downloadurl : <a href='" + response.filedownloaduri + "' target='_blank'>" + response.filedownloaduri + "</a></p>"; singlefileuploadsuccess.style.display = "block"; } else { singlefileuploadsuccess.style.display = "none"; singlefileuploaderror.innerhtml = (response && response.message) || "some error occurred"; } } xhr.send(formdata);}function uploadmultiplefiles(files) { var formdata = new formdata(); for(var index = 0; index < files.length; index++) { formdata.append("files", files[index]); } var xhr = new xmlhttprequest(); xhr.open("post", "/uploadmultiplefiles"); xhr.onload = function() { console.log(xhr.responsetext); var response = json.parse(xhr.responsetext); if(xhr.status == 200) { multiplefileuploaderror.style.display = "none"; var content = "<p>all files uploaded successfully</p>"; for(var i = 0; i < response.length; i++) { content += "<p>downloadurl : <a href='" + response[i].filedownloaduri + "' target='_blank'>" + response[i].filedownloaduri + "</a></p>"; } multiplefileuploadsuccess.innerhtml = content; multiplefileuploadsuccess.style.display = "block"; } else { multiplefileuploadsuccess.style.display = "none"; multiplefileuploaderror.innerhtml = (response && response.message) || "some error occurred"; } } xhr.send(formdata);}singleuploadform.addeventlistener('submit', function(event){ var files = singlefileuploadinput.files; if(files.length === 0) { singlefileuploaderror.innerhtml = "please select a file"; singlefileuploaderror.style.display = "block"; } uploadsinglefile(files[0]); event.preventdefault();}, true);multipleuploadform.addeventlistener('submit', function(event){ var files = multiplefileuploadinput.files; if(files.length === 0) { multiplefileuploaderror.innerhtml = "please select at least one file"; multiplefileuploaderror.style.display = "block"; } uploadmultiplefiles(files); event.preventdefault();}, true); |
总结
至此,文件的上传及下载功能已完成。在正式环境中可能还需要将上传的文件存储到数据库,此处按照实际需求去处理即可。
本文源代码地址:https://github.com/JemGeek/SpringBoot-Sample/tree/master/SpringBoot-File
本文参考(需要FQ):https://www.callicoder.com/spring-boot-file-upload-download-rest-api-example/
以上就是本文的全部内容,希望对大家的学习有所帮助,也希望大家多多支持服务器之家。


