问题描述
在做权限验证的时候,我们经常会遇到这样的情况:教师拥有多个学生,但是在处理学生信息的时候,教师只能操作自己班级的学生。所以,我们要做的就是,当教师尝试处理别的班的学生的时候,抛出异常。
实体关系
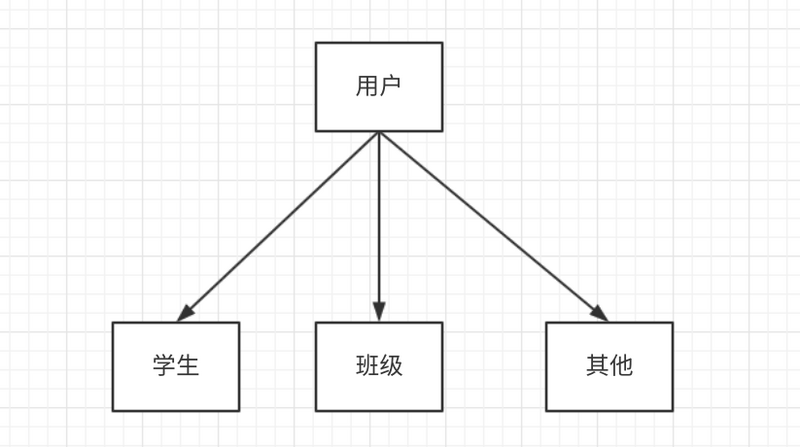
用户1:1教师,教师m:n班级,班级1:n学生

实现思路
以findbyid为例。因为从整体上看,用户和学生是m:n的关系,所以在调用这个接口的时候,获取该学生的所有用户,然后跟当前登录用户进行对比,如果不在其中,抛出异常。
利用切面,我们可以在findbyid、update、delete方法上进行验证。
注解
我们会在方法上添加注解,以表示对该方法进行权限验证。
|
1
2
3
4
5
6
7
8
9
|
@target(elementtype.method) // 注解使用在方法上@retention(retentionpolicy.runtime) // 运行时生效public @interface authorityannotation { /** * 仓库名 */ @required class repository();} |
因为我们需要获取出学生,但是并不限于学生,所以就要将仓库repository作为一个参数传入。
实体
上面我们说过,需要获取学生中的用户,所以我们可以在实体中定义一个方法,获取所有有权限的用户:getbelongusers()
但是,我们知道,学生和用户没用直接的关系,而且为了复用,在对其他实体进行验证的时候也能使用,可以考虑创建一个接口,让需要验证的实体去实现他。

这样,我们可以在让每个实体都集成这个接口,然后形成链式调用,这样就解决了上面你的两个问题。
|
1
2
3
|
public interface baseentity { list<user> getbelongtousers();} |
教师:
|
1
2
3
4
5
6
7
8
9
10
|
@entitypublic class teacher implements yunzhientity, baseentity { ... @override public list<user> getbelongtousers() { list<user> userlist = new arraylist<>(); userlist.add(this.getuser()); return userlist; }} |
班级:
|
1
2
3
4
5
6
7
8
9
10
11
12
13
|
@entitypublic class klass implements baseentity { ... @override public list<user> getbelongtousers() { list<user> userlist = new arraylist<>(); for (teacher teacher: this.getteacherlist()) { userlist.addall(teacher.getbelongtousers()); } return userlist; }} |
学生:
|
1
2
3
4
5
6
7
8
|
@entitypublic class student implements baseentity { ... @override public list<user> getbelongtousers() { return this.getklass().getbelongtousers(); }} |
切面
有了实体后,我们就可以建立切面实现验证功能了。
|
1
2
3
4
5
6
7
8
9
10
11
12
13
14
|
@aspect@componentpublic class ownerauthorityaspect { private static final logger logger = loggerfactory.getlogger(ownerauthorityaspect.class.getname()); /** * 使用注解,并第一个参数为id */ @pointcut("@annotation(com.yunzhiclub.alice.annotation.authorityannotation) && args(id,..) && @annotation(authorityannotation)") public void doaccesscheck(long id, authorityannotation authorityannotation) { } @before("doaccesscheck(id, authorityannotation)") public void before(long id, authorityannotation authorityannotation) { } |
首先,我们要获取到待操作对象。但是在获取对象之前,我们必须获取到repository。
这里我们利用applicationcontext来获取仓库bean,然后再利用获取到的bean,生成repository对象。
|
1
2
3
4
5
6
7
8
9
10
11
12
13
14
15
16
17
18
19
20
|
@aspect@componentpublic class ownerauthorityaspect implements applicationcontextaware { private applicationcontext applicationcontext = null; // 初始化上下文 ...... @before("doaccesscheck(id, authorityannotation)") public void before(long id, authorityannotation authorityannotation) { logger.debug("获取注解上的repository, 并通过applicationcontext来获取bean"); class<?> repositoryclass = authorityannotation.repository(); object object = applicationcontext.getbean(repositoryclass); logger.debug("将bean转换为crudrepository"); crudrepository<baseentity, object> crudrepository = (crudrepository<baseentity, object>)object; } @override public void setapplicationcontext(applicationcontext applicationcontext) throws beansexception { this.applicationcontext = applicationcontext; }} |
该类实现了applicationcontextaware接口,通过setapplicationcontext函数获取到了applicationcontext。
接下来,就是利用repository获取对象,然后获取他的所属用户,再与当前登录用户进行比较。
|
1
2
3
4
5
6
7
8
9
10
11
12
13
14
15
16
17
18
19
20
21
22
23
24
25
26
27
28
29
30
31
32
33
|
@before("doaccesscheck(id, authorityannotation)")public void before(long id, authorityannotation authorityannotation) { logger.debug("获取注解上的repository, 并通过applicationcontext来获取bean"); class<?> repositoryclass = authorityannotation.repository(); object object = applicationcontext.getbean(repositoryclass); logger.debug("将bean转换为crudrepository"); crudrepository<baseentity, object> crudrepository = (crudrepository<baseentity, object>)object; logger.debug("获取实体对象"); optional<baseentity> baseentityoptional = crudrepository.findbyid(id); if(!baseentityoptional.ispresent()) { throw new runtimeexception("对不起,未找到相关的记录"); } baseentity baseentity = baseentityoptional.get(); logger.debug("获取登录用户以及拥有者,并进行比对"); list<user> belongtotusers = baseentity.getbelongtousers(); user currentloginuser = userservice.getcurrentloginuser(); boolean havepermission = false; if (currentloginuser != null && belongtotusers.size() != 0) { for (user user: belongtotusers) { if (user.getid().equals(currentloginuser.getid())) { havepermission = true; break; } } if (!havepermission) { throw new runtimeexception("权限不允许"); } }} |
使用
在控制器的方法上使用注解:@authorityannotation,传入repository。
|
1
2
3
4
5
6
7
8
9
10
11
12
13
14
15
16
17
18
19
20
21
22
23
24
|
@restcontroller@requestmapping("/student")public class studentcontroller { private final studentservice studentservice; // 学生 @autowired public studentcontroller(studentservice studentservice) { this.studentservice = studentservice; } /** * 通过id获取学生 * * @param id * @return */ @authorityannotation(repository = studentrepository.class) @getmapping("/{id}") @jsonview(studentjsonview.get.class) public student findbyid(@pathvariable long id) { return studentservice.findbyid(id); }} |
出现的问题
实现之后,进行单元测试的过程中出现了问题。
|
1
2
3
4
5
6
7
8
9
10
11
12
13
14
15
16
17
|
@testpublic void update() throws exception { logger.info("获取一个保存学生"); student student = studentservice.getonesavestudent(); long id = student.getid(); logger.info("获取一个更新学生"); student newstudent = studentservice.getoneunsavestudent(); string jsonstring = jsonobject.tojsonstring(newstudent); logger.info("发送更新请求"); this.mockmvc .perform(put(baseurl + "/" + id) .cookie(this.cookie) .content(jsonstring) .contenttype(mediatype.application_json_utf8)) .andexpect(status().isok());} |

400的错误,说明参数错误,参数传的是实体,看下传了什么:

我们看到,这个字段并不是我们实体中的字段,但是为什么序列化的时候出现了这个字段呢?
原因是这样的,我们在实体中定义了一个getbelongtousers函数,然后jsonobject在进行序列化的时候会根据实体中的getter方法,获取get后面的为key,也就是将belongtousers看做了字段。
所以就出现了上面传实体字段多出的情况,从而引发了400的错误。
解决
我们不想jsonobject在序列化的时候处理getbelongtousers,就需要声明一下,这里用到了注解:@jsonignore。这样在序列化的时候就会忽略它。
|
1
2
3
4
5
6
7
8
9
10
|
@entitypublic class student implements baseentity { ...... @jsonignore @override public list<user> getbelongtousers() { return this.getklass().getbelongtousers(); }} |
修改后的学生实体如上,其他实现了getbelongtousers方法的,都需要做相同处理。
总结
以上就是本文的全部内容,希望对大家的学习有所帮助,也希望大家多多支持服务器之家。
原文链接:https://segmentfault.com/a/1190000018442618


