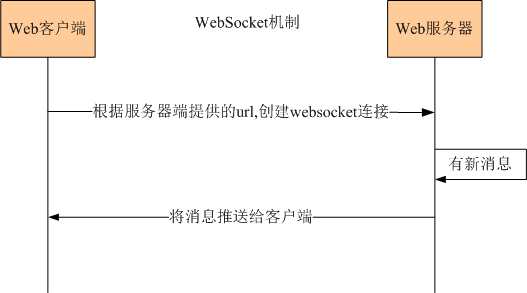
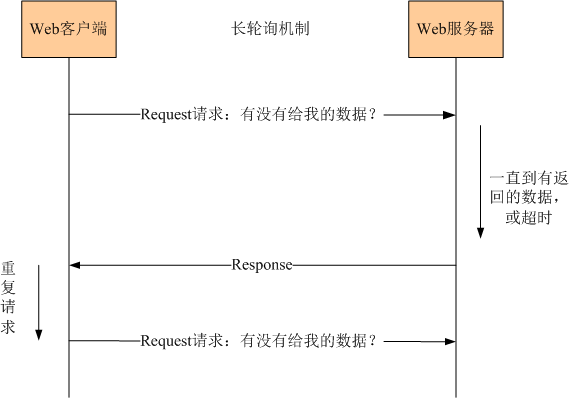
一、websocket与http长轮询
websocket属于html5 规范的一部分,提供的一种在单个 tcp 连接上进行全双工通讯的协议。允许服务端主动向客户端推送数据。在 websocket api 中,浏览器和服务器只需要完成一次握手,两者之间就直接可以创建持久性的连接,并进行双向数据传输。(tomcat 8以上版本支持)
http 协议是一种无状态的、无连接的、单向的应用层协议。它采用了请求/响应模型。通信请求只能由客户端发起,服务端对请求做出应答处理。这种通信模型有一个弊端:http 协议无法实现服务器主动向客户端发起消息。
http长轮询:客户端向服务器发送(http)ajax请求,服务器接到请求后hold住连接,直到有新消息才返回响应信息并关闭连接,客户端处理完响应信息后再向服务器发送新的请求。
websocket与http长轮询的通信机制如下:


二、客户端如何使用websocket
浏览器通过 javascript 向服务器发出建立 websocket 连接的请求,连接建立以后,客户端和服务器端就可以通过 tcp 连接直接交换数据。
当你获取 web socket 连接后,你可以通过send()方法来向服务器发送数据,并通过onmessage事件来接收服务器返回的数据。
1. 创建 websocket 对象api
|
1
2
3
|
//第一个参数 url, 指定连接的 url。第二个参数 protocol 是可选的,指定了可接受的子协议。 api:var websocket = new websocket(url, [protocol] ); |
2. websocket 属性
以下是 websocket 对象的属性。假定我们使用了以上代码创建了 socket 对象:
| 属性 | 描述 |
|---|---|
| socket.readystate |
只读属性 readystate 表示连接状态,可以是以下值:
|
| socket.bufferedamount |
只读属性 bufferedamount 已被 send() 放入正在队列中等待传输,但是还没有发出的 utf-8 文本字节数。 |
3. websocket 事件
以下是 websocket 对象的相关事件。假定我们使用了以上代码创建了 socket 对象:
| 事件 | 事件处理程序 | 描述 |
|---|---|---|
| open | socket.onopen | 连接建立时触发 |
| message | socket.onmessage | 客户端接收服务端数据时触发 |
| error | socket.onerror | 通信发生错误时触发 |
| close | socket.onclose | 连接关闭时触发 |
4. websocket 方法
以下是 websocket 对象的相关方法。假定我们使用了以上代码创建了 socket 对象:
| 方法 | 描述 |
|---|---|
| socket.send() |
使用连接发送数据 |
| socket.close() |
关闭连接 |
5. websocket 实例
|
1
2
3
4
5
6
7
8
9
10
11
12
13
14
15
16
17
18
19
20
21
22
23
24
25
26
27
28
29
30
31
32
33
34
35
36
37
38
39
40
41
42
43
44
45
46
47
48
49
50
51
52
53
54
55
56
57
58
59
60
61
62
63
64
65
66
67
68
69
70
71
72
73
74
75
76
77
78
79
80
81
82
83
84
85
86
87
88
89
90
91
92
93
94
95
96
97
98
99
100
101
102
103
104
105
106
107
108
109
110
111
112
113
114
115
116
117
|
<%@ page language="java" contenttype="text/html; charset=utf-8" pageencoding="utf-8"%><html><head><script type="text/javascript" src="../js/jquery.min.js"></script><meta http-equiv="content-type" content="text/html; charset=utf-8"><title>testing websocket</title></head><script type="text/javascript"> var websocket; $(document).ready(function() { //var ip = window.location.host; var url = "ws://your ip/demo/ws/websocket"; //判断当前浏览器是否支持websocket if ('websocket' in window) { //建立客户端websocket websocket = new websocket(url); } else { console.log("您的浏览器不支持websocket"); } //封装内部监听事件 function init(){ //连接发生错误的回调方法 websocket.onerror = function(event) { console.log("websocket连接发生错误."); }; //连接成功建立的回调方法 websocket.onopen = function(event) { console.log("websocket连接成功."); //心跳检测重置 heartcheck.start(); }; //接收到消息的回调方法 websocket.onmessage = function(event) { //拿到任何消息都说明当前连接是正常的 if(event.data=="&"){ console.log("收到心跳回复"+event.data); }else{ console.log("接收到消息="+event.data); onmessage(event); } heartcheck.start(); }; //连接关闭的回调方法 // 断线重连 websocket.onclose = function() { console.log("websocket连接断开"); } //监听窗口关闭事件,当窗口关闭时,主动去关闭websocket连接,防止连接还没断开就关闭窗口,server端会抛异常。 window.onbeforeunload = function() { websocket.close(); console.log("窗口关闭,websocket断开连接."); } } function onmessage(event) { setmessageinnerhtml(event.data); } function posttoserver() { websocket.send(document.getelementbyid("msg").value); console.log("向服务器发送消息="+document.getelementbyid("msg").value); document.getelementbyid("msg").value = ""; } //将消息显示在网页上 function setmessageinnerhtml(innerhtml) { document.getelementbyid('message').innerhtml += innerhtml + '<br/>'; } function onclose(){ websocket.close(); } }); //心跳检测 var heartcheck = { timeout: 10000, timeoutobj: null, servertimeoutobj: null, start: function(){ console.log("start heartcheck"); var self = this; this.timeoutobj && cleartimeout(this.timeoutobj); this.servertimeoutobj && cleartimeout(this.servertimeoutobj); this.timeoutobj = settimeout(function(){ //这里发送一个心跳,后端收到后,返回一个心跳消息, console.log('发送心跳&'); websocket.send("&"); self.servertimeoutobj = settimeout(function() { console.log(websocket); console.log("服务器心跳回复超时"); websocket.close(); }, self.timeout); }, this.timeout) } } </script><body> <textarea id="message" readonly></textarea> <br /> <input id="msg" type="text" /> <button type="submit" id="sendbutton" onclick="posttoserver()">send!</button> <button type="submit" id="sendbutton" onclick="onclose()">end</button><script type="text/javascript" src="../js/websocket.js"></script></body></html> |
三、服务器端如何使用websocket
1. pom.xml文件引入对应的依赖包:
|
1
2
3
4
5
6
7
8
9
10
11
12
13
14
15
|
<!-- websocket 开始--> <dependency> <groupid>javax.websocket</groupid> <artifactid>javax.websocket-api</artifactid> <version>1.1</version> <scope>provided</scope> </dependency> <dependency> <groupid>javax</groupid> <artifactid>javaee-api</artifactid> <version>7.0</version> <scope>provided</scope> </dependency> <!-- websocket 结束--> |
2. spring配置文件配置websocket服务类
|
1
2
3
|
<!-- websocket --> <bean id="websocketservice" class="minyuantec.tvwall.service.impl.websocketserviceimpl" scope="singleton"> </bean> |
3. struts2配置文件过滤websocket请求
|
1
2
|
<!-- 过滤掉ws请求 --><constant name="struts.action.excludepattern" value="/ws/.*,ws://.*"></constant> |
4. 定义websocket.java类
|
1
2
3
4
5
6
7
8
9
10
11
12
13
14
15
16
17
18
19
20
21
22
23
24
25
26
27
28
29
30
31
32
33
34
35
36
37
38
39
40
41
42
43
44
45
46
47
48
49
50
51
52
53
54
55
56
57
58
59
60
61
62
63
64
65
66
67
68
69
70
71
72
73
74
75
76
77
78
79
80
81
82
83
84
85
86
87
88
89
90
91
92
93
94
95
96
97
98
99
100
101
102
103
104
105
106
|
@serverendpoint("/ws/websocket")public class websocket { private static logger logger = logger.getlogger(websocket.class); @suppresswarnings("static-access") private messagehandler messagehandler = getwebsocketservice().messagehandler; //静态变量,用来记录当前在线连接数。应该把它设计成线程安全的 public static int onlinecount = 0; //与某个客户端的连接会话,需要通过它来给客户端发送数据 public session session; /** * 连接建立成功调用的方法 * @param session 可选的参数。session为与某个客户端的连接会话,需要通过它来给客户端发送数据 */ @onopen public void onopen(session session){ this.session = session; websocketmaputil.put(session.getid(),this);//存入map addonlinecount(); //在线数加1 messagehandler.onconnect(session.getid()); system.out.println("有新连接加入!当前在线人数为" + getonlinecount()); logger.info("有新连接加入!当前在线人数为" + getonlinecount()); } /** * 连接关闭调用的方法 */ @onclose public void onclose(){ websocketmaputil.remove(session.getid()); //从map中删除 subonlinecount(); //在线数减1 messagehandler.ondisconnect(session.getid()); try { if(session != null){ session.close(); } } catch (ioexception e) { e.printstacktrace(); } system.out.println("有一连接关闭!当前在线人数为" + getonlinecount()); logger.info("有一连接关闭!当前在线人数为" + getonlinecount()); } /** * 收到客户端消息后调用的方法 * @param message 客户端发送过来的消息 * @param session 可选的参数 */ @onmessage public string onmessage(string message, session session) { system.out.println("来自客户端的消息:" + message); logger.info("来自客户端的消息:" + message); if (message.equals("&")){ return "&"; }else{ messagehandler.onmessage(session.getid(),message); return "got your message ("+ message +")"; } } /** * 发生错误时调用 * @param session * @param error */ @onerror public void onerror(session session, throwable error){ system.out.println("发生错误"); logger.info("发生错误:" + error); error.printstacktrace(); } //单发消息 public void sendmessage(string message) throws ioexception{ //阻塞式(同步) //this.session.getbasicremote().sendtext(message); //非阻塞式(异步) this.session.getasyncremote().sendtext(message); } //群发消息 public void sendmessageall(string message) throws ioexception{ for(websocket websocket : websocketmaputil.getvalues()){ websocket.sendmessage(message); } } public static synchronized int getonlinecount() { return onlinecount; } public static synchronized void addonlinecount() { websocket.onlinecount++; } public static synchronized void subonlinecount() { websocket.onlinecount--; } public websocketserviceimpl getwebsocketservice(){ classpathxmlapplicationcontext classpathxmlapplicationcontext = new classpathxmlapplicationcontext("classpath*:applicationcontext.xml"); return (websocketserviceimpl) classpathxmlapplicationcontext.getbean("websocketservice"); }} |
5. 在websocketserviceimpl实现类里实现服务器推送消息的方法
|
1
2
3
4
5
6
7
8
9
10
11
12
13
14
15
16
17
18
19
20
21
22
23
|
@override public boolean sendmessage(string message) { logger.info("发送给客户端的websocket消息message=="+message); if (messagehandler == null) { logger.info("上层调用者没有给messagehandler赋值,websocket消息无法发送到客户端"); return false; } if (message == null || "".equals(message)) { logger.info("发送给客户端的消息message为空"); return false; } try { for(websocket websocket : websocketmaputil.getvalues()){ websocket.sendmessage(message); logger.info("给sessionid为" + websocket.session.getid() + "的客户端发送消息:"+message+"=成功"); } return true; } catch (ioexception e) { logger.info("向所有客户端发送消息:"+message+"=失败:" + e); e.printstacktrace(); } return false; } |
其实,使用tomcat8开发websocket服务端非常简单,主要有如下两种方式:
1. 使用注解方式开发(上述示例代码),被@serverendpoint修饰的java类即可作为websocket服务端。
2. 继承endpint基类实现websocket服务端。
以上就是本文的全部内容,希望对大家的学习有所帮助,也希望大家多多支持服务器之家。
原文链接:http://www.cnblogs.com/bingyimeiling/p/10276801.html


