我们在使用一些开源调度系统(比如:elastic-job等)的时候,对于任务的执行时间通常都是有规律性的,可能是每隔半小时执行一次,或者每天凌晨一点执行一次。然而实际业务中还存在另外一种定时任务,它可能需要一些触发条件才开始定时,比如:编写博文时候,设置2小时之后发送。对于这些开始时间不确定的定时任务,我们也可以通过spring cloud stream来很好的处理。
为了实现开始时间不确定的定时任务触发,我们将引入延迟消息的使用。rabbitmq中提供了关于延迟消息的插件,所以本文就来具体介绍以下如何利用spring cloud stream以及rabbitmq轻松的处理上述问题。
动手试试
插件安装
关于RabbitMQ延迟消息的插件介绍可以查看官方网站: https://www.rabbitmq.com/blog/2015/04/16/scheduling-messages-with-rabbitmq/
安装方式很简单,只需要在这个页面: http://www.rabbitmq.com/community-plugins.html 中找到 rabbitmq_delayed_message_exchange 插件,根据您使用的rabbitmq版本选择对应的插件版本下载即可。
注意:只有rabbitmq 3.6.x以上才支持
在下载好之后,解压得到 .ez 结尾的插件包,将其复制到rabbitmq安装目录下的 plugins 文件夹。
然后通过命令行启用该插件:
|
1
|
rabbitmq-plugins enable rabbitmq_delayed_message_exchange |
该插件在通过上述命令启用后就可以直接使用,不需要重启。
另外,如果您没有启用该插件,您可能为遇到类似这样的错误:
error 156 --- [ 127.0.0.1:5672] o.s.a.r.c.cachingconnectionfactory : channel shutdown: connection error; protocol method: #method(reply-code=503, reply-text=command_invalid - unknown exchange type 'x-delayed-message', class-id=40, method-id=1
应用编码
下面通过编写一个简单的例子来具体体会一下这个属性的用法:
|
1
2
3
4
5
6
7
8
9
10
11
12
13
14
15
16
17
18
19
20
21
22
23
24
25
26
27
28
29
30
31
32
33
34
35
36
37
38
39
40
41
42
43
44
45
46
47
48
49
50
51
52
53
54
55
56
57
58
|
@enablebinding(testapplication.testtopic.class)@springbootapplicationpublic class testapplication { public static void main(string[] args) { springapplication.run(testapplication.class, args); } @slf4j @restcontroller static class testcontroller { @autowired private testtopic testtopic; /** * 消息生产接口 * * @param message * @return */ @getmapping("/sendmessage") public string messagewithmq(@requestparam string message) { log.info("send: " + message); testtopic.output().send(messagebuilder.withpayload(message).setheader("x-delay", 5000).build()); return "ok"; } } /** * 消息消费逻辑 */ @slf4j @component static class testlistener { @streamlistener(testtopic.input) public void receive(string payload) { log.info("received: " + payload); } } interface testtopic { string output = "example-topic-output"; string input = "example-topic-input"; @output(output) messagechannel output(); @input(input) subscribablechannel input(); }} |
内容很简单,既包含了消息的生产,也包含了消息消费。在 /sendmessage 接口的定义中,发送了一条消息,一条消息的头信息中包含了 x-delay 字段,该字段用来指定消息延迟的时间,单位为毫秒。所以上述代码发送的消息会在5秒之后被消费。在消息监听类 testlistener 中,对 testtopic.input 通道定义了 @streamlistener ,这里会对延迟消息做具体的逻辑。由于消息的消费是延迟的,从而变相实现了从消息发送那一刻起开始的定时任务。
在启动应用之前,还要需要做一些必要的配置,下面分消息生产端和消费端做说明:
消息生产端
|
1
2
|
spring.cloud.stream.bindings.example-topic-output.destination=delay-topicspring.cloud.stream.rabbit.bindings.example-topic-output.producer.delayed-exchange=true |
注意这里的一个新参数 spring.cloud.stream.rabbit.bindings.example-topic-output.producer.delayed-exchange ,用来开启延迟消息的功能,这样在创建exchange的时候,会将其设置为具有延迟特性的exchange,也就是用到上面我们安装的延迟消息插件的功能。
消息消费端
|
1
2
3
|
spring.cloud.stream.bindings.example-topic-input.destination=delay-topicspring.cloud.stream.bindings.example-topic-input.group=testspring.cloud.stream.rabbit.bindings.example-topic-input.consumer.delayed-exchange=true |
在消费端也一样,需要设置 spring.cloud.stream.rabbit.bindings.example-topic-output.producer.delayed-exchange=true 。如果该参数不设置,将会出现类似下面的错误:
error 9340 --- [ 127.0.0.1:5672] o.s.a.r.c.cachingconnectionfactory : channel shutdown: channel error; protocol method: #method<channel.close>(reply-code=406, reply-text=precondition_failed - inequivalent arg 'type' for exchange 'delay-topic' in vhost '/': received 'topic' but current is ''x-delayed-message'', class-id=40, method-id=10)
完成了上面配置之后,就可以启动应用,并尝试访问 localhost:8080/sendmessage?message=hello 接口来发送一个消息到mq中了。此时可以看到类似下面的日志:
|
1
2
3
4
|
2019-01-02 23:28:45.318 info 96164 --- [ctor-http-nio-3] c.d.s.testapplication$testcontroller : send: hello2019-01-02 23:28:45.328 info 96164 --- [ctor-http-nio-3] o.s.a.r.c.cachingconnectionfactory : attempting to connect to: [localhost:5672]2019-01-02 23:28:45.333 info 96164 --- [ctor-http-nio-3] o.s.a.r.c.cachingconnectionfactory : created new connection: rabbitconnectionfactory.publisher#5c5f9a03:0/simpleconnection@3278a728 [delegate=amqp://guest@127.0.0.1:5672/, localport= 53536]2019-01-02 23:28:50.349 info 96164 --- [ay-topic.test-1] c.d.stream.testapplication$testlistener : received: hello |
从日志中可以看到, send: hello 和 received: hello 两条输出之间间隔了5秒,符合我们上面编码设置的延迟时间。
深入思考
在代码层面已经完成了定时任务,那么我们如何查看延迟的消息数等信息呢?
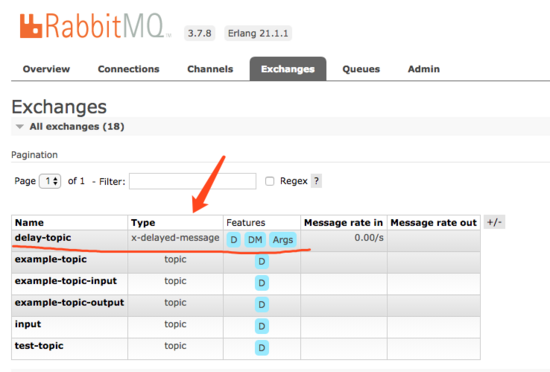
此时,我们可以打开rabbitmq的web控制台,首先可以进入exchanges页面,看看这个特殊exchange,具体如下:

可以看到,这个exchange的type类型是 x-delayed-message 。点击该exchange的名称,进入详细页面,就可以看到更多具体信息了:

代码示例
本文示例读者可以通过查看下面仓库的中的 stream-delayed-message 项目:
以上就是本文的全部内容,希望对大家的学习有所帮助,也希望大家多多支持服务器之家。
原文链接:http://blog.didispace.com/spring-cloud-starter-finchley-7-7/


