最近看了许多iphone x适配的文章,发现很少有介绍safearea的,就来随便写写
现在对于iphone x的适配,有一种常见的做法是给导航栏或tabbar增加一个固定的距离,比如顶部增加44pt,底部增加34pt。这种写死距离的做法乍看上去挺简单,其实并不好,理由如下
-
不适合多机型的适配,如果以后出了一种带刘海的ipad,需要预留出来的距离就未必是现在写死的距离
-
不适合需要支持横竖屏的app,横屏顶部不需要增加距离,反而是左右各有44pt,底部的距离也和竖屏不同
-
不够动态。还是举个例子,假如有电话打进来了,导航栏应该会下移,这时候view可能还是会被挡住
这里我想探讨一下如何使用safearealayoutguide和safeareainsets,以一种动态的方式,一劳永逸地解决iphone x甚至后续所有机型的适配问题。
safearealayoutguide
首先我们看看什么是safearealayoutguide
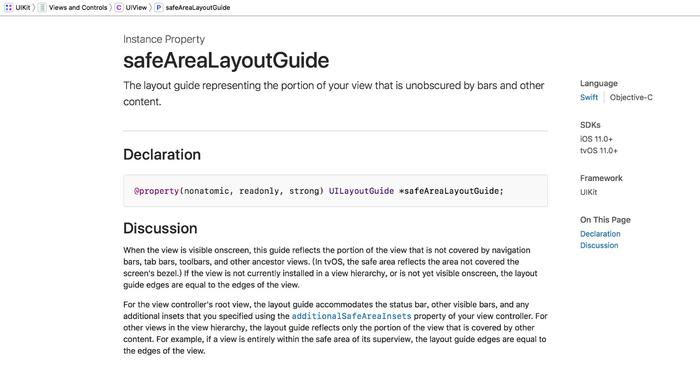
看起来复杂,其实很简单,我归纳一下有几点:
-
它是uiview的一个只读属性,意味着所有uiview对象都有并且是系统帮我们创建好的
-
它继承uilayoutguide,有layoutframe意味着它能代表一块区域
-
它代表的区域避开了诸如导航栏、tabbar或者其他有可能挡住你这个uiview对象显示的所有父view,意味着你的view对象只要相对另一个view的safelayoutguide做布局就不用担心她被奇奇怪怪的东西挡住
-
对于控制器的view的safearealayoutguide,他的区域同样避开了statusbar或其他有可能挡住view显示的东西,我们甚至可以用控制器的additionalsafeareainsets属性,来额外指定inset
-
如果view完全在父view的安全区域内,或者view不在视图层级或屏幕上,那么view的safearealayoutguide区域其实和view自身是一样大的
safearealayoutguide是一个相对抽象的概念,为了便于理解,我们可以把safearealayoutguide看成是一个“view”,这个“view”系统自动帮我们调整它的bounds,让它不会被各种奇奇怪怪的东西挡住,包括iphone x的刘海区域和底部的一道杠区域,可以认为在这个“view”上一定能完整显示所有内容。
以下绿色部分就是当前控制器view的safearealayoutguide区域
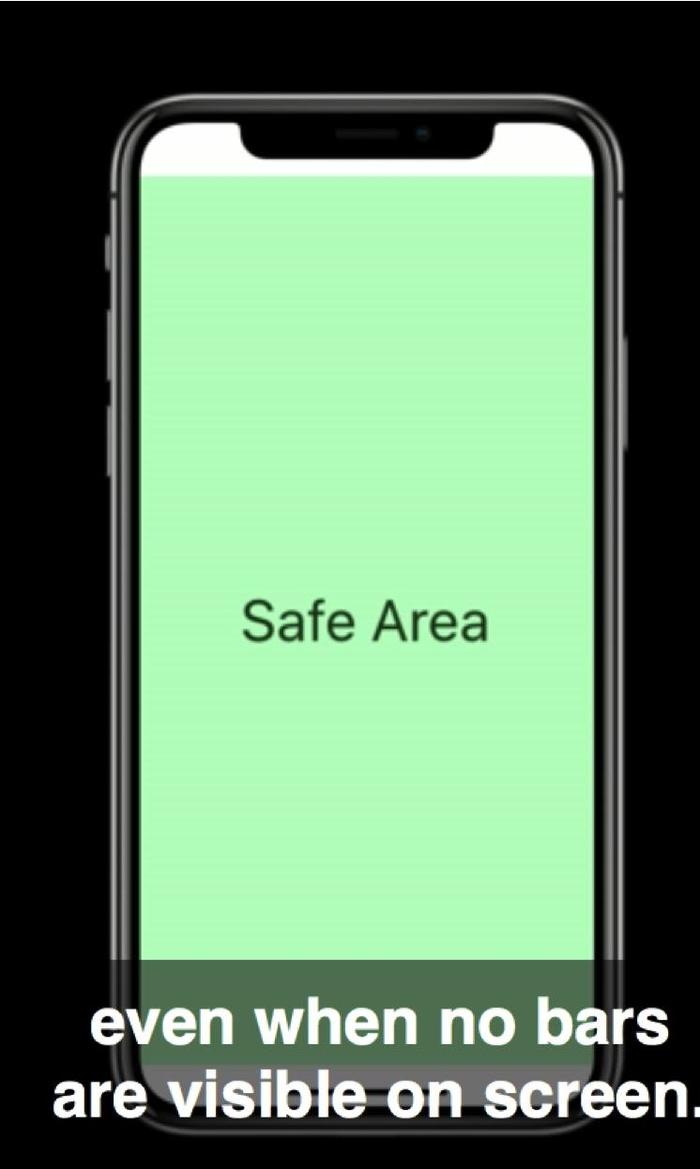
iphone x竖屏safearealayoutguide的bounds.png
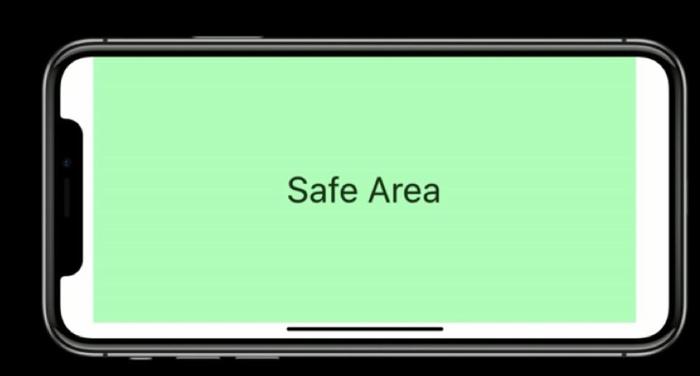
iphone x横屏safearealayoutguide的bounds.png
截图来自https://developer.apple.com/videos/play/fall2017/801/
不过需要铭记的一点是这个“view”并不会显示在我们的视图层级上。
uilayoutguides will not show up in the view hierarchy, but may be used as items in an nslayoutconstraint and represent a rectangle in the layout engine.
在我看来,他最大的作用是作为参照物,让view可以相对某个view的safearealayoutguide做布局,从而保证view能正常、安全地显示(相对的那个view不一定要是父view)
在一种常见的使用场景里,以前我的某个view是相对于控制器的view做布局,现在是相对控制器view的safearealayoutguide做布局了
以前是这样写
[nslayoutconstraint constraintwithitem:someview attribute:nslayoutattributetop relatedby:nslayoutrelationequal toitem:self.vc.view attribute:nslayoutattributetop multiplier:1.0 constant:0];
现在是这样
[nslayoutconstraint constraintwithitem:someview attribute:nslayoutattributetop relatedby:nslayoutrelationequal toitem:self.vc.view.safearealayoutguide attribute:nslayoutattributetop multiplier:1.0 constant:0];
适配前后的效果
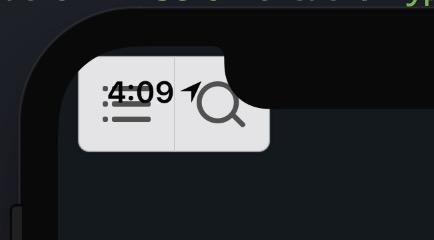
适配前.png
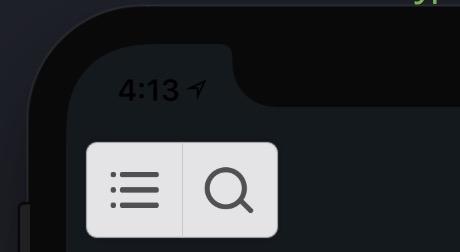
改成相对于view的safearealayoutguide后-竖屏.png
改成相对于view的safearealayoutguide后-横屏.png
可以看到,相同的布局下,横屏在没有statusbar时,距离顶部是0,左边是44,如果有statusbar,距离顶部就是20。反正不管怎么弄,只要我们相对safearealayoutguide做布局,我们的view就能够安全完整地显示出来
那么非ios11怎么办?
非ios11 还是只能对view做布局,就要写两套布局代码,稍后会介绍
这样是不是就足够应对所有情况了呢?
并不是
我们自定义的view有一边需要紧挨着屏幕边缘,比如我项目里是自定义的导航栏,它的顶部是挨着屏幕顶部的,那么导航栏就不能相对view的safearealayoutguide布局,否则顶部会空出来一截子
frame布局
这时就轮到safeareainsets来发挥作用啦
safeareainsets
先看一下safeareainsets的官方解释
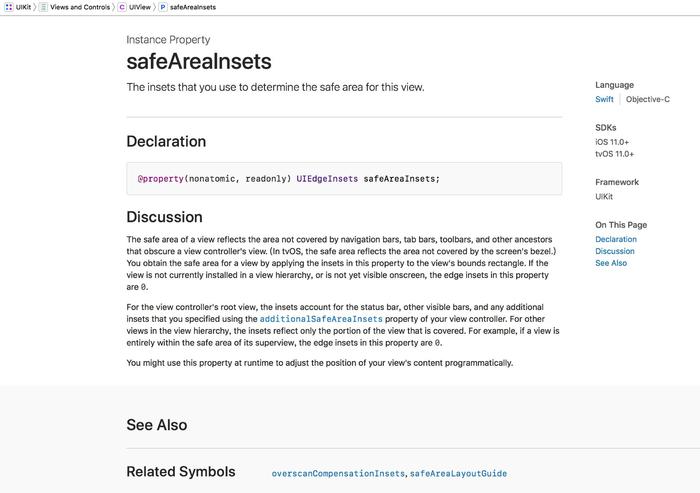
有没有觉得和safearealayoutguide很像?safearealayoutguide可能就是根据safeareainsets来调整自己的bounds的
iphone x竖屏时占满整个屏幕的控制器的view的safeareainsets是(44,0,34,0),横屏是(0,44,21,44),inset后的区域正好是safearealayoutguide区域
既然如此,对于自定义的顶部导航栏来说,我们可以给导航栏的高度加上一个vc.view.safeareainsets.top,让他变高一点就可以了,这样在x上,竖屏时top = 44, 横屏时top = 0,导航栏的高度能响应改变
需要注意的是,无论safearealayoutguide还是safeareainsets都是ios11才能使用的。
对于safeareainsets,我们可以把版本判断写在一个函数里
我们可以这样写
|
1
2
3
4
5
6
|
static inline uiedgeinsets sgm_safeareainset(uiview *view) { if (@available(ios 11.0, *)) { return view.safeareainsets; } return uiedgeinsetszero;} |
|
1
2
3
|
uiedgeinsets safeareainsets = sgm_safeareainset(self.view);cgfloat height = kdefaulttopviewheight; // 导航栏原本的高度,通常是44.0height += safeareainsets.top > 0 ? safeareainsets.top : 20.0; // 20.0是statusbar的高度 |
问题又来了,这段代码放在什么地方合适呢?前面官方文档提到过,如果view不在屏幕上或显示层级里,view的safeareainsets = uiedgeinsetszero,所以我们需要明确知道safeareainsets改变的时机
实际上系统已经提供了回调
对于uiviewcontroller
-(void)viewsafeareainsetsdidchange ns_requires_super api_available(ios(11.0), tvos(11.0));
对于uiview
|
1
|
-(void)safeareainsetsdidchange api_available(ios(11.0),tvos(11.0)); |
这里主要探讨controller的回调,view的回调是类似的。只要controller的view的safeareainsets改变,系统就会调用viewsafeareainsetsdidchange。自然而然,我们会想把以上代码放在这里,然而这里有个大坑,你会发现,当这个控制器以动画的方式push进来时,导航栏的高度也会动画地变高,产生了不必要的多余动画,这种体验很糟糕
那么究竟应该放在哪里?我们很有必要看一下新的viewcontroller调用时序
以下是从“rootvc” push 到 “pushvc”控制台输出的调用时序以及对应控制器的view的safeareainsets
|
1
2
3
4
5
6
7
8
9
10
11
12
13
14
|
2017-10-04 16:59:59.594811+0800 xxx[15662:803767] begin pushviewcontroller to [<_ttcc8xxxtests27containerviewcontrollertest20mockuiviewcontroller: 0x7f9c07b643b0>]viewdidload()---optional("pushvc")---uiedgeinsets(top: 0.0, left: 0.0, bottom: 0.0, right: 0.0)willmove(toparentviewcontroller:)---optional("pushvc")---uiedgeinsets(top: 0.0, left: 0.0, bottom: 0.0, right: 0.0)viewwilldisappear---optional("rootvc")---uiedgeinsets(top: 44.0, left: 0.0, bottom: 34.0, right: 0.0)viewwillappear---optional("pushvc")---uiedgeinsets(top: 0.0, left: 0.0, bottom: 0.0, right: 0.0)viewsafeareainsetsdidchange()---optional("pushvc")---uiedgeinsets(top: 44.0, left: 0.0, bottom: 34.0, right: 0.0)viewwilllayoutsubviews()---optional("pushvc")---uiedgeinsets(top: 44.0, left: 0.0, bottom: 34.0, right: 0.0)viewdidlayoutsubviews()---optional("pushvc")---uiedgeinsets(top: 44.0, left: 0.0, bottom: 34.0, right: 0.0)viewwilllayoutsubviews()---optional("pushvc")---uiedgeinsets(top: 44.0, left: 0.0, bottom: 34.0, right: 0.0)viewdidlayoutsubviews()---optional("pushvc")---uiedgeinsets(top: 44.0, left: 0.0, bottom: 34.0, right: 0.0)viewdidappear---optional("pushvc")---uiedgeinsets(top: 44.0, left: 0.0, bottom: 34.0, right: 0.0)viewdiddisappear---optional("rootvc")---uiedgeinsets(top: 44.0, left: 0.0, bottom: 34.0, right: 0.0)didmove(toparentviewcontroller:)---optional("pushvc")---uiedgeinsets(top: 44.0, left: 0.0, bottom: 34.0, right: 0.0)2017-10-04 16:59:59.604563+0800 xxx[15662:803767] did pushviewcontroller [<_ttcc8xxxtests27containerviewcontrollertest20mockuiviewcontroller: 0x7f9c0790d170>]->[<_ttcc8xxxtests27containerviewcontrollertest20mockuiviewcontroller: 0x7f9c07b643b0>] time = [0.009772] |
可以看到,viewsafeareainsetsdidchange调用时机很早,在viewwillappear后,这是为什么出现多余动画的原因。并且“pushvc”的safeareainsets直到viewsafeareainsetsdidchange调用前,都是uiedgeinsetszero,之后才是正确的uiedgeinsets(top: 44.0, left: 0.0, bottom: 34.0, right: 0.0)
并且viewsafeareainsetsdidchange后面会调用两次viewdidlayoutsubviews,所以我们应该把改变高度或布局的代码都写在viewdidlayoutsubviews里,这样就不会有多余的动画效果了。需要注意viewdidlayoutsubviews可能会由别的操作频繁触发,所以如果调整safearea布局的代码比较耗时,可以考虑加上一个状态标记,只在didchange后执行一次布局调整
最后的代码应该长这样
|
1
2
3
4
5
6
7
8
|
- (void)viewdidlayoutsubviews { [super viewdidlayoutsubviews]; uiedgeinsets safeareainsets = sgm_safeareainset(self.view); cgfloat height = 44.0; // 导航栏原本的高度,通常是44.0 height += safeareainsets.top > 0 ? safeareainsets.top : 20.0; // 20.0是statusbar的高度,这里假设statusbar不消失 if (_navigationbar && _navigationbar.height != height) { _navigationbar.height = height; } |
适配前后的效果

适配前

适配后
这样对于frame布局和autolayout布局的各种情况,有了一个动态的适配方案,就是分别使用safearealayoutguide和safeareainsets来灵活处理布局,相比写死一个固定距离,当前和未来的各种机型都能一套代码适配,扩展性更好。我们项目目前也是采用这种做法,如果你的项目需要适配横竖屏或ui控件布局相对复杂,真的应该考虑使用safearea
顺便提一下,vfl似乎已经废了,因为|只能表示父view的边缘,并没有一个符号来表示父view的safearealayoutguide的边缘,以前我们写的vfl代码,好多得改,改起来也特别麻烦,建议别再用vfl了
最后一个版本判断的问题,safeareainsets和safearealayoutguide都是ios11的api,如果不做封装,直接在代码里写,势必会出现大量@available这种版本判断语句,代码里到处是@available,看起来很崩溃,破坏代码可读性。
因为我之前写了一个自动布局框架,这次就将safearealayoutguide和版本判断都顺便封装在里面了,个人觉得这套框架比nslayoutanchor好用,主要作用是简化布局代码书写,以下是生成一个nslayoutconstraint的对比
|
1
2
3
4
5
6
7
8
9
10
|
// 需求是topleftview的top等于self.view的safearealayoutguide的top// 使用系统apiif (@available(ios 11.0, *)) { [nslayoutconstraint constraintwithitem:self.topleftview attribute:nslayoutattributetop relatedby:nslayoutrelationequal toitem:self.view.safearealayoutguide attribute:nslayoutattributetop multiplier:1.0 constant:0]; } else { [nslayoutconstraint constraintwithitem:self.topleftview attribute:nslayoutattributetop relatedby:nslayoutrelationequal toitem:self.view attribute:nslayoutattributetop multiplier:1.0 constant:0]; }// 使用nslayoutconstraint-sslayoutself.topleftview.top_attr = self.view.top_attr_safe |
在业务代码里不会出现任何版本判断,大家有兴趣的话可以试一下
以上就是本文的全部内容,希望对大家的学习有所帮助,也希望大家多多支持服务器之家。
原文链接:https://www.jianshu.com/p/1432a94ef66f


