概述
用一个简单的例子演示spring cloud中eureka和ribbon的基本用法。
版本和环境
- idea
- spring boot 1.5.·0
- jdk 1.8
- maven 3
构建eureka server
在spring cloud,可以使用eureka来管理微服务,微服务可以注册到eureka中。
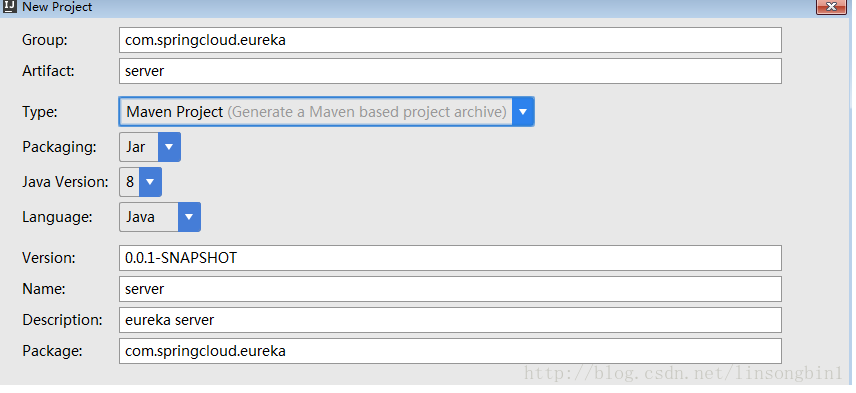
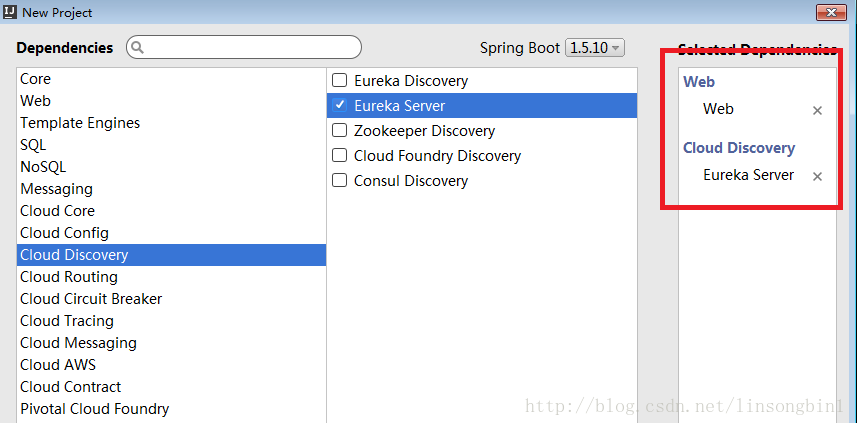
首先可以用idea的spring initialzr 来创建eureka server注册中心。


修改application.properties文件,添加如下内容
|
1
2
3
4
5
|
spring.application.name=eureka-server eureka.instance.hostname=localhost eureka.client.register-with-eureka=falseeureka.client.fetch-registry=falseserver.port=8881 |
在spring boot为我们生成的启动类serverapplication 中加入@enableeurekaserver 注解
|
1
2
3
4
5
6
7
8
9
10
11
12
13
14
|
package com.springcloud.eureka;import org.springframework.boot.springapplication;import org.springframework.boot.autoconfigure.springbootapplication;import org.springframework.cloud.netflix.eureka.server.enableeurekaserver;@enableeurekaserver@springbootapplicationpublic class serverapplication { public static void main(string[] args) { springapplication.run(serverapplication.class, args); }} |
在浏览器中输入http://localhost:8881/
可以看到如下界面:

可以看到暂时还没有服务注册上来。到此,一个简单的微服务注册中心就构建完了。
编写微服务userservice
接下来用rest构建一个微服务接口,并注册到注册中心上去。依然使用spring initialzr 来构建一个新的工程。使用方式跟上面的一样。


注意这次要勾选eureka discovery 组件。而不是eureka server 。
修改application.properties文件,添加如下内容:
|
1
2
3
|
spring.application.name=user server.port=8882eureka.client.service-url.defaultzone=http://localhost:8881/eureka/ |
在spring boot 为我们生成的userapplication 类中使用@enablediscoveryclient 注解。
|
1
2
3
4
5
6
7
8
9
10
11
12
13
14
|
package com.springcloud;import org.springframework.boot.springapplication;import org.springframework.boot.autoconfigure.springbootapplication;import org.springframework.cloud.client.discovery.enablediscoveryclient;@enablediscoveryclient@springbootapplicationpublic class userapplication { public static void main(string[] args) { springapplication.run(userapplication.class, args); }} |
创建一个rest full的微服务接口。
|
1
2
3
4
5
6
7
8
9
10
11
12
13
|
package com.springcloud;import org.springframework.web.bind.annotation.getmapping;import org.springframework.web.bind.annotation.restcontroller;@restcontrollerpublic class usercontroller { @getmapping("/getuser") public string getuser() { return "i am user list."; }} |
运行userapplication后,再次访问http://localhost:8881/
会发现user这个服务已经注册上来了。

编写微服务order
接下来,我们再构建一个订单的微服务,并访问user这个微服务中的接口。
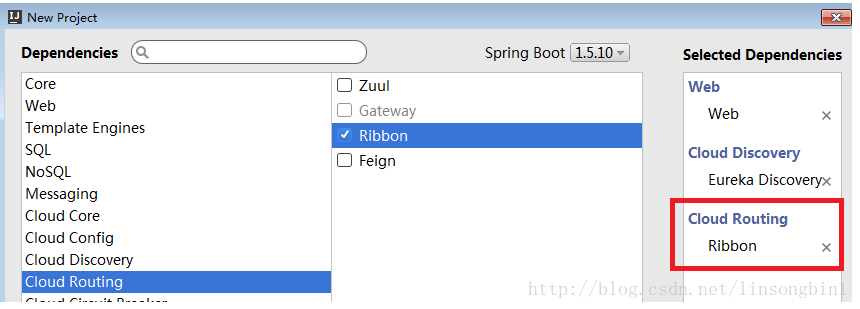
依然使用spring initialzr 来构建一个新工程。user这个微服务是可以部署到多台机器上的。客户端在访问这个服务的时候,请求可以路由到任何一台部署了user服务的机器。因此客户端需要使用一个路由算法来调度user这个服务。在spring cloud中,可以使用ribbon组件来做客户端路由。ribbon内部会去服务注册中心获取服务列表的,以便调用对应的服务。

这次除了勾选eureka discovery 组件。还需要勾选ribbon 。
修改application.properties文件,添加如下内容:
|
1
2
3
|
spring.application.name=order server.port=8883eureka.client.service-url.defaultzone=http://localhost:8881/eureka/ |
在spring boot 为我们生成的orderapplication类中增加如下配置。
|
1
2
3
4
5
6
7
8
9
10
11
12
13
14
15
16
17
18
19
20
21
|
package com.springboot;import org.springframework.boot.springapplication;import org.springframework.boot.autoconfigure.springbootapplication;import org.springframework.cloud.client.discovery.enablediscoveryclient;import org.springframework.cloud.client.loadbalancer.loadbalanced;import org.springframework.context.annotation.bean;import org.springframework.web.client.resttemplate;@enablediscoveryclient@springbootapplicationpublic class orderapplication { @bean @loadbalanced resttemplate resttemplate() { return new resttemplate(); } public static void main(string[] args) { springapplication.run(orderapplication.class, args); }} |
由于使用了ribbon,这里需要使用@loadbalanced注解。
编写ordercontroller。
|
1
2
3
4
5
6
7
8
9
10
11
12
13
14
15
16
|
package com.springboot;import org.springframework.beans.factory.annotation.autowired;import org.springframework.web.bind.annotation.getmapping;import org.springframework.web.bind.annotation.restcontroller;import org.springframework.web.client.resttemplate;@restcontrollerpublic class ordercontroller { @autowired private resttemplate resttemplate; @getmapping("/getorderuser") public string getorderuser() { return resttemplate.getforentity("http://user/getuser",string.class).getbody(); }} |
运行orderapplication后,访问http://localhost:8881/
会发现order这个服务也被注册到注册中心了。

接下来我们访问ordercontroller中的getorderuser 方法,触发调用usercontroller的getuser方法。
在浏览器中输入:http://localhost:8883/getorderuser
可以看到返回了:i am user list.
以上就是本文的全部内容,希望对大家的学习有所帮助,也希望大家多多支持服务器之家。
原文链接:http://blog.csdn.net/linsongbin1/article/details/79361268


