前言
最近写的 Swift 项目里要实现一个聊天界面,在处理键盘弹出的时候遇到了一点麻烦。
麻烦就在于键盘弹出后如何处理屏幕和键盘的关系
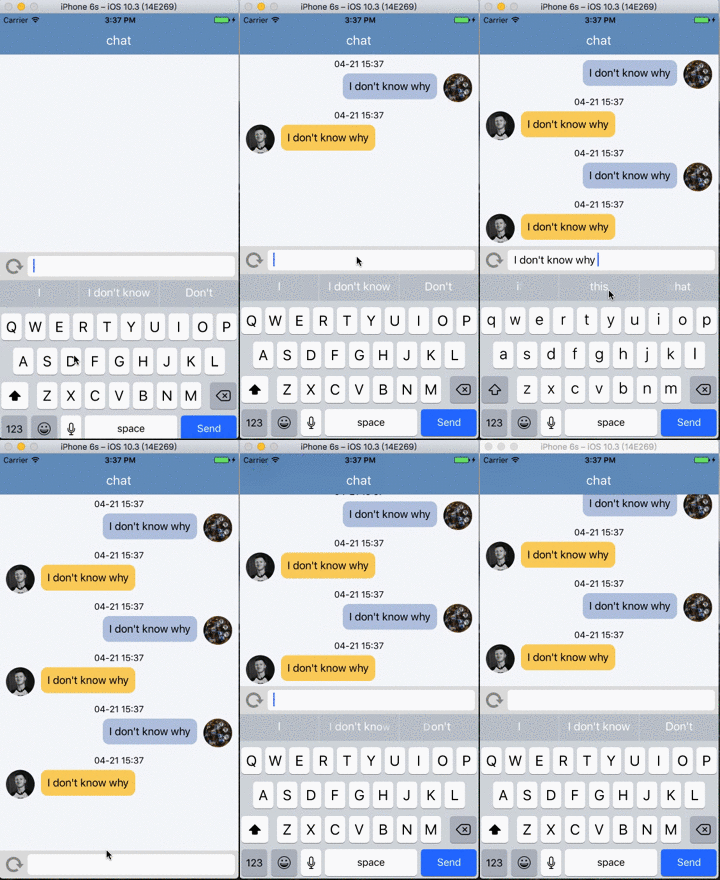
经过一番死磕,终于做出了想要的效果,效果如下:
注:原本项目是 Swift 2.3 写的,为了写这篇博客,用 Swift 3.1 重新实现了一遍。
感受:方法名真的缩短了不少,😁

分析
现在开始,就让我来分析一下这次死磕历程。
一开始想到了两种处理方法,一种是 键盘弹出消失的同时,输入栏随着键盘移动,一种是 键盘弹出消失时,整个屏幕随着键盘移动,这两种方法都有弊端,让我们分类讨论下:
1. 输入栏随着键盘移动
- 当消息条数较少时,键盘不会遮挡住消息
- 消息条数多了以后,键盘会遮挡住屏幕中处在键盘位置的消息
- 每次发送了新的消息,用户无法及时看到(因为被键盘遮住了)
结论:体验不好
2. 屏幕随着键盘移动
- 消息多了以后,能在屏幕上及时看到最新的消息
- 但消息少的时候,由于键盘把整个 view 顶出屏幕,用户看不到这头几条消息
- 当消息没有占满整个屏幕的时候,键盘把 view 顶上去,view 底部会留下一段空白
结论:还是体验不好
上述两种情况的图片我就不发了,大家自己脑补一下
那么作为强迫症,怎么能容忍这种不好的体验?于是开始死磕,首先参考了下日常使用最多的微信、qq,分情况总结了一下微信、qq里键盘弹出的效果
- 情况一:消息较少时(当键盘弹出不会遮挡住消息)聊天界面不动,键盘弹出时只有输入栏上滑,这样保证了最开始的几条消息能完整显示
- 情况二:消息较多但还未占满屏幕时(当键盘弹出会遮挡住部分消息),键盘弹出时输入栏上滑,同时聊天界面也上滑。注意:此时输入栏上滑的距离为键盘高度,聊天界面上滑距离为键盘可能遮挡住消息的高度
- 情况三:消息占满或超出屏幕时,键盘弹出时整个 view 上滑
- 这其中还包括了发送消息时,聊天界面上滑,保证最后一条消息显示在键盘上方的处理。
如果大家不方便脑补,直接掏出手机,用微信或qq和女神聊个天吧
下面,我们放出代码分析:
布局
首先导入 SnapKit 布局框架,对聊天界面和输入栏进行约束
由于我懒,怎么使用 Snapkit 就不赘述 😁
|
1
2
3
4
5
6
7
8
9
10
11
12
13
|
toolBarView.snp.makeConstraints { (make) in make.left.equalTo(view.snp.left) make.right.equalTo(view.snp.right) make.height.equalTo(toolBarHeight) make.bottom.equalTo(view.snp.bottom)}chatTableView.snp.makeConstraints { (make) in make.left.equalTo(view.snp.left) make.right.equalTo(view.snp.right) make.bottom.equalTo(toolBarView.snp.top) make.top.equalTo(view.snp.top).offset(64)} |
这里让聊天界面的底部和输入栏的上方贴合
监听
监听键盘的弹出和消失
|
1
2
3
4
5
6
7
|
NotificationCenter.default.addObserver(self, selector: #selector(keyBoardWillShow(notification:)), name: NSNotification.Name.UIKeyboardWillShow, object: nil)NotificationCenter.default.addObserver(self, selector: #selector(keyBoardWillHide(notification:)), name: NSNotification.Name.UIKeyboardWillHide, object: nil) |
当键盘弹出时,会触发 keyBoardWillShow(notification:) 方法,键盘消失时,会触发 keyBoardWillHide(notification:) 方法,我们很多复杂的逻辑,都要在这两个方法中实现。另外,Swift 3.1 的版本中,把很多方法的 NS 前缀去除了,所以还在用 Swift 2.3 的童鞋,在NotificationCenter 前面加上 NS 前缀就可以了。
下面重头戏来了,实现上述三种情况的效果
效果
弹出动画
想要 view 随着键盘弹出上滑,需要得到键盘的高度和键盘弹出动画的时间,这里我们通过如下代码得到:
|
1
2
3
4
5
6
7
8
9
10
11
12
13
14
|
func keyBoardWillShow(notification: Notification) { let userInfo = notification.userInfo! as Dictionary let value = userInfo[UIKeyboardFrameEndUserInfoKey] as! NSValue let keyBoardRect = value.cgRectValue // 得到键盘高度 let keyBoardHeight = keyBoardRect.size.height mKeyBoardHeight = keyBoardHeight // 得到键盘弹出所需时间 let duration = userInfo[UIKeyboardAnimationDurationUserInfoKey] as! NSNumber mKeyBoardAnimateDuration = duration.doubleValue ...} |
然后实现动画
之前在实现输入栏随着键盘弹出的时候,尝试过两种写法:
1、更新 frame
|
1
2
3
4
5
6
7
|
var animate: (()->Void) = { let newFrame = CGRect(x: 0, y: 0, width: SCREEN_WIDTH, height: SCREEN_HEIGHT - mKeyBoardHeight) self.toolBarView.frame = newFrame}UIView.animate(withDuration: mKeyBoardAnimateDuration, delay: 0, options: options, animations: animate) |
2、更新约束
|
1
2
3
4
5
6
7
8
|
var animate: (()->Void) = { self.toolBarView.snp.updateConstraints(closure: { (make) in make.bottom.equalTo(self.view.snp_bottom).offset(-mKeyBoardHeight) }}UIView.animate(withDuration: mKeyBoardAnimateDuration, delay: 0, options: options, animations: animate) |
但最后发现,由于滑动的速度不一样,会造成键盘弹出和输入栏上滑时出现缝隙。一句话,体验不好。
于是去网上找了一种方法(必须要感谢下那位大哥),利用一个动画的 options,和 view 的 transform 方法完美解决问题。让 view 和键盘滑动时无缝贴合、如丝般顺滑。
方法如下:
处理所需的动画
|
1
2
3
|
var animate: (()->Void) = { self.toolBarView.transform = CGAffineTransform(translationX: 0, y: -keyBoardHeight)} |
创建动画 options
|
1
2
3
|
let options = UIViewAnimationOptions(rawValue: UInt((userInfo[UIKeyboardAnimationCurveUserInfoKey] as! NSNumber).intValue << 16)) |
实现动画
|
1
2
|
UIView.animate(withDuration: mKeyBoardAnimateDuration, delay: 0, options: options, animations: animate) |
如此这般,大功告成!亲个嘴儿 😙
现在有了丝滑的滑动效果,我们来处理上述分析的三种情况
定义情况
首先定义效果枚举类型,枚举的好处就不赘述了
|
1
2
3
4
5
|
enum AnimateType { case animate1 // 键盘弹出的话不会遮挡消息 case animate2 // 键盘弹出的话会遮挡消息,但最后一条消息距离输入框有一段距离 case animate3 // 最后一条消息距离输入框在小范围内,这里设为 30} |
枚举类型对应了上述分析的三种效果
让我们回顾一下三种情况
- 情况一:消息较少时(当键盘弹出不会遮挡住消息)聊天界面不动,键盘弹出时只有输入栏上滑,这样保证了最开始的几条消息能完整显示
- 情况二:消息较多但还未占满屏幕时(当键盘弹出会遮挡住部分消息),键盘弹出时输入栏上滑,同时聊天界面也上滑。注意:此时输入栏上滑的距离为键盘高度,聊天界面上滑距离为键盘可能遮挡住消息的高度
- 情况三:消息占满或超出屏幕时,键盘弹出时整个 view 上滑
实现
当消息数量为 0 时,默认动画为输入框滑动
|
1
2
3
|
var animate: (()->Void) = { self.toolBarView.transform = CGAffineTransform(translationX: 0, y: -keyBoardHeight)} |
当消息数量不为 0 时,需要进行计算判断情况
首先得到最后一条消息在屏幕的位置,其中 cellDistance 就是最后一条消息相对于当前屏幕的 y 值
|
1
2
3
4
|
let lastIndex = IndexPath(row: msgList.count - 1, section: 0)let rectCellView = chatTableView.rectForRow(at: lastIndex)let rect = chatTableView.convert(rectCellView, to: chatTableView.superview)let cellDistance = rect.origin.y + rect.height |
限定两个位置 distance1 和 distance2
distance1 代表弹出键盘后键盘顶部的位置相对于当前屏幕的 y 值,对应第一和第二种情况的判断,distance2 代表未弹出键盘时输入框顶部的位置当对于当前屏幕的 y 值。
|
1
2
|
let distance1 = SCREEN_HEIGHT - toolBarHeight - keyBoardHeightlet distance2 = SCREEN_HEIGHT - toolBarHeight - 2 * fitBlank |
计算出最后一条消息的位置和限定 distance1 的差值
这样,当处于第二种情况时,输入框上滑距离为键盘高度,聊天界面上滑距离为计算出的差值,完美实现对应效果
对应代码如下:
|
1
2
3
4
5
6
7
8
9
10
11
12
13
14
15
16
17
18
19
20
|
let difY = cellDistance - distance1if cellDistance <= distance1 { animate = { self.toolBarView.transform = CGAffineTransform(translationX: 0, y: -keyBoardHeight) } animateType = .animate1} else if distance1 < cellDistance && cellDistance <= distance2 { animate = { self.toolBarView.transform = CGAffineTransform(translationX: 0, y: -keyBoardHeight) self.chatTableView.transform = CGAffineTransform(translationX: 0, y: -difY) self.lastDifY = difY //这里记录下最后一次滑动的dif值,以后有用 } animateType = .animate2} else { animate = { self.view.transform = CGAffineTransform(translationX: 0, y: -keyBoardHeight) } animateType = .animate3} |
以上代码都发生在 keyBoardWillShow(notification: Notification) 中,每次判断完动画的情况后,记录下动画情况,然后当键盘消失时,在 keyBoardWillHide(notification: Notification) 中还原
代码如下:
|
1
2
3
4
5
6
7
8
9
10
11
12
13
14
15
16
17
|
// 返回 view 或 toolBarView 或 chatTableView 到原有状态switch animateType {case .animate1: animate = { self.toolBarView.transform = CGAffineTransform.identity self.chatTableView.transform = CGAffineTransform.identity }case .animate2: animate = { self.toolBarView.transform = CGAffineTransform.identity self.chatTableView.transform = CGAffineTransform.identity }case .animate3: animate = { self.view.transform = CGAffineTransform.identity }} |
如此这般,就实现了三种滑动的效果。但是别急,问题又来了。在情况一和情况二中,聊天界面上滑,怎么保证最后一条消息显示在键盘上方呢?
这就需要我们在发送完消息后,刷新列表的方法中进行处理,这里贴出整个刷新列表方法
实现思路为:
- 处于情况三时,由于之前约束了聊天界面在输入栏上方,并且整个界面一起上滑,约束依旧成立,只需把聊天界面最后一条消息滚动到聊天界面底部
- 处于情况一和情况二时,如果聊天界面上滑的总距离(lastDifY + difY)小于键盘高度,则可以继续上滑,上滑距离为新增消息的高度
- 一旦聊天界面上滑的总距离将要超过键盘高度,则上滑总距离设为键盘高度,如果聊天界面上滑的总距离超过键盘高度,界面上会出现多余的空白
- 一旦聊天界面上滑的总距离为键盘高度,则按照情况三处理
费尽唇舌,可能还是说不清楚,所以上代码吧😭:
|
1
2
3
4
5
6
7
8
9
10
11
12
13
14
15
16
17
18
19
20
21
22
23
24
25
26
27
28
29
30
31
32
33
34
35
36
37
38
39
40
41
42
43
44
45
46
47
|
// 刷新列表 func reloadTableView() { chatTableView.reloadData() chatTableView.layoutIfNeeded() // 得到最后一条消息在view中的位置 let lastIndex = IndexPath(row: msgList.count - 1, section: 0) let rectCellView = chatTableView.rectForRow(at: lastIndex) let rect = chatTableView.convert(rectCellView, to: chatTableView.superview) let cellDistance = rect.origin.y + rect.height let distance1 = SCREEN_HEIGHT - toolBarHeight - mKeyBoardHeight // 计算键盘可能遮住的消息的长度 let difY = cellDistance - distance1 if animateType == .animate3 { // 处于情况三时,由于之前的约束(聊天界面在输入栏上方),并且 // 是整个界面一起上滑,所以约束依旧成立,只需把聊天界面最后 // 一条消息滚动到聊天界面底部即可 scrollToBottom() } else if (animateType == .animate1 || animateType == .animate2) && difY > 0{ // 在情况一和情况二中,如果聊天界面上滑的总距离小于键盘高度,则可以继续上滑 // 一旦聊天界面上滑的总距离 lastDifY + difY 将要超过键盘高度,则上滑总距离设为键盘高度 // 此时执行 trans 动画 // 一旦聊天界面上滑总距离为键盘高度,则变为情况三的情况,把聊天界面最后 // 一条消息滚动到聊天界面底部即可 if lastDifY + difY < mKeyBoardHeight { lastDifY += difY let animate: (()->Void) = { self.chatTableView.transform = CGAffineTransform(translationX: 0, y: -self.lastDifY) } UIView.animate(withDuration: mKeyBoardAnimateDuration, delay: 0, options: animateOption, animations: animate) } else if lastDifY + difY > mKeyBoardHeight { if lastDifY != mKeyBoardHeight { let animate: (()->Void) = { self.chatTableView.transform = CGAffineTransform(translationX: 0, y: -self.mKeyBoardHeight) } UIView.animate(withDuration: mKeyBoardAnimateDuration, delay: 0, options: animateOption, animations: animate) lastDifY = mKeyBoardHeight } scrollToBottom() } } } |
再贴一下滚动最后一条消息到聊天界面底部的代码:
|
1
2
3
4
5
|
func scrollToBottom() { if msgList.count > 0 { chatTableView.scrollToRow(at: IndexPath(row: msgList.count - 1, section: 0), at: .bottom, animated: true) }} |
至此,就真的大功告成了
最后,附上源码地址:
github地址:https://github.com/Newbeeee/NbChatView-Swift
总结
开局只是想简单实现聊天效果,没想到因为强迫症和实现优秀的体验,在键盘效果上死磕了许久。前后共花了一天半时间,当真是茶饭不思,夜不能寐。中间尝试了无数滑动方法,在笔记本上画图模拟各种情况,最终做出来后,就像那啥之后,整个人瞬间疲软了,迫不及待地睡了一觉,但内心却是无比激动。
以上就是这篇文章的全部内容了,希望本文的内容对大家的学习或者工作能带来一定的帮助,如果有疑问大家可以留言交流,谢谢大家对服务器之家的支持。
原文链接:http://www.jianshu.com/p/9dfbd6492d56


