九宫格坐标计算
一、要求
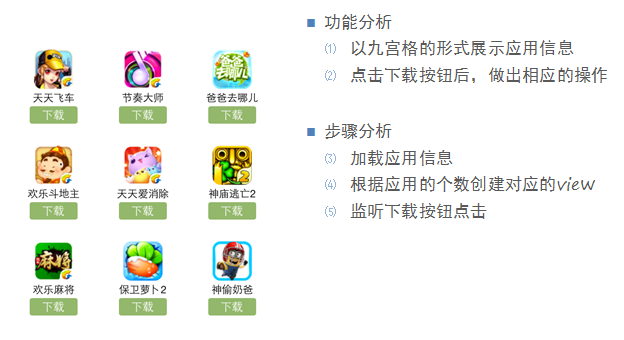
完成下面的布局
二、分析
寻找左边的规律,每一个uiview的x坐标和y坐标。

三、实现思路
(1)明确每一块用得是什么view
(2)明确每个view之间的父子关系,每个视图都只有一个父视图,拥有很多的子视图。
(3)可以先尝试逐个的添加格子,最后考虑使用for循环,完成所有uiview的创建
(4)加载app数据,根据数据长度创建对应个数的格子
(5)添加格子内部的子控件
(6)给内部的子控件装配数据
四、代码示例
//
// yyviewcontroller.m
// 九宫格练习
//
// created by 孔医己 on 14-5-22.
// copyright (c) 2014年 itcast. all rights reserved.
//
#import "yyviewcontroller.h"
@interface yyviewcontroller ()
@property(nonatomic,strong)nsarray *apps;
@end
@implementation yyviewcontroller
//1.加载数据
- (nsarray *)apps
{
if (!_apps) {
nsstring *path=[[nsbundle mainbundle]pathforresource:@"app.plist" oftype:nil];
_apps=[nsarray arraywithcontentsoffile:path];
}
return _apps;
}
- (void)viewdidload
{
[super viewdidload];
nslog(@"%d",self.apps.count);
//2.完成布局设计
//三列
int totalloc=3;
cgfloat appvieww=80;
cgfloat appviewh=90;
cgfloat margin=(self.view.frame.size.width-totalloc*appvieww)/(totalloc+1);
int count=self.apps.count;
for (int i=0; i<count; i++) {
int row=i/totalloc;//行号
//1/3=0,2/3=0,3/3=1;
int loc=i%totalloc;//列号
cgfloat appviewx=margin+(margin+appvieww)*loc;
cgfloat appviewy=margin+(margin+appviewh)*row;
//创建uiview控件
uiview *appview=[[uiview alloc]initwithframe:cgrectmake(appviewx, appviewy, appvieww, appviewh)];
//[appview setbackgroundcolor:[uicolor purplecolor]];
[self.view addsubview:appview];
//创建uiview控件中的子视图
uiimageview *appimageview=[[uiimageview alloc]initwithframe:cgrectmake(0, 0, 80, 50)];
uiimage *appimage=[uiimage imagenamed:self.apps[i][@"icon"]];
appimageview.image=appimage;
[appimageview setcontentmode:uiviewcontentmodescaleaspectfit];
// nslog(@"%@",self.apps[i][@"icon"]);
[appview addsubview:appimageview];
//创建文本标签
uilabel *applable=[[uilabel alloc]initwithframe:cgrectmake(0, 50, 80, 20)];
[applable settext:self.apps[i][@"name"]];
[applable settextalignment:nstextalignmentcenter];
[applable setfont:[uifont systemfontofsize:12.0]];
[appview addsubview:applable];
//创建按钮
uibutton *appbtn=[uibutton buttonwithtype:uibuttontypecustom];
appbtn.frame= cgrectmake(10, 70, 60, 20);
[appbtn setbackgroundimage:[uiimage imagenamed:@"buttongreen"] forstate:uicontrolstatenormal];
[appbtn setbackgroundimage:[uiimage imagenamed:@"buttongreen_highlighted"] forstate:uicontrolstatehighlighted];
[appbtn settitle:@"下载" forstate:uicontrolstatenormal];
appbtn.titlelabel.font=[uifont systemfontofsize:12.0];
[appview addsubview:appbtn];
[appbtn addtarget:self action:@selector(click) forcontrolevents:uicontroleventtouchupinside];
}
}
-(void)click
{
//动画标签
uilabel *animalab=[[uilabel alloc]initwithframe:cgrectmake(self.view.center.x-100, self.view.center.y+20, 200, 40)];
[animalab settext:@"下载成功"];
animalab.font=[uifont systemfontofsize:12.0];
[animalab setbackgroundcolor:[uicolor browncolor]];
[animalab setalpha:0];
[self.view addsubview:animalab];
// [uiview beginanimations:nil context:nil];
// [animalab setalpha:1];
// [uiview setanimationduration:4.0];
// [uiview commitanimations];
//执行完之后,还得把这给删除了,推荐使用block动画
[uiview animatewithduration:4.0 animations:^{
[animalab setalpha:1];
} completion:^(bool finished) {
//[self.view re];
}];
}
- (void)didreceivememorywarning
{
[super didreceivememorywarning];
}
@end
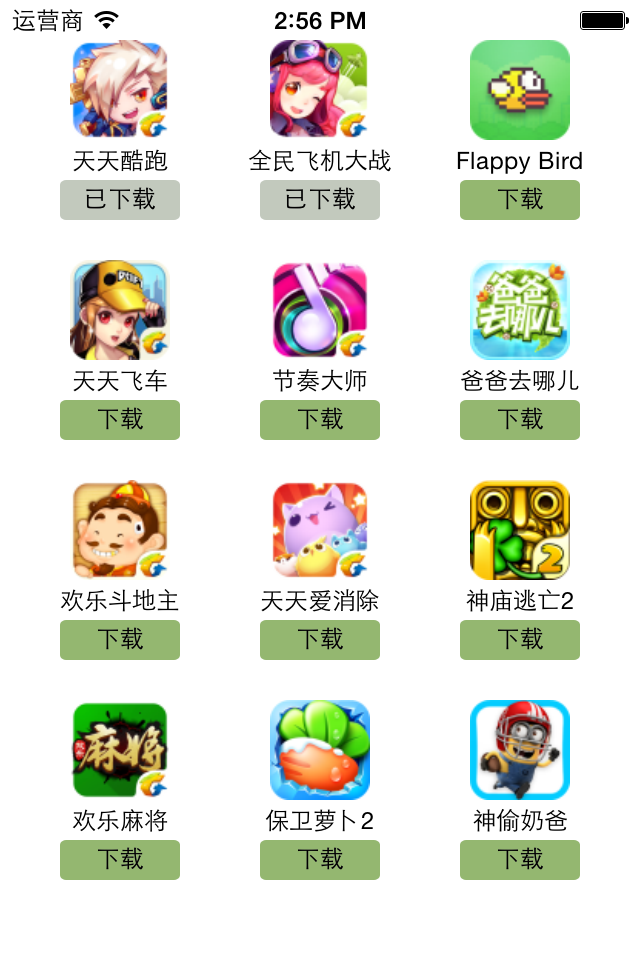
执行效果:
字典转模型
一、能完成功能的“问题代码”
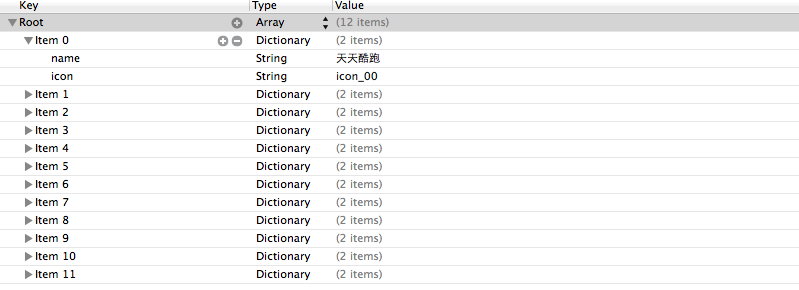
1.从plist中加载的数据
2.实现的代码
//
// lfviewcontroller.m
// 03-应用管理
//
// created by apple on 14-5-22.
// copyright (c) 2014年 heima. all rights reserved.
//
#import "lfviewcontroller.h"
@interface lfviewcontroller ()
@property (nonatomic, strong) nsarray *applist;
@end
@implementation lfviewcontroller
- (nsarray *)applist
{
if (!_applist) {
// 1. 从mainbundle加载
nsbundle *bundle = [nsbundle mainbundle];
nsstring *path = [bundle pathforresource:@"app.plist" oftype:nil];
_applist = [nsarray arraywithcontentsoffile:path];
nslog(@"%@", _applist);
}
return _applist;
}
- (void)viewdidload
{
[super viewdidload];
// 总共有3列
int totalcol = 3;
cgfloat vieww = 80;
cgfloat viewh = 90;
cgfloat marginx = (self.view.bounds.size.width - totalcol * vieww) / (totalcol + 1);
cgfloat marginy = 10;
cgfloat starty = 20;
for (int i = 0; i < self.applist.count; i++) {
int row = i / totalcol;
int col = i % totalcol;
cgfloat x = marginx + (vieww + marginx) * col;
cgfloat y = starty + marginy + (viewh + marginy) * row;
uiview *appview = [[uiview alloc] initwithframe:cgrectmake(x, y, vieww, viewh)];
[self.view addsubview:appview];
// 创建appview内部的细节
// 0> 读取数组中的字典
nsdictionary *dict = self.applist[i];
// 1> uiimageview
uiimageview *imageview = [[uiimageview alloc] initwithframe:cgrectmake(0, 0, vieww, 50)];
imageview.image = [uiimage imagenamed:dict[@"icon"]];
imageview.contentmode = uiviewcontentmodescaleaspectfit;
[appview addsubview:imageview];
// 2> uilabel
uilabel *label = [[uilabel alloc] initwithframe:cgrectmake(0, imageview.bounds.size.height, vieww, 20)];
// 设置文字
label.text = dict[@"name"];
label.font = [uifont systemfontofsize:12.0];
label.textalignment = nstextalignmentcenter;
[appview addsubview:label];
// 3> uibutton
// uibuttontypecustom和[[uibutton alloc] init]是等价的
uibutton *button = [uibutton buttonwithtype:uibuttontypecustom];
button.frame = cgrectmake(15, 70, vieww - 30, 20);
[button settitle:@"下载" forstate:uicontrolstatenormal];
// *** 不能使用如下代码直接设置title
// button.titlelabel.text = @"下载";
// @property中readonly表示不允许修改对象的指针地址,但是可以修改对象的属性
button.titlelabel.font= [uifont systemfontofsize:14.0];
[button setbackgroundimage:[uiimage imagenamed:@"buttongreen"] forstate:uicontrolstatenormal];
[button setbackgroundimage:[uiimage imagenamed:@"buttongreen_highlighted"] forstate:uicontrolstatehighlighted];
[appview addsubview:button];
}
}
@end
3.实现效果

4.代码问题
在上述代码的第62,69行,我们是直接通过字典的键名获取plist中的数据信息,在viewcontroller中需要直接和数据打交道,如果需要多次使用可能会因为不小心把键名写错,而程序并不报错。鉴于此,可以考虑把字典数据转换成一个模型,把数据封装到一个模型中去,让viewcontroller不再直接和数据打交道,而是和模型交互。
一般情况下,设置数据和取出数据都使用“字符串类型的key”,编写这些key时,编辑器没有智能提示,需要手敲。如:
dict[@"name"] = @"jack";
nsstring *name = dict[@"name"];
手敲字符串key,key容易写错
key如果写错了,编译器不会有任何警告和报错,造成设错数据或者取错数据
二、字典转模型
1.字典转模型介绍
示意图:
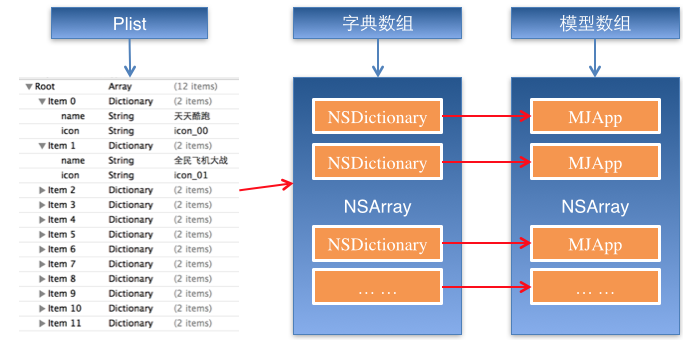
字典转模型的好处:
(1)降低代码的耦合度
(2)所有字典转模型部分的代码统一集中在一处处理,降低代码出错的几率
(3)在程序中直接使用模型的属性操作,提高编码效率
(4)调用方不用关心模型内部的任何处理细节
字典转模型的注意点:
模型应该提供一个可以传入字典参数的构造方法
- (instancetype)initwithdict:(nsdictionary *)dict;
+ (instancetype)xxxwithdict:(nsdictionary *)dict;
提示:在模型中合理地使用只读属性,可以进一步降低代码的耦合度。
2.代码示例(一)
新建一个类,用来作为数据模型
viewcontroller.m文件代码(字典转模型)
#import "lfviewcontroller.h"
#import "lfappinfo.h"
@interface lfviewcontroller ()
@property (nonatomic, strong) nsarray *applist;
@end
@implementation lfviewcontroller
// 字典转模型
- (nsarray *)applist
{
if (!_applist) {
// 1. 从mainbundle加载
nsbundle *bundle = [nsbundle mainbundle];
nsstring *path = [bundle pathforresource:@"app.plist" oftype:nil];
// _applist = [nsarray arraywithcontentsoffile:path];
nsarray *array = [nsarray arraywithcontentsoffile:path];
// 将数组转换成模型,意味着self.applist中存储的是lfappinfo对象
// 1. 遍历数组,将数组中的字典依次转换成appinfo对象,添加到一个临时数组
// 2. self.applist = 临时数组
nsmutablearray *arraym = [nsmutablearray array];
for (nsdictionary *dict in array) {
//用字典来实例化对象的工厂方法
[arraym addobject:[lfappinfo appinfowithdict:dict]];
}
_applist = arraym;
}
return _applist;
}
- (void)viewdidload
{
[super viewdidload];
// 总共有3列
int totalcol = 3;
cgfloat vieww = 80;
cgfloat viewh = 90;
cgfloat marginx = (self.view.bounds.size.width - totalcol * vieww) / (totalcol + 1);
cgfloat marginy = 10;
cgfloat starty = 20;
for (int i = 0; i < self.applist.count; i++) {
int row = i / totalcol;
int col = i % totalcol;
cgfloat x = marginx + (vieww + marginx) * col;
cgfloat y = starty + marginy + (viewh + marginy) * row;
uiview *appview = [[uiview alloc] initwithframe:cgrectmake(x, y, vieww, viewh)];
[self.view addsubview:appview];
// 创建appview内部的细节
// 0> 读取数组中的appinfo
// nsdictionary *dict = self.applist[i];
lfappinfo *appinfo = self.applist[i];
// 1> uiimageview
uiimageview *imageview = [[uiimageview alloc] initwithframe:cgrectmake(0, 0, vieww, 50)];
imageview.image = appinfo.image;
imageview.contentmode = uiviewcontentmodescaleaspectfit;
[appview addsubview:imageview];
// 2> uilabel
uilabel *label = [[uilabel alloc] initwithframe:cgrectmake(0, imageview.bounds.size.height, vieww, 20)];
// 设置文字
label.text = appinfo.name;
label.font = [uifont systemfontofsize:12.0];
label.textalignment = nstextalignmentcenter;
[appview addsubview:label];
// 3> uibutton
// uibuttontypecustom和[[uibutton alloc] init]是等价的
uibutton *button = [uibutton buttonwithtype:uibuttontypecustom];
button.frame = cgrectmake(15, 70, vieww - 30, 20);
[button settitle:@"下载" forstate:uicontrolstatenormal];
button.titlelabel.font= [uifont systemfontofsize:14.0];
[button setbackgroundimage:[uiimage imagenamed:@"buttongreen"] forstate:uicontrolstatenormal];
[button setbackgroundimage:[uiimage imagenamed:@"buttongreen_highlighted"] forstate:uicontrolstatehighlighted];
[appview addsubview:button];
button.tag = i;
[button addtarget:self action:@selector(downloadclick:) forcontrolevents:uicontroleventtouchupinside];
}
}
- (void)downloadclick:(uibutton *)button
{
nslog(@"%d", button.tag);
// 实例化一个uilabel显示在视图上,提示用户下载完成
uilabel *label = [[uilabel alloc] initwithframe:cgrectmake(80, 400, 160, 40)];
label.textalignment = nstextalignmentcenter;
label.backgroundcolor = [uicolor lightgraycolor];
lfappinfo *appinfo = self.applist[button.tag];
label.text = [nsstring stringwithformat:@"下载%@完成", appinfo.name];
label.font = [uifont systemfontofsize:13.0];
label.alpha = 1.0;
[self.view addsubview:label];
// 动画效果
// 动画效果完成之后,将label从视图中删除
// 首尾式动画,只能做动画,要处理完成后的操作不方便
// [uiview beginanimations:nil context:nil];
// [uiview setanimationduration:1.0];
// label.alpha = 1.0;
// [uiview commitanimations];
// block动画比首尾式动画简单,而且能够控制动画结束后的操作
// 在ios中,基本都使用首尾式动画
[uiview animatewithduration:2.0 animations:^{
label.alpha = 0.0;
} completion:^(bool finished) {
// 删除label
[label removefromsuperview];
}];
}
@end
模型.h文件代码
#import <foundation/foundation.h>
@interface lfappinfo : nsobject
// 应用程序名称
@property (nonatomic, copy) nsstring *name;
// 应用程序图标名称
@property (nonatomic, copy) nsstring *icon;
// 图像
// 定义属性时,会生成getter&setter方法,还会生成一个带下划线的成员变量
// 如果是readonly属性,只会生成getter方法,同时没有成员变量
@property (nonatomic, strong, readonly) uiimage *image;
// instancetype会让编译器检查实例化对象的准确类型
// instancetype只能用于返回类型,不能当做参数使用
- (instancetype)initwithdict:(nsdictionary *)dict;
/** 工厂方法 */
+ (instancetype)appinfowithdict:(nsdictionary *)dict;
@end
模型.m文件数据处理代码
#import "lfappinfo.h"
@interface lfappinfo()
{
uiimage *_imageabc;
}
@end
@implementation lfappinfo
- (instancetype)initwithdict:(nsdictionary *)dict
{
self = [super init];
if (self) {
self.name = dict[@"name"];
self.icon = dict[@"icon"];
}
return self;
}
+ (instancetype)appinfowithdict:(nsdictionary *)dict
{
return [[self alloc] initwithdict:dict];
}
- (uiimage *)image
{
if (!_imageabc) {
_imageabc = [uiimage imagenamed:self.icon];
}
return _imageabc;
}
@end
3.代码示例(二)
数据信息:plist文件

字典转模型(初步)
模型.h文件
#import <foundation/foundation.h>
@interface lfquestion : nsobject
@property (nonatomic, copy) nsstring *answer;
@property (nonatomic, copy) nsstring *title;
@property (nonatomic, copy) nsstring *icon;
@property (nonatomic, strong) nsarray *options;
@property (nonatomic, strong) uiimage *image;
/** 用字典实例化对象的成员方法 */
- (instancetype)initwithdict:(nsdictionary *)dict;
/** 用字典实例化对象的类方法,又称工厂方法 */
+ (instancetype)questionwithdict:(nsdictionary *)dict;
@end
模型.m文件
#import "lfquestion.h"
@implementation lfquestion
+ (instancetype)questionwithdict:(nsdictionary *)dict
{
return [[self alloc] initwithdict:dict];
}
- (instancetype)initwithdict:(nsdictionary *)dict
{
self = [super init];
if (self) {
self.answer = dict[@"answer"];
self.icon = dict[@"icon"];
self.title = dict[@"title"];
self.options = dict[@"options"];
[self setvaluesforkeyswithdictionary:dict];
}
return self;
}
viewcontroller.m文件中的数据处理
- (nsarray *)questions
{
if (!_questions) {
nsarray *array = [nsarray arraywithcontentsoffile:[[nsbundle mainbundle] pathforresource:@"questions.plist" oftype:nil]];
nsmutablearray *arraym = [nsmutablearray array];
for (nsdictionary *dict in array) {
[arraym addobject:[lfquestion questionwithdict:dict]];
}
_questions=arraym;
}
return _questions;
}
字典转模型(优化)
上面代码可以做进一步的优化,从plist文件中读取数据是可以交给模型去处理的,优化后代码如下:
模型.h文件
#import <foundation/foundation.h>
@interface lfquestion : nsobject
@property (nonatomic, copy) nsstring *answer;
@property (nonatomic, copy) nsstring *title;
@property (nonatomic, copy) nsstring *icon;
@property (nonatomic, strong) nsarray *options;
@property (nonatomic, strong) uiimage *image;
/** 用字典实例化对象的成员方法 */
- (instancetype)initwithdict:(nsdictionary *)dict;
/** 用字典实例化对象的类方法,又称工厂方法 */
+ (instancetype)questionwithdict:(nsdictionary *)dict;
/** 从plist加载对象数组 */
+ (nsarray *)questions;
@end
模型.m文件
#import "lfquestion.h"
@implementation lfquestion
+ (instancetype)questionwithdict:(nsdictionary *)dict
{
return [[self alloc] initwithdict:dict];
}
- (instancetype)initwithdict:(nsdictionary *)dict
{
self = [super init];
if (self) {
self.answer = dict[@"answer"];
self.icon = dict[@"icon"];
self.title = dict[@"title"];
self.options = dict[@"options"];
[self setvaluesforkeyswithdictionary:dict];
}
return self;
}
+ (nsarray *)questions
{
nsarray *array = [nsarray arraywithcontentsoffile:[[nsbundle mainbundle] pathforresource:@"questions.plist" oftype:nil]];
nsmutablearray *arraym = [nsmutablearray array];
for (nsdictionary *dict in array) {
[arraym addobject:[lfquestion questionwithdict:dict]];
}
return arraym;
}
@end
viewcontroller.m文件中的数据处理代码部分
- (nsarray *)questions
{
if (!_questions) {
_questions = [lfquestion questions];
}
return _questions;
}
补充内容:(kvc)的使用
(1)在模型内部的数据处理部分,可以使用键值编码来进行处理
- (instancetype)initwithdict:(nsdictionary *)dict
{
self = [super init];
if (self) {
// self.answer = dict[@"answer"];
// self.icon = dict[@"icon"];
// self.title = dict[@"title"];
// self.options = dict[@"options"];
// kvc (key value coding)键值编码
// cocoa 的大招,允许间接修改对象的属性值
// 第一个参数是字典的数值
// 第二个参数是类的属性
[self setvalue:dict[@"answer"] forkeypath:@"answer"];
[self setvalue:dict[@"icon"] forkeypath:@"icon"];
[self setvalue:dict[@"title"] forkeypath:@"title"];
[self setvalue:dict[@"options"] forkeypath:@"options"];
}
return self;
}
(2)setvaluesforkeys的使用
上述数据操作细节,可以直接通过setvaluesforkeys方法来完成。
- (instancetype)initwithdict:(nsdictionary *)dict
{
self = [super init];
if (self) {
// 使用setvaluesforkeys要求类的属性必须在字典中存在,可以比字典中的键值多,但是不能少。
[self setvaluesforkeyswithdictionary:dict];
}
return self;
}
三、补充说明
1.readonly属性
(1)@property中readonly表示不允许修改对象的指针地址,但是可以修改对象的属性。
(2)通常使用@property关键字定义属性时,会生成getter&setter方法,还会生成一个带下划线的成员变量。
(3)如果是readonly属性,只会生成getter方法,不会生成带下划线的成员变量.
2.instancetype类型
(1)instancetype会让编译器检查实例化对象的准确类型
(2)instancetype只能用于返回类型,不能当做参数使用
3.instancetype & id的比较
(1) instancetype在类型表示上,跟id一样,可以表示任何对象类型
(2) instancetype只能用在返回值类型上,不能像id一样用在参数类型上
(3) instancetype比id多一个好处:编译器会检测instancetype的真实类型

