本文实例为大家分享了springmvc maven搭建web项目的具体步骤,供大家参考,具体内容如下
1、创建一个maven project 为spring1
2、进行项目的配置:默认的java 1.5 在properties中选择project facts项目进行配置,反选web之后修改java环境为1.8.修改之后如下图:

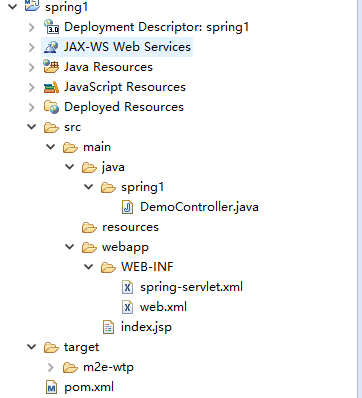
3. 配置好的工作目录如下:

4 修改pom.xml文件
增加两个jar包:servlet和spring webmvc
pom.xml如下:
|
1
|
|
2
3
4
5
6
7
8
9
10
11
12
13
14
15
|
<!doctype web-app public"-//sun microsystems, inc.//dtd web application 2.3//en""http://java.sun.com/dtd/web-app_2_3.dtd" ><web-app><servlet><servlet-name>spring</servlet-name><servlet-class>org.springframework.web.servlet.dispatcherservlet</servlet-class></servlet><servlet-mapping><servlet-name>spring</servlet-name><url-pattern>/</url-pattern></servlet-mapping></web-app> |
4. 默认的配置文件是spring-servlet.xml ,在/web-inf下创建配置文件,内容如下:
|
1
|
|
2
3
4
5
6
7
8
9
10
11
12
13
14
15
16
17
18
19
20
21
22
23
24
25
26
27
28
29
30
|
<?xml version="1.0" encoding="utf-8"?><beans xmlns="http://www.springframework.org/schema/beans"xmlns:xsi="http://www.w3.org/2001/xmlschema-instance" xmlns:context="http://www.springframework.org/schema/context"xmlns:tx="http://www.springframework.org/schema/tx" xmlns:mvc="http://www.springframework.org/schema/mvc"xsi:schemalocation="http://www.springframework.org/schema/beans http://www.springframework.org/schema/beans/spring-beans.xsd http://www.springframework.org/schema/context http://www.springframework.org/schema/context/spring-context.xsd http://www.springframework.org/schema/tx http://www.springframework.org/schema/tx/spring-tx.xsdhttp://www.springframework.org/schema/mvchttp://www.springframework.org/schema/mvc/spring-mvc.xsd"><!-- 配置扫描的包 --><context:component-scan base-package="spring1.*" /><!-- 注册handlermapper、handleradapter两个映射类 --><mvc:annotation-driven /><!-- 访问静态资源 --><mvc:default-servlet-handler /><!-- 视图解析器 --><bean><property name="prefix" value="/web-inf/"></property><property name="suffix" value=".jsp"></property></bean></beans> |
注:在这个默认的配置过程中 程序会扫描spring1包中的所有的controller
5、 在src/main/java创建controller
|
1
|
|
2
3
4
5
6
7
8
9
10
11
12
13
|
package spring1;import org.springframework.stereotype.controller;import org.springframework.web.bind.annotation.requestmapping;@controllerpublic class democontroller {@requestmapping("/index")public string index(){return "index";}} |
6、 在webapp目录下创建index.jsp.
|
1
|
|
2
3
4
5
|
<html><body><h2>hello world!</h2></body></html> |
7、 部署项目到tomcat上,部署的内容如下:

8、启动tomcat 在浏览器中输入:http://localhost:8080/spring1/

总结:调试了好久,终于调试出来信息啦 小小激动一下啊
以上就是本文的全部内容,希望对大家的学习有所帮助,也希望大家多多支持服务器之家。


