一、什么是 Spring MVC
Spring MVC 属于 SpringFrameWork 的后续产品,已经融合在 Spring Web Flow 里面,是一个强大灵活的 Web 框架。Spring MVC 提供了一个 DispatcherServlet 作为前端控制器来分配请求。通过策略接口,Spring 框架是高度可配置的。Spring MVC 还包含多种视图技术,如 Java Server Pages(JSP)、Velocity、Tiles、iText 和 POI 等。Spring MVC 分离了控制器、模型对象、分派器以及处理程序对象的角色,这种分离让它们更容易进行定制。
Spring MVC 框架主要由 DispatcherServlet、处理器映射器、处理器适配器、处理器(控制器)、视图解析器、视图组成。
二、Spring MVC 执行流程
Spring MVC 高层次的请求处理工作流程如下(图来自 Spring 官网):
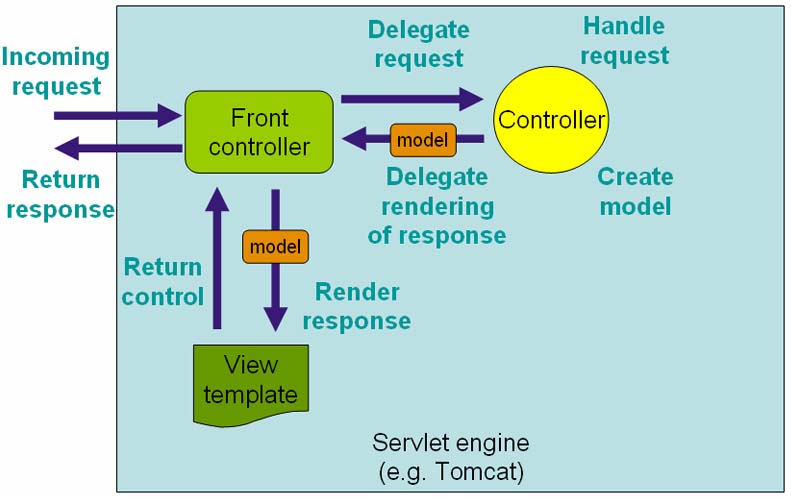
细分后,Spring MVC 执行流程如下,共包括八步:
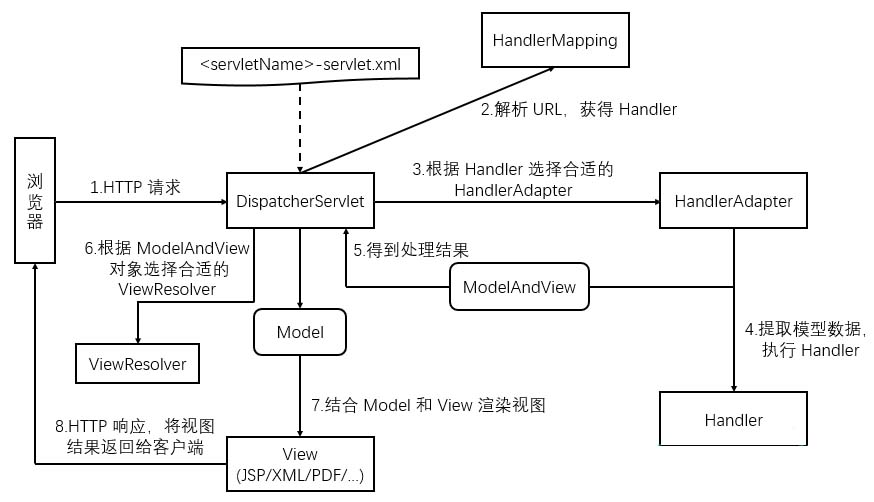
Spring MVC 相关接口解释:
(1)DispatcherServlet
前端控制器,所有的请求都有经过它来统一分发,请求会被分发给对应的 Handler。
(2)HandlerMapping(处理器映射器)
解析请求链接,然后根据请求链接找到执行这个请求的类(HandlerMapping 所说的 handler)。
(3)HandlerAdapter(处理器适配器)
调用具体的方法对用户发来的请求来进行处理。
(4)Controller
Controller 将处理用户请求,Controller 处理完用户请求,则返回 ModelAndView 对象给 DispatcherServlet 前端控制器。
从宏观角度考虑,DispatcherServlet 是整个 Web 应用的控制器;从微观考虑,Controller 是单个 Http 请求处理过程中的控制器。
(5)ViewResolver(视图解析器)
解析 MdoelAndView,将 MdoelAndView 中的逻辑视图名变为一个真正的 View 对象,并将 MdoelAndView 中的 Model 取出。
前面简单的介绍了 Spring MVC ,下面以简单的用户注册为例,来了解 Spring MVC 的一些基本原理和运用。
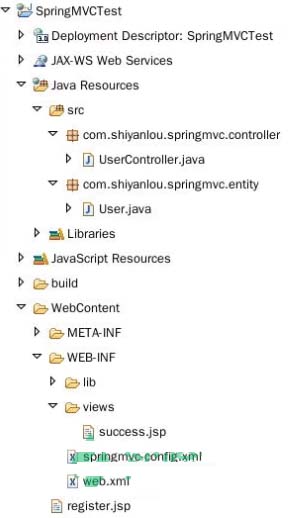
三、项目文件结构
四、开发准备
Spring MVC 的相关文件放在实验楼的服务器中,请打开实验环境桌面上的 Xfce ,输入下面的代码获取:
wget http://labfile.oss.aliyuncs.com/courses/810/Spring-jars.zip
输入下面的命令解压 .zip 文件:
unzip Spring-jars.zip
五、实验步骤
1 新建项目工程
在 Eclipse 里新建一个 Web 工程(Dynamic Web Project),命名为 SpringMVCTest 。
注意勾选 “自动生成 web.xml” 这个选项。
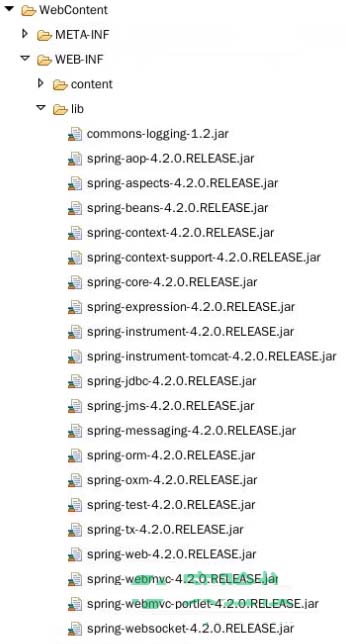
将 /home/shiyanlou/Spring-jars/ 路径下的全部 jar 包拷贝到项目的 WebContent/WEB-INF/lib/ 目录下。
2 配置 web.xml 文件
修改 web.xml 文件内容如下:
|
1
2
3
4
5
6
7
8
9
10
11
12
13
14
15
16
17
18
19
20
21
22
23
24
25
26
27
28
29
30
|
<?xml version="1.0" encoding="UTF-8"?><web-app xmlns:xsi="http://www.w3.org/2001/XMLSchema-instance" xmlns="http://java.sun.com/xml/ns/javaee" xmlns:web="http://java.sun.com/xml/ns/javaee/web-app_2_5.xsd" xsi:schemaLocation="http://java.sun.com/xml/ns/javaee http://java.sun.com/xml/ns/javaee/web-app_3_0.xsd" id="WebApp_ID" version="3.0"> <display-name>SpringMVCTest</display-name> <!-- 配置 Spring MVC DispatchcerServlet 前端控制器 --> <servlet> <servlet-name>springmvc</servlet-name> <servlet-class>org.springframework.web.servlet.DispatcherServlet</servlet-class> <init-param> <!-- contextConfigLocation 是参数名称,该参数的值包含 Spring MVC 的配置文件路径 --> <param-name>contextConfigLocation</param-name> <param-value>/WEB-INF/springmvc-config.xml</param-value> </init-param> <!-- 在 Web 应用启动时立即加载 Servlet --> <load-on-startup>1</load-on-startup> </servlet> <!-- Servlet 映射声明 --> <servlet-mapping> <servlet-name>springmvc</servlet-name> <!-- 监听当前域的所有请求 --> <url-pattern>/</url-pattern> </servlet-mapping> <!-- 添加 register.jsp 为首页 --> <welcome-file-list> <welcome-file>register.jsp</welcome-file> </welcome-file-list></web-app> |
在 web.xml 中配置了 DispatchcerServlet,DispatchcerServlet 加载时需要一个 Spring MVC 的配置文件,默认会去 WEB-INF 下查找对应的 [servlet-name]-servlet.xml 文件,如本例中默认查找的是 springmvc-servlet.xml。
Spring MVC 的配置文件可以放在任何地方,用 servlet 的子元素 init-param 描述即可,见上述示例代码,这时 DispatchcerServlet 就会去查找 /WEB-INF/springmvc-config.xml。
3 springmvc-config.xml 文件
在 WebContent/WEB-INF/ 目录下新建 Spring MVC 配置文件 springmvc-config.xml,配置 Spring MVC 的 Controller,添加如下代码:
|
1
2
3
4
5
6
7
8
9
10
11
12
13
14
15
16
17
18
19
20
21
22
|
<?xml version="1.0" encoding="UTF-8"?><beans xmlns="http://www.springframework.org/schema/beans" xmlns:xsi="http://www.w3.org/2001/XMLSchema-instance" xmlns:context="http://www.springframework.org/schema/context" xmlns:mvc="http://www.springframework.org/schema/mvc" xsi:schemaLocation="http://www.springframework.org/schema/beans http://www.springframework.org/schema/beans/spring-beans-4.2.xsd http://www.springframework.org/schema/context http://www.springframework.org/schema/context/spring-context-4.2.xsd http://www.springframework.org/schema/mvc http://www.springframework.org/schema/mvc/spring-mvc-4.2.xsd"> <context:annotation-config /> <!-- 配置自动扫描的包,完成 Bean 的创建和自动依赖注入的功能 --> <context:component-scan base-package="com.shiyanlou.springmvc.controller" /> <!-- 这两个类用来配置 annotation 类型的处理器映射器和处理器适配器 --> <bean class="org.springframework.web.servlet.mvc.annotation.DefaultAnnotationHandlerMapping" /> <bean class="org.springframework.web.servlet.mvc.annotation.AnnotationMethodHandlerAdapter" /> <!-- 配置视图解析器 --> <bean class="org.springframework.web.servlet.view.InternalResourceViewResolver"> <property name="prefix" value="/WEB-INF/views/"></property> <property name="suffix" value=".jsp"></property> </bean></beans> |
上述配置文件中, Spring 使用了扫描机制查找应用程序所有基于注解的控制器类,在本例中,扫描的是 com.shiyanlou.springmvc.controller 包及其子包下的所有 Java 文件。
同时配置了 annatation 类型的处理器映射器 DefaultAnnotationHandlerMapping 和处理器适配器 AnnotationMethodHandlerAdapter,DefaultAnnotationHandlerMapping 根据请求查找映射,AnnotationMethodHandlerAdapter 完成对控制器类的 @RequestMapping 标注方法(下面会介绍)的调用。
最后配置的视图解析器 InternalResourceViewResolver 用来解析视图,将 View 呈现给用户。视图解析器中配置的 prefix表示视图的前缀, suffix表示视图的后缀。
注:在 Spring4.0 之后,如果不配置处理映射器、处理器适配器和视图解析器,会使用默认的。
4 实体类 User
在项目目录 /Java Resources/src 的包 com.shiyanlou.springmvc.entity 下新建类 User.java,包含 id、username、password 和 age 属性,代码如下:
|
1
2
3
4
5
6
7
8
9
10
11
12
13
14
15
16
17
18
19
20
21
22
23
24
25
26
27
28
29
30
31
32
33
34
35
36
37
38
39
40
41
42
43
44
45
|
package com.shiyanlou.springmvc.entity;import java.io.Serializable;public class User implements Serializable { private static final long serialVersionUID = 1L; private Integer id; private String username; private String password; private Integer age; public Integer getId() { return id; } public void setId(Integer id) { this.id = id; } public String getUsername() { return username; } public void setUsername(String username) { this.username = username; } public String getPassword() { return password; } public void setPassword(String password) { this.password = password; } public Integer getAge() { return age; } public void setAge(Integer age) { this.age = age; }} |
5 Controller 类的实现
在包 com.shiyanlou.springmvc.controller 下新建 Controller 类 UserController.java,具体解释注释已经给出,代码如下:
|
1
2
3
4
5
6
7
8
9
10
11
12
13
14
15
16
17
18
19
20
21
22
23
24
25
26
27
28
|
package com.shiyanlou.springmvc.controller;import org.springframework.stereotype.Controller;import org.springframework.ui.Model;import org.springframework.web.bind.annotation.ModelAttribute;import org.springframework.web.bind.annotation.RequestMapping;import com.shiyanlou.springmvc.entity.User;/** * UserController 是一个基于注解的控制器 * 可以同时处理多个请求动作 */@Controllerpublic class UserController { /** * RequestMapping 用来映射一个请求和请求的方法 * value="/register" 表示请求由 register 方法进行处理 */ @RequestMapping(value="/register") public String Register(@ModelAttribute("form") User user, Model model) { // user:视图层传给控制层的表单对象;model:控制层返回给视图层的对象 // 在 model 中添加一个名为 "user" 的 user 对象 model.addAttribute("user", user); // 返回一个字符串 " success" 作为视图名称 return "success"; }} |
6 JSP 页面
(1)register.jsp
在 WebContent 目录下新建一个 JSP 页面命名为 register.jsp,代码如下:
|
1
2
3
4
5
6
7
8
9
10
11
12
13
14
15
16
17
18
19
20
21
22
23
24
25
26
27
28
29
30
31
32
|
<%@ page language="java" contentType="text/html; charset=UTF-8" pageEncoding="UTF-8"%><!DOCTYPE html PUBLIC "-//W3C//DTD HTML 4.01 Transitional//EN" "http://www.w3.org/TR/html4/loose.dtd"><html><head><meta http-equiv="Content-Type" content="text/html; charset=UTF-8"><title>register page</title></head><body> <form action="register" method="post"> <h5>User registration</h5> <p> <label>name </label> <input type="text" id="username" name="username" tabindex="1"> </p> <p> <label>password </label> <input type="text" id="password" name="password" tabindex="2"> </p> <p> <label>age </label> <input type="text" id="age" name="age" tabindex="3"> </p> <p id="buttons"> <input id="submit" type="submit" tabindex="4" value="register"> <input id="reset" type="reset" tabindex="5" value="reset"> </p> </form></body></html> |
(2)success.jsp
在 WebContent/WEB-INF 目录下新建文件夹 views,并在该路径下新建一个 JSP 页面命名为 success.jsp,代码如下:
|
1
2
3
4
5
6
7
8
9
10
11
12
13
14
15
|
<%@ page language="java" contentType="text/html; charset=UTF-8" pageEncoding="UTF-8"%><!DOCTYPE html PUBLIC "-//W3C//DTD HTML 4.01 Transitional//EN" "http://www.w3.org/TR/html4/loose.dtd"><html><head><meta http-equiv="Content-Type" content="text/html; charset=UTF-8"><title>success page</title></head><body> <h5>login was successful</h5> <p> name:${requestScope.user.username}<br /> password:${requestScope.user.password}<br /> age:${requestScope.user.age}<br /> </p></body></html> |
7 运行测试
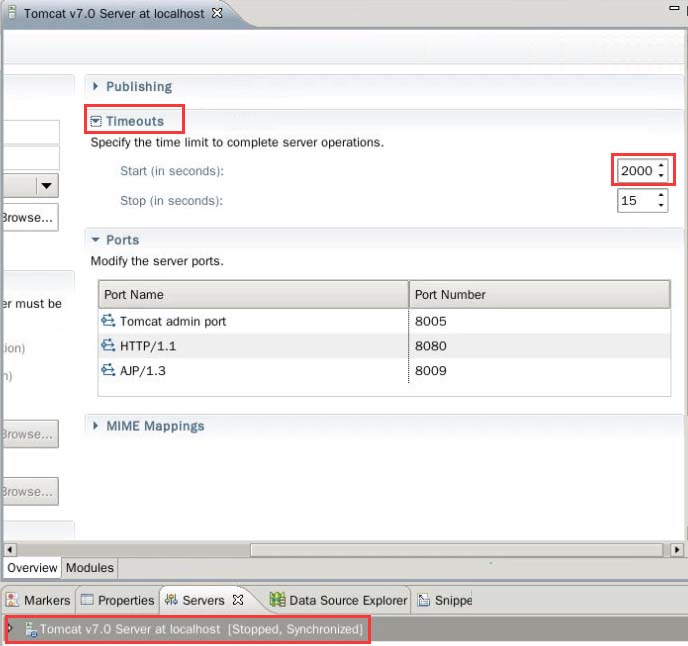
注:由于在线环境的资源问题,这里启动 tomcat 比较慢,需要大家耐心等待几分钟。如果遇到 Tomcat 启动超时的问题,请按照下图的方法延长 Tomcat 的启动时间。
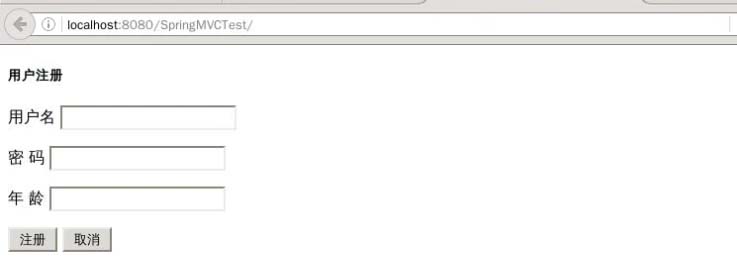
右击 SpringMVCTest 工程,Run As->Run on Server,保持默认选项不变,点击 Finish,一会儿即可看到结果:
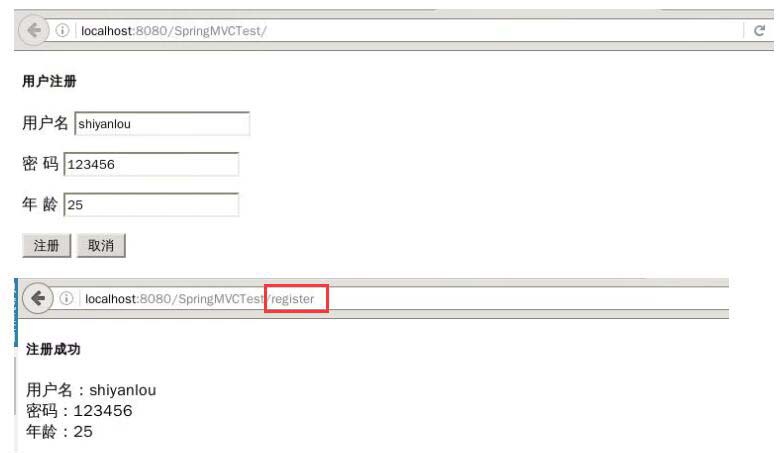
输入注册信息,点击注册按钮,结果如下:
以上这篇基于Spring MVC 简介及入门小例子(推荐)就是小编分享给大家的全部内容了,希望能给大家一个参考,也希望大家多多支持服务器之家。


