很多hadoop初学者估计都我一样,由于没有足够的机器资源,只能在虚拟机里弄一个linux安装hadoop的伪分布,然后在host机上win7里使用eclipse或Intellj idea来写代码测试,那么问题来了,win7下的eclipse或intellij idea如何远程提交map/reduce任务到远程hadoop,并断点调试?
一、准备工作
1.1 在win7中,找一个目录,解压hadoop-2.6.0,本文中是D:\yangjm\Code\study\hadoop\hadoop-2.6.0 (以下用$HADOOP_HOME表示)
1.2 在win7中添加几个环境变量
HADOOP_HOME=D:\yangjm\Code\study\hadoop\hadoop-2.6.0
HADOOP_BIN_PATH=%HADOOP_HOME%\bin
HADOOP_PREFIX=D:\yangjm\Code\study\hadoop\hadoop-2.6.0
另外,PATH变量在最后追加;%HADOOP_HOME%\bin
二、eclipse远程调试
1.1 下载hadoop-eclipse-plugin插件
hadoop-eclipse-plugin是一个专门用于eclipse的hadoop插件,可以直接在IDE环境中查看hdfs的目录和文件内容。其源代码托管于github上,官网地址是 https://github.com/winghc/hadoop2x-eclipse-plugin
有兴趣的可以自己下载源码编译,百度一下N多文章,但如果只是使用 https://github.com/winghc/hadoop2x-eclipse-plugin/tree/master/release%20这里已经提供了各种编译好的版本,直接用就行,将下载后的hadoop-eclipse-plugin-2.6.0.jar复制到eclipse/plugins目录下,然后重启eclipse就完事了
1.2 下载windows64位平台的hadoop2.6插件包(hadoop.dll,winutils.exe)
在hadoop2.6.0源码的hadoop-common-project\hadoop-common\src\main\winutils下,有一个vs.net工程,编译这个工程可以得到这一堆文件,输出的文件中,
hadoop.dll、winutils.exe 这二个最有用,将winutils.exe复制到$HADOOP_HOME\bin目录,将hadoop.dll复制到%windir%\system32目录 (主要是防止插件报各种莫名错误,比如空对象引用啥的)
注:如果不想编译,可直接下载编译好的文件 hadoop2.6(x64)V0.2.rar
1.3 配置hadoop-eclipse-plugin插件
启动eclipse,windows->show view->other
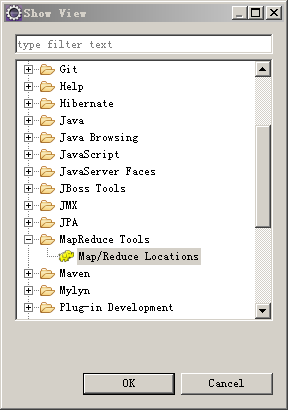
window->preferences->hadoop map/reduce 指定win7上的hadoop根目录(即:$HADOOP_HOME)

然后在Map/Reduce Locations 面板中,点击小象图标

添加一个Location
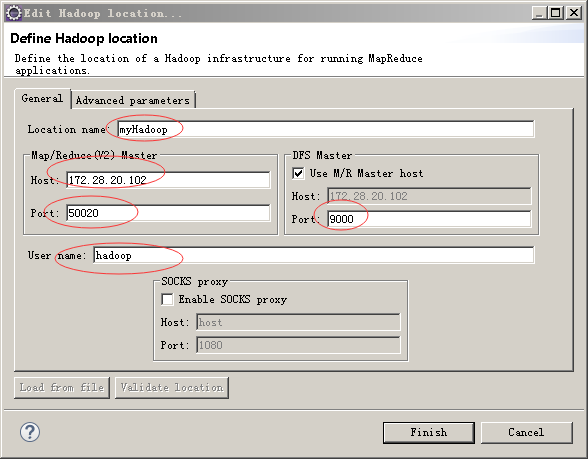
这个界面灰常重要,解释一下几个参数:
Location name 这里就是起个名字,随便起
Map/Reduce(V2) Master Host 这里就是虚拟机里hadoop master对应的IP地址,下面的端口对应 hdfs-site.xml里dfs.datanode.ipc.address属性所指定的端口
DFS Master Port: 这里的端口,对应core-site.xml里fs.defaultFS所指定的端口
最后的user name要跟虚拟机里运行hadoop的用户名一致,我是用hadoop身份安装运行hadoop 2.6.0的,所以这里填写hadoop,如果你是用root安装的,相应的改成root
这些参数指定好以后,点击Finish,eclipse就知道如何去连接hadoop了,一切顺利的话,在Project Explorer面板中,就能看到hdfs里的目录和文件了
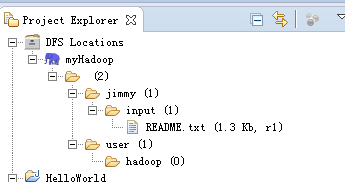
可以在文件上右击,选择删除试下,通常第一次是不成功的,会提示一堆东西,大意是权限不足之类,原因是当前的win7登录用户不是虚拟机里hadoop的运行用户,解决办法有很多,比如你可以在win7上新建一个hadoop的管理员用户,然后切换成hadoop登录win7,再使用eclipse开发,但是这样太烦,最简单的办法:
hdfs-site.xml里添加
|
1
2
3
4
|
<property> <name>dfs.permissions</name> <value>false</value> </property> |
然后在虚拟机里,运行hadoop dfsadmin -safemode leave
保险起见,再来一个 hadoop fs -chmod 777 /
总而言之,就是彻底把hadoop的安全检测关掉(学习阶段不需要这些,正式生产上时,不要这么干),最后重启hadoop,再到eclipse里,重复刚才的删除文件操作试下,应该可以了。
1.4 创建WoldCount示例项目
新建一个项目,选择Map/Reduce Project
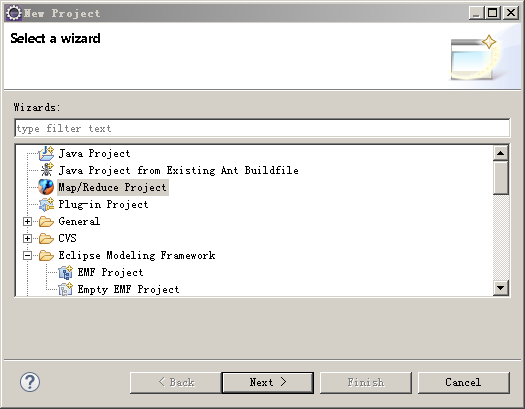
后面的Next就行了,然后放一上WodCount.java,代码如下:
|
1
2
3
4
5
6
7
8
9
10
11
12
13
14
15
16
17
18
19
20
21
22
23
24
25
26
27
28
29
30
31
32
33
34
35
36
37
38
39
40
41
42
43
44
45
46
47
48
49
50
51
52
53
54
55
56
57
58
59
60
61
62
63
64
65
66
67
68
|
package yjmyzz;import java.io.IOException;import java.util.StringTokenizer;import org.apache.hadoop.conf.Configuration;import org.apache.hadoop.fs.Path;import org.apache.hadoop.io.IntWritable;import org.apache.hadoop.io.Text;import org.apache.hadoop.mapreduce.Job;import org.apache.hadoop.mapreduce.Mapper;import org.apache.hadoop.mapreduce.Reducer;import org.apache.hadoop.mapreduce.lib.input.FileInputFormat;import org.apache.hadoop.mapreduce.lib.output.FileOutputFormat;import org.apache.hadoop.util.GenericOptionsParser;public class WordCount { public static class TokenizerMapper extends Mapper<Object, Text, Text, IntWritable> { private final static IntWritable one = new IntWritable(1); private Text word = new Text(); public void map(Object key, Text value, Context context) throws IOException, InterruptedException { StringTokenizer itr = new StringTokenizer(value.toString()); while (itr.hasMoreTokens()) { word.set(itr.nextToken()); context.write(word, one); } } } public static class IntSumReducer extends Reducer<Text, IntWritable, Text, IntWritable> { private IntWritable result = new IntWritable(); public void reduce(Text key, Iterable<IntWritable> values, Context context) throws IOException, InterruptedException { int sum = 0; for (IntWritable val : values) { sum += val.get(); } result.set(sum); context.write(key, result); } } public static void main(String[] args) throws Exception { Configuration conf = new Configuration(); String[] otherArgs = new GenericOptionsParser(conf, args).getRemainingArgs(); if (otherArgs.length < 2) { System.err.println("Usage: wordcount <in> [<in>...] <out>"); System.exit(2); } Job job = Job.getInstance(conf, "word count"); job.setJarByClass(WordCount.class); job.setMapperClass(TokenizerMapper.class); job.setCombinerClass(IntSumReducer.class); job.setReducerClass(IntSumReducer.class); job.setOutputKeyClass(Text.class); job.setOutputValueClass(IntWritable.class); for (int i = 0; i < otherArgs.length - 1; ++i) { FileInputFormat.addInputPath(job, new Path(otherArgs[i])); } FileOutputFormat.setOutputPath(job, new Path(otherArgs[otherArgs.length - 1])); System.exit(job.waitForCompletion(true) ? 0 : 1); }} |
然后再放一个log4j.properties,内容如下:(为了方便运行起来后,查看各种输出)
|
1
2
3
4
5
6
7
8
9
10
11
|
log4j.rootLogger=INFO, stdout#log4j.logger.org.springframework=INFO#log4j.logger.org.apache.activemq=INFO#log4j.logger.org.apache.activemq.spring=WARN#log4j.logger.org.apache.activemq.store.journal=INFO#log4j.logger.org.activeio.journal=INFOlog4j.appender.stdout=org.apache.log4j.ConsoleAppenderlog4j.appender.stdout.layout=org.apache.log4j.PatternLayoutlog4j.appender.stdout.layout.ConversionPattern=%d{ABSOLUTE} | %-5.5p | %-16.16t | %-32.32c{1} | %-32.32C %4L | %m%n |
最终的目录结构如下:
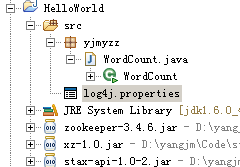
然后可以Run了,当然是不会成功的,因为没给WordCount输入参数,参考下图:
1.5 设置运行参数
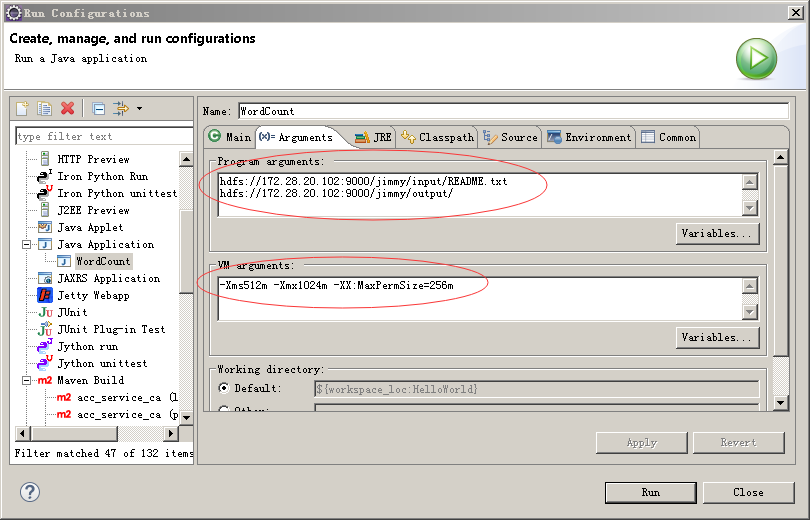
因为WordCount是输入一个文件用于统计单词字,然后输出到另一个文件夹下,所以给二个参数,参考上图,在Program arguments里,输入
hdfs://172.28.20.xxx:9000/jimmy/input/README.txt
hdfs://172.28.20.xxx:9000/jimmy/output/
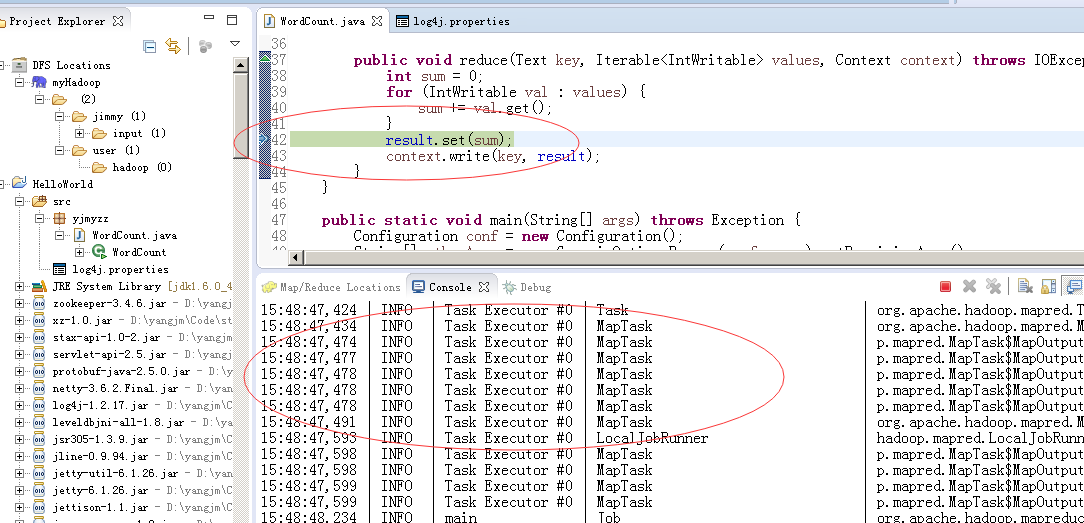
大家参考这个改一下(主要是把IP换成自己虚拟机里的IP),注意的是,如果input/READM.txt文件没有,请先手动上传,然后/output/ 必须是不存在的,否则程序运行到最后,发现目标目录存在,也会报错,这个弄完后,可以在适当的位置打个断点,终于可以调试了:
三、intellij idea 远程调试hadoop
3.1 创建一个maven的WordCount项目
pom文件如下:
|
1
2
3
4
5
6
7
8
9
10
11
12
13
14
15
16
17
18
19
20
21
22
23
24
25
26
27
28
29
30
31
32
33
|
<?xml version="1.0" encoding="UTF-8"?> <modelVersion>4.0.0</modelVersion> <groupId>yjmyzz</groupId> <artifactId>mapreduce-helloworld</artifactId> <version>1.0-SNAPSHOT</version> <dependencies> <dependency> <groupId>org.apache.hadoop</groupId> <artifactId>hadoop-common</artifactId> <version>2.6.0</version> </dependency> <dependency> <groupId>org.apache.hadoop</groupId> <artifactId>hadoop-mapreduce-client-jobclient</artifactId> <version>2.6.0</version> </dependency> <dependency> <groupId>commons-cli</groupId> <artifactId>commons-cli</artifactId> <version>1.2</version> </dependency> </dependencies> <build> <finalName>${project.artifactId}</finalName> </build></project> |
项目结构如下:
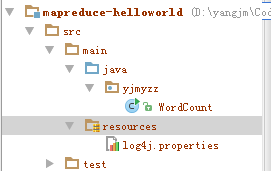
项目上右击-》Open Module Settings 或按F12,打开模块属性
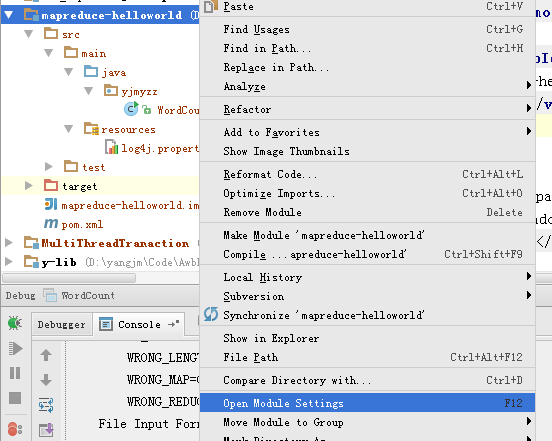
添加依赖的Libary引用
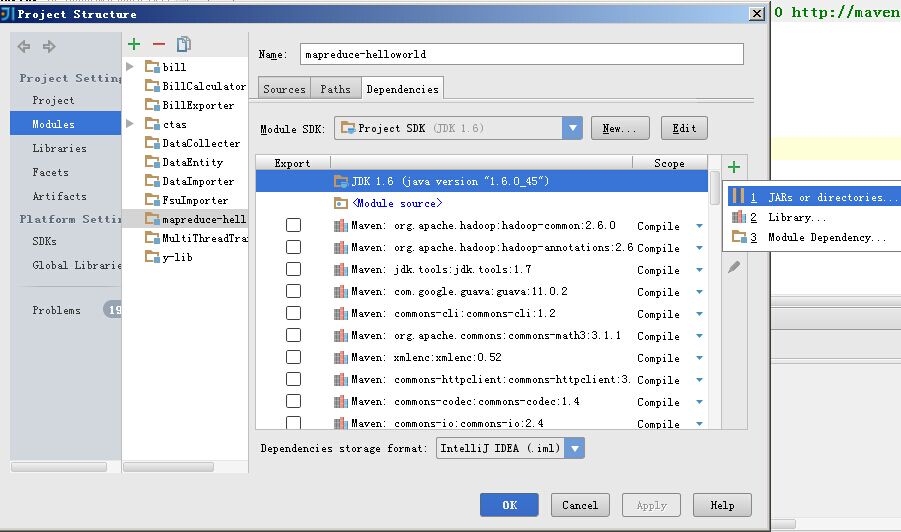
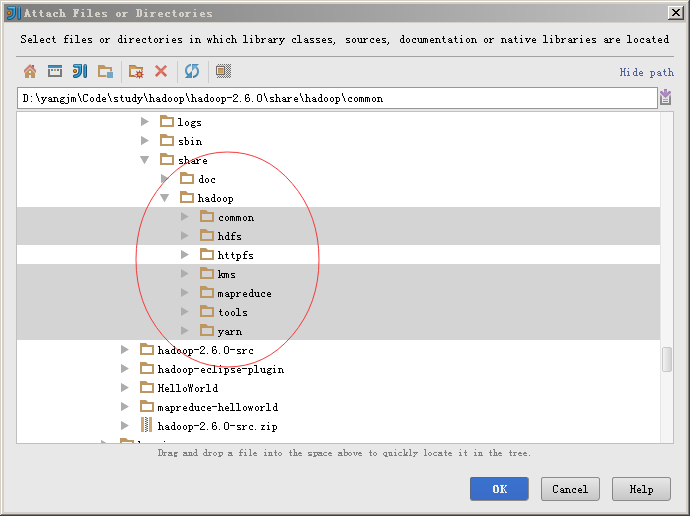
然后把$HADOOP_HOME下的对应包全导进来
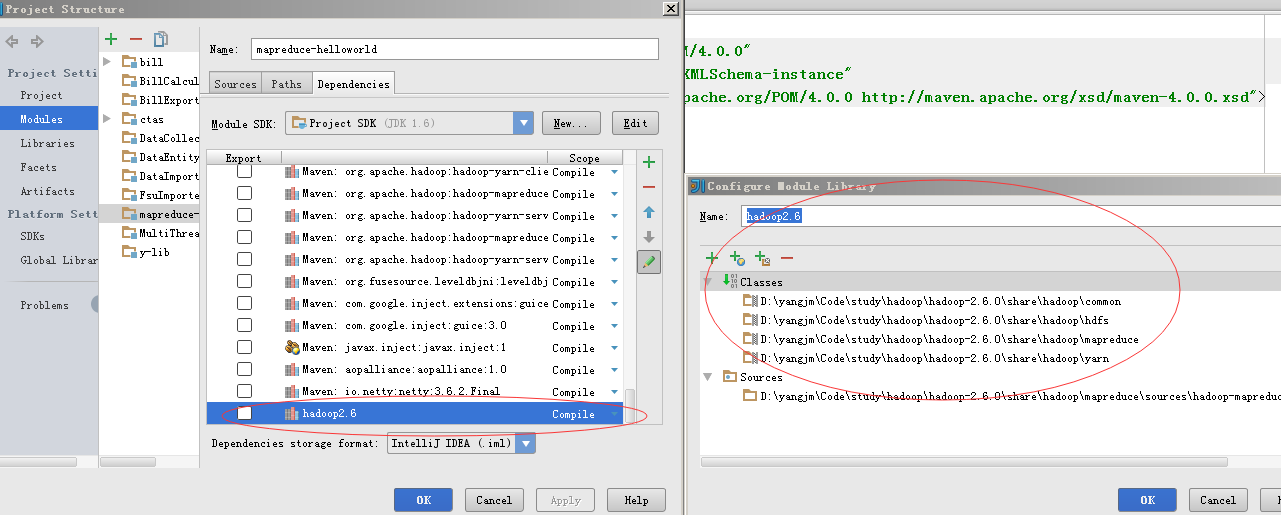
导入的libary可以起个名称,比如hadoop2.6
3.2 设置运行参数
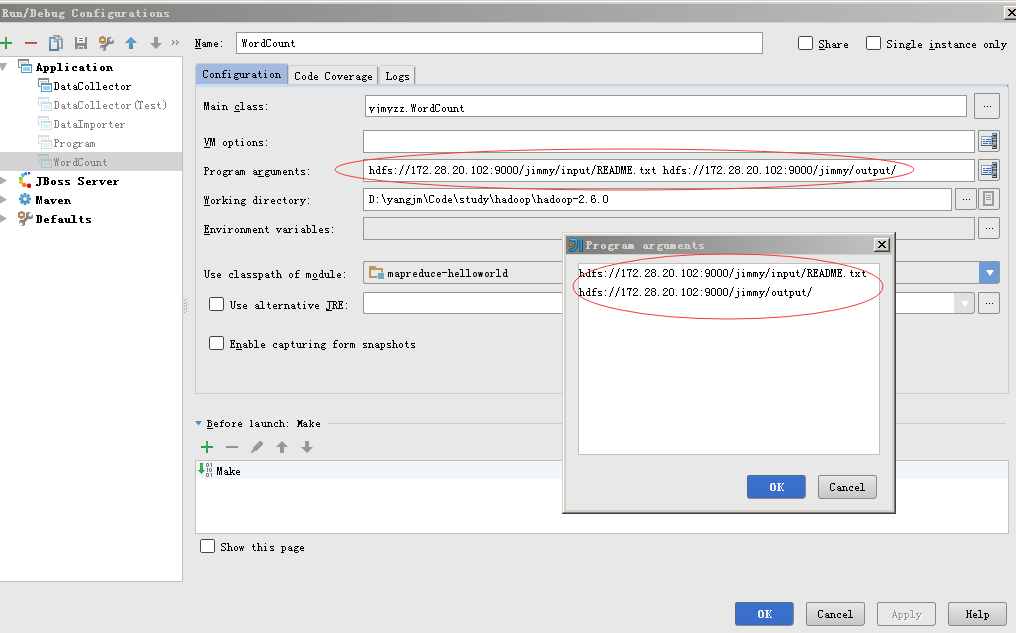
注意二个地方:
1是Program aguments,这里跟eclipes类似的做法,指定输入文件和输出文件夹
2是Working Directory,即工作目录,指定为$HADOOP_HOME所在目录
然后就可以调试了
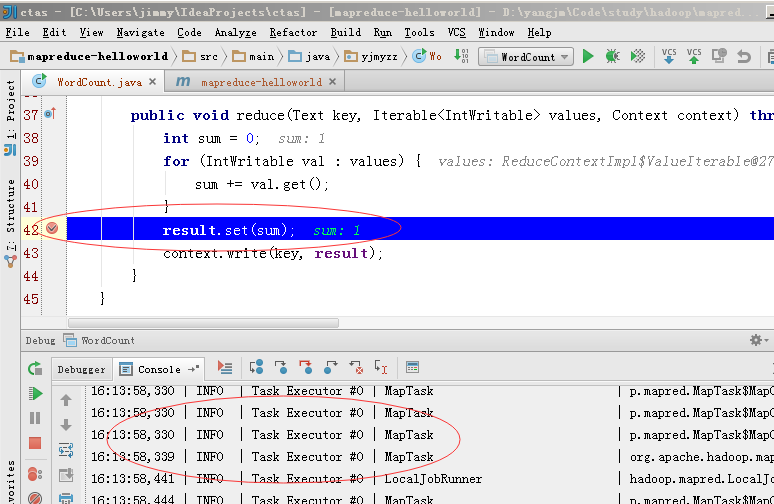
intellij下唯一不爽的,由于没有类似eclipse的hadoop插件,每次运行完wordcount,下次再要运行时,只能手动命令行删除output目录,再行调试。为了解决这个问题,可以将WordCount代码改进一下,在运行前先删除output目录,见下面的代码:
|
1
2
3
4
5
6
7
8
9
10
11
12
13
14
15
16
17
18
19
20
21
22
23
24
25
26
27
28
29
30
31
32
33
34
35
36
37
38
39
40
41
42
43
44
45
46
47
48
49
50
51
52
53
54
55
56
57
58
59
60
61
62
63
64
65
66
67
68
69
70
71
72
73
74
75
76
77
78
79
80
81
82
83
84
85
86
87
88
89
90
91
92
93
94
95
|
package yjmyzz;import java.io.IOException;import java.util.StringTokenizer;import org.apache.hadoop.conf.Configuration;import org.apache.hadoop.fs.FileSystem;import org.apache.hadoop.fs.Path;import org.apache.hadoop.io.IntWritable;import org.apache.hadoop.io.Text;import org.apache.hadoop.mapreduce.Job;import org.apache.hadoop.mapreduce.Mapper;import org.apache.hadoop.mapreduce.Reducer;import org.apache.hadoop.mapreduce.lib.input.FileInputFormat;import org.apache.hadoop.mapreduce.lib.output.FileOutputFormat;import org.apache.hadoop.util.GenericOptionsParser;public class WordCount { public static class TokenizerMapper extends Mapper<Object, Text, Text, IntWritable> { private final static IntWritable one = new IntWritable(1); private Text word = new Text(); public void map(Object key, Text value, Context context) throws IOException, InterruptedException { StringTokenizer itr = new StringTokenizer(value.toString()); while (itr.hasMoreTokens()) { word.set(itr.nextToken()); context.write(word, one); } } } public static class IntSumReducer extends Reducer<Text, IntWritable, Text, IntWritable> { private IntWritable result = new IntWritable(); public void reduce(Text key, Iterable<IntWritable> values, Context context) throws IOException, InterruptedException { int sum = 0; for (IntWritable val : values) { sum += val.get(); } result.set(sum); context.write(key, result); } } /** * 删除指定目录 * * @param conf * @param dirPath * @throws IOException */ private static void deleteDir(Configuration conf, String dirPath) throws IOException { FileSystem fs = FileSystem.get(conf); Path targetPath = new Path(dirPath); if (fs.exists(targetPath)) { boolean delResult = fs.delete(targetPath, true); if (delResult) { System.out.println(targetPath + " has been deleted sucessfullly."); } else { System.out.println(targetPath + " deletion failed."); } } } public static void main(String[] args) throws Exception { Configuration conf = new Configuration(); String[] otherArgs = new GenericOptionsParser(conf, args).getRemainingArgs(); if (otherArgs.length < 2) { System.err.println("Usage: wordcount <in> [<in>...] <out>"); System.exit(2); } //先删除output目录 deleteDir(conf, otherArgs[otherArgs.length - 1]); Job job = Job.getInstance(conf, "word count"); job.setJarByClass(WordCount.class); job.setMapperClass(TokenizerMapper.class); job.setCombinerClass(IntSumReducer.class); job.setReducerClass(IntSumReducer.class); job.setOutputKeyClass(Text.class); job.setOutputValueClass(IntWritable.class); for (int i = 0; i < otherArgs.length - 1; ++i) { FileInputFormat.addInputPath(job, new Path(otherArgs[i])); } FileOutputFormat.setOutputPath(job, new Path(otherArgs[otherArgs.length - 1])); System.exit(job.waitForCompletion(true) ? 0 : 1); }} |
但是光这样还不够,在IDE环境中运行时,IDE需要知道去连哪一个hdfs实例(就好象在db开发中,需要在配置xml中指定DataSource一样的道理),将$HADOOP_HOME\etc\hadoop下的core-site.xml,复制到resouces目录下,类似下面这样:
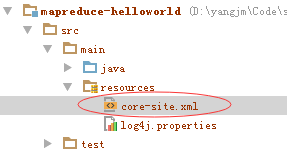
里面的内容如下:
|
1
2
3
4
5
6
7
8
|
<?xml version="1.0" encoding="UTF-8"?><?xml-stylesheet type="text/xsl" href="configuration.xsl"?><configuration> <property> <name>fs.defaultFS</name> </property></configuration> |
上面的IP换成虚拟机里的IP即可。
原文链接:http://www.cnblogs.com/yjmyzz/p/how-to-remote-debug-hadoop-with-eclipse-and-intellij-idea.html


