pytorch 在torchvision包里面有很多的的打包好的数据集,例如minist,Imagenet-12,CIFAR10 和CIFAR100。在torchvision的dataset包里面,用的时候直接调用就行了。具体的调用格式可以去看文档(目前好像只有英文的)。网上也有很多源代码。
不过,当我们想利用自己制作的数据集来训练网络模型时,就要有自己的方法了。pytorch在torchvision.dataset包里面封装过一个函数ImageFolder()。这个函数功能很强大,只要你直接将数据集路径保存为例如“train/1/1.jpg ,rain/1/2.jpg …… ”就可以根据根目录“./train”将数据集装载了。
|
1
|
dataset.ImageFolder(root="datapath", transfroms.ToTensor()) |
但是后来我发现一个问题,就是这个函数加载出来的图像矩阵都是三通道的,并且没有什么参数调用可以让其变为单通道。如果我们要用到单通道数据集(灰度图)的话,比如自己加载Lenet-5模型的数据集,就只能自己写numpy数组再转为pytorch的Tensor()张量了。
接下来是我做的过程:
首先,还是要用到opencv,用灰度图打开一张图片,省事。
|
1
2
3
4
5
6
7
8
9
10
11
|
#读取图片 这里是灰度图 for item in all_path: img = cv2.imread(item[1],0) img = cv2.resize(img,(28,28)) arr = np.asarray(img,dtype="float32") data_x[i ,:,:,:] = arr i+=1 data_y.append(int(item[0])) data_x = data_x / 255 data_y = np.asarray(data_y) |
其次,pytorch有自己的numpy转Tensor函数,直接转就行了。
|
1
2
|
data_x = torch.from_numpy(data_x)data_y = torch.from_numpy(data_y) |
下一步利用torch.util和torchvision里面的dataLoader函数,就能直接得到和torchvision.dataset里面封装好的包相同的数据集样本了
|
1
2
|
dataset = dataf.TensorDataset(data_x,data_y)loader = dataf.DataLoader(dataset, batch_size=batchsize, shuffle=True) |
最后就是自己建网络设计参数训练了,这部分和文档以及github中的差不多,就不赘述了。
下面是整个程序的源代码,我利用的还是上次的车标识别的数据集,一共分四类,用的是2层卷积核两层全连接。
源代码:
|
1
2
3
4
5
6
7
8
9
10
11
12
13
14
15
16
17
18
19
20
21
22
23
24
25
26
27
28
29
30
31
32
33
34
35
36
37
38
39
40
41
42
43
44
45
46
47
48
49
50
51
52
53
54
55
56
57
58
59
60
61
62
63
64
65
66
67
68
69
70
71
72
73
74
75
76
77
78
79
80
81
82
83
84
85
86
87
88
89
90
91
92
93
94
95
96
97
98
99
100
101
102
103
104
105
106
107
108
109
110
111
112
113
114
115
116
117
118
119
120
121
122
123
124
125
126
127
128
129
130
131
132
133
134
135
136
137
138
139
140
141
142
143
144
145
146
147
148
149
150
151
152
153
154
155
156
157
158
159
160
161
162
163
164
165
166
|
# coding=utf-8import osimport cv2import numpy as npimport random import torchimport torch.nn as nnimport torch.utils.data as dataffrom torch.autograd import Variableimport torch.nn.functional as Fimport torch.optim as optim #训练参数cuda = Falsetrain_epoch = 20train_lr = 0.01train_momentum = 0.5batchsize = 5 #测试训练集路径test_path = "/home/test/"train_path = "/home/train/" #路径数据all_path =[] def load_data(data_path): signal = os.listdir(data_path) for fsingal in signal: filepath = data_path+fsingal filename = os.listdir(filepath) for fname in filename: ffpath = filepath+"/"+fname path = [fsingal,ffpath] all_path.append(path) #设立数据集多大 count = len(all_path) data_x = np.empty((count,1,28,28),dtype="float32") data_y = []#打乱顺序 random.shuffle(all_path) i=0; #读取图片 这里是灰度图 最后结果是i*i*i*i#分别表示:batch大小 , 通道数, 像素矩阵 for item in all_path: img = cv2.imread(item[1],0) img = cv2.resize(img,(28,28)) arr = np.asarray(img,dtype="float32") data_x[i ,:,:,:] = arr i+=1 data_y.append(int(item[0])) data_x = data_x / 255 data_y = np.asarray(data_y)# lener = len(all_path) data_x = torch.from_numpy(data_x) data_y = torch.from_numpy(data_y) dataset = dataf.TensorDataset(data_x,data_y) loader = dataf.DataLoader(dataset, batch_size=batchsize, shuffle=True) return loader# print data_y train_load = load_data(train_path)test_load = load_data(test_path) class L5_NET(nn.Module): def __init__(self): super(L5_NET ,self).__init__(); #第一层输入1,20个卷积核 每个5*5 self.conv1 = nn.Conv2d(1 , 20 , kernel_size=5) #第二层输入20,30个卷积核 每个5*5 self.conv2 = nn.Conv2d(20 , 30 , kernel_size=5) #drop函数 self.conv2_drop = nn.Dropout2d() #全链接层1,展开30*4*4,连接层50个神经元 self.fc1 = nn.Linear(30*4*4,50) #全链接层1,50-4 ,4为最后的输出分类 self.fc2 = nn.Linear(50,4) #前向传播 def forward(self,x): #池化层1 对于第一层卷积池化,池化核2*2 x = F.relu(F.max_pool2d( self.conv1(x) ,2 ) ) #池化层2 对于第二层卷积池化,池化核2*2 x = F.relu(F.max_pool2d( self.conv2_drop( self.conv2(x) ) , 2 ) ) #平铺轴30*4*4个神经元 x = x.view(-1 , 30*4*4) #全链接1 x = F.relu( self.fc1(x) ) #dropout链接 x = F.dropout(x , training= self.training) #全链接w x = self.fc2(x) #softmax链接返回结果 return F.log_softmax(x) model = L5_NET()if cuda : model.cuda() optimizer = optim.SGD(model.parameters() , lr =train_lr , momentum = train_momentum ) #预测函数def train(epoch): model.train() for batch_idx, (data, target) in enumerate(train_load): if cuda: data, target = data.cuda(), target.cuda() data, target = Variable(data), Variable(target) #求导 optimizer.zero_grad() #训练模型,输出结果 output = model(data) #在数据集上预测loss loss = F.nll_loss(output, target) #反向传播调整参数pytorch直接可以用loss loss.backward() #SGD刷新进步 optimizer.step() #实时输出 if batch_idx % 10 == 0: print('Train Epoch: {} [{}/{} ({:.0f}%)]\tLoss: {:.6f}'.format( epoch, batch_idx * len(data), len(train_load.dataset), 100. * batch_idx / len(train_load), loss.data[0]))# #测试函数def test(epoch): model.eval() test_loss = 0 correct = 0 for data, target in test_load: if cuda: data, target = data.cuda(), target.cuda() data, target = Variable(data, volatile=True), Variable(target) #在测试集上预测 output = model(data) #计算在测试集上的loss test_loss += F.nll_loss(output, target).data[0] #获得预测的结果 pred = output.data.max(1)[1] # get the index of the max log-probability #如果正确,correct+1 correct += pred.eq(target.data).cpu().sum() #loss计算 test_loss = test_loss test_loss /= len(test_load) #输出结果 print('\nThe {} epoch result : Average loss: {:.6f}, Accuracy: {}/{} ({:.2f}%)\n'.format( epoch,test_loss, correct, len(test_load.dataset), 100. * correct / len(test_load.dataset))) for epoch in range(1, train_epoch+ 1): train(epoch) test(epoch) |
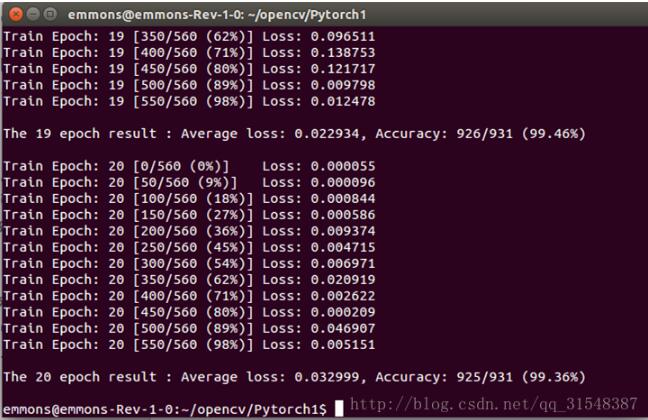
最后的训练结果和在keras下差不多,不过我训练的时候好像把训练集和测试集弄反了,数目好像测试集比训练集还多,有点尴尬,不过无伤大雅。结果图如下:

以上这篇Pytorch自己加载单通道图片用作数据集训练的实例就是小编分享给大家的全部内容了,希望能给大家一个参考,也希望大家多多支持服务器之家。
原文链接:https://blog.csdn.net/qq_31548387/article/details/73302319


