前言:强大的 ebpf 使用越来越广,能做的事情也越来越多,尤其是无侵入的优雅方式更加是技术选型的好选择。本文介绍如何使用 ebpf 来监控 Node.js 的耗时,从而了解 Node.js 事件循环的执行情况。不过这只是粗粒度的监控,想要精细地了解 Node.js 的运行情况,需要做的事情还很多。
在 Node.js 里,我们可以通过 V8 Inspector 的 cpuprofile 来了解 JS 的执行耗时,但是 cpuprofile 无法看到 C、C++ 代码的执行耗时,通常我们可以使用 perf 工具来或许 C、C++ 代码的耗时,不过这里介绍的是通过 ebpf 来实现,不失为一种探索。首先来看一下对 poll io 阶段的监控。先定义一个结构体用于记录耗时。
- struct event
- {
- __u64 start_time;
- __u64 end_time;
- };
接着写 bpf 程序。
-
#include
-
#include
-
#include
-
#include
- #include "uv.h"
- #include "uv_uprobe.h"
- char LICENSE[] SEC("license") = "Dual BSD/GPL";
- #define MAX_ENTRIES 10240
- // 用于记录数据
- struct {
- __uint(type, BPF_MAP_TYPE_HASH);
- __uint(max_entries, MAX_ENTRIES);
- __type(key, __u32);
- __type(value, const char *);} values SEC(".maps");
- // 用于输入数据到用户层
- struct {
- __uint(type, BPF_MAP_TYPE_PERF_EVENT_ARRAY);
- __uint(key_size, sizeof(__u32));
- __uint(value_size, sizeof(__u32));} events SEC(".maps");static __u64 id = 0;SEC("uprobe/uv__io_poll")int BPF_KPROBE(uprobe_uv__io_poll, uv_loop_t* loop, int timeout){
- __u64 current_id = id;
- __u64 time = bpf_ktime_get_ns();
- bpf_map_update_elem(&values, ¤t_id, &time, BPF_ANY);
- return 0;
- }
- SEC("uretprobe/uv__io_poll")
- int BPF_KRETPROBE(uretprobe_uv__io_poll){
- __u64 current_id
- __u64 current_id = id;
- __u64 *time = bpf_map_lookup_elem(&values, ¤t_id);
- if (!time) {
- return 0;
- }
- struct event e;
- // 记录开始时间和结束时间
- e.start_time = *time;
- e.end_time = bpf_ktime_get_ns();
- // 输出到用户层
- bpf_perf_event_output(ctx, &events, BPF_F_CURRENT_CPU, &e, sizeof(e));
- bpf_map_delete_elem(&values, ¤t_id);
- id++;
- return 0;
- }
最后编写使用 ebpf 程序的代码,只列出核心代码。
-
#include
-
#include
-
#include
-
#include
-
#include
- #include "uv_uprobe.skel.h"
- #include "uprobe_helper.h"
-
#include
-
#include
- #include "uv_uprobe.h"
- // 输出结果函数
- static void handle_event(void *ctx, int cpu, void *data, __u32 data_sz){
- const struct event *e = (const struct event *)data;
- printf("%s %llu\n", "poll io", (e->end_time - e->start_time) / 1000 / 1000);
- }
- int main(int argc, char **argv){
- struct uv_uprobe_bpf *skel;
- long base_addr, uprobe_offset;
- int err, i;
- struct perf_buffer_opts pb_opts;
- struct perf_buffer *pb = NULL;
- // 监控哪个 Node.js 进程
- char * pid_str = argv[1];
- pid_t pid = (pid_t)atoi(pid_str);
- char execpath[500];
- // 根据 pid 找到 Node.js 的可执行文件
- int ret = get_pid_binary_path(pid, execpath, 500);
- // 需要监控的函数,uv__io_poll 是处理 poll io 阶段的函数
- char * func = "uv__io_poll";
- // 通过可执行文件获得函数的地址
- uprobe_offset = get_elf_func_offset(execpath, func);
- // 加载 bpf 程序到内核
- skel = uv_uprobe_bpf__open();
- err = uv_uprobe_bpf__load(skel);
- // 挂载监控点
- skel->links.uprobe_uv__io_poll = bpf_program__attach_uprobe(skel->progs.uprobe_uv__io_poll,
- false /* not uretprobe */,
- -1,
- execpath,
- uprobe_offset);
- skel->links.uretprobe_uv__io_poll = bpf_program__attach_uprobe(skel->progs.uretprobe_uv__io_poll,
- true /* uretprobe */,
- -1 /* any pid */,
- execpath,
- uprobe_offset);
- // 设置回调处理 bpf 的输出
- pb_opts.sample_cb = handle_event;
- pb_opts.lost_cb = handle_lost_events;
- pb = perf_buffer__new(bpf_map__fd(skel->maps.events), PERF_BUFFER_PAGES,
- &pb_opts);
- printf("%-7s %-7s\n", "phase", "interval");
- for (i = 0; ; i++) {
- // 等待 bpf 的输出,然后执行回调处理,基于 epoll 实现
- perf_buffer__poll(pb, PERF_POLL_TIMEOUT_MS);
- }
- }
编译以上代码,然后启动一个 Node.js 进程,接着把 Node.js 进程的 pid 作为参数执行上面代码,就可以看到 poll io 阶段的耗时,通常,如果 Node.js 里没有任务会阻塞到 epoll_wait 中,所以我们无法观察到耗时。我们只需要在代码里写个定时器就行。
- setInterval(() => {}, 3000);
我们可以看到 poll io 耗时在 3s 左右,因为有定时器时,poll io 最多等待 3s 后就会返回,也就是整个 poll io 阶段的耗时。了解了基本的实现后,我们来监控整个事件循环每个阶段的耗时。原理是类似的。先定义一个处理多个阶段的宏。
- #define PHASE(uprobe) \
- uprobe(uv__run_timers) \
- uprobe(uv__run_pending) \
- uprobe(uv__run_idle) \
- uprobe(uv__run_prepare) \
- uprobe(uv__io_poll) \
- uprobe(uv__run_check) \
- uprobe(uv__run_closing_handles)
接着改一下 bpf 代码。
- #define PROBE(type) \
- SEC("uprobe/" #type) \
- int BPF_KPROBE(uprobe_##type) \
- { \
- char key[20] = #type; \
- __u64 time = bpf_ktime_get_ns(); \
- bpf_map_update_elem(&values, &key, &time, BPF_ANY); \
- return 0; \
- } \
- SEC("uretprobe/" #type) \
- int BPF_KRETPROBE(uretprobe_##type) \
- { \
- char key[20] = #type; \
- __u64 *time = bpf_map_lookup_elem(&values, &key); \
- if (!time) { \
- return 0; \
- } \
- struct event e = { \
- .name=#type \
- }; \
- e.start_time = *time; \
- e.end_time = bpf_ktime_get_ns(); \
- bpf_perf_event_output(ctx, &events, BPF_F_CURRENT_CPU, &e, sizeof(e)); \
- bpf_map_delete_elem(&values, key); \
- return 0; \
- }
- PHASE(PROBE)
我们看到代码和之前的 bpf 代码是一样的,只是通过宏的方式,方便定义多个阶段,避免重复代码。主要了使用 C 的一些知识。#a 等于 "a",a##b 等于ab,"a" "b" 等于 "ab"("a" "b" 中间有个空格)。同样,写完 bpf 代码后,再改一下主程序的代码。
- #define ATTACH_UPROBE(type) \
- do \
- { char * func_##type = #type; \
- uprobe_offset = get_elf_func_offset(execpath, func_##type); \
- if (uprobe_offset == -1) { \
- fprintf(stderr, "invalid function &s: %s\n", func_##type); \
- break; \
- } \
- fprintf(stderr, "uprobe_offset: %ld\n", uprobe_offset);\
- skel->links.uprobe_##type = bpf_program__attach_uprobe(skel->progs.uprobe_##type,\
- false /* not uretprobe */,\
- pid,\
- execpath,\
- uprobe_offset);\
- skel->links.uretprobe_##type = bpf_program__attach_uprobe(skel->progs.uretprobe_##type,\
- true /* uretprobe */,\
- pid /* any pid */,\
- execpath,\
- uprobe_offset);\
- } while(false);
- PHASE(ATTACH_UPROBE)
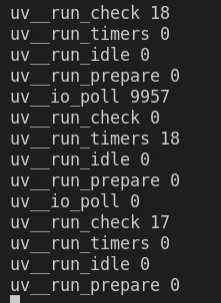
同样,代码还是一样的,只是变成了宏定义,然后通过 PHASE(ATTACH_UPROBE) 定义重复代码。这里使用了 do while(false) 是因为如果某个阶段的处理过程有问题,则忽略,因为我们不能直接 return,所以 do while 是比较好的实现方式。因为在我测试的时候,有两个阶段是失败的,原因是找不到对应函数的地址。最后写个测试代码。
- function compute() {
- let sum = 0;
- for(let i = 0; i < 10000000; i++) {
- sum += i;
- }
- }
- setInterval(() => {
- compute();
- setImmediate(() => {
- compute();
- });
- }, 10000)
执行后看到输出。

后记:本文大致介绍了基于 ebpf 实现对 Node.js 事件循环的耗时监控,这只是非常初步的探索。
原文链接:https://mp.weixin.qq.com/s/YXRmt_ETlZf1JkORbMb-8g


