首先,介绍自己电脑:ubuntu18.04、vs code 1.46版
本文目的:为vs code配置好c++ 开发环境,以及vs code +cmake的配置
对于c++ 工程,有四个必要的json配置文件,先ctrl+shift+p打开输入指令分别是:
-
c_cpp_properties.json:配置项目结构,自动生成和更新,输入c/c++:edit configuration -
task.json: 构建和编译运行项目,输入task:configure task,模板,others -
launch.json: 调试,读取可执行文件 -
setting.json: 输入setting
针对两种情况分别进行介绍,最后根据十四讲中使用eigen进行实验。
一、vs code 的c++开发环境
摘要:
1.新建c/c++工程,vscode以文件夹为管理工程的方式,因此需要建立一个文件夹来保存工程。
2.配置launch.json文件,读取可执行文件。需要进行修改地方的是指定运行的文件,其次我们还可以在里面添加build任务,用于调试。
3.配置tasks.json文件,这个文件用来方便用户自定义任务,我们可以通过这个文件来添加g++/gcc或者是make命令,方便我们编译程序。
4.之后就可以进行基础的c/c++开发与调试了。
1、建立工程
新建一个工作区文件夹,然后在vscode中打开这个文件夹。vscode调试必须在工作区文件夹下,单独打开一个文件调试会报错。vscode不支持中文路径,文件夹名称不能有空格。
|
1
2
3
4
5
6
7
8
|
#include <iostream>using namespace std;int main(){ cout<<"hello world"<<endl; getchar(); return 0;} |
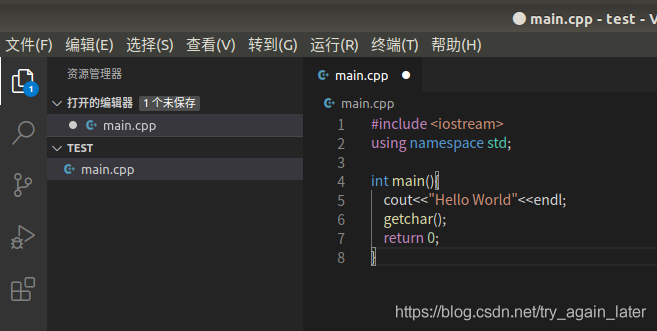
2、更改配置文件(launch.json)
launch.json目的:读取执行out文件
点击左侧的debug按钮,选择添加配置(add
configuration),然后选择c++(gdb/lldb),然后点击默认生成,将自动生成launch.json文件,具体操作如下:
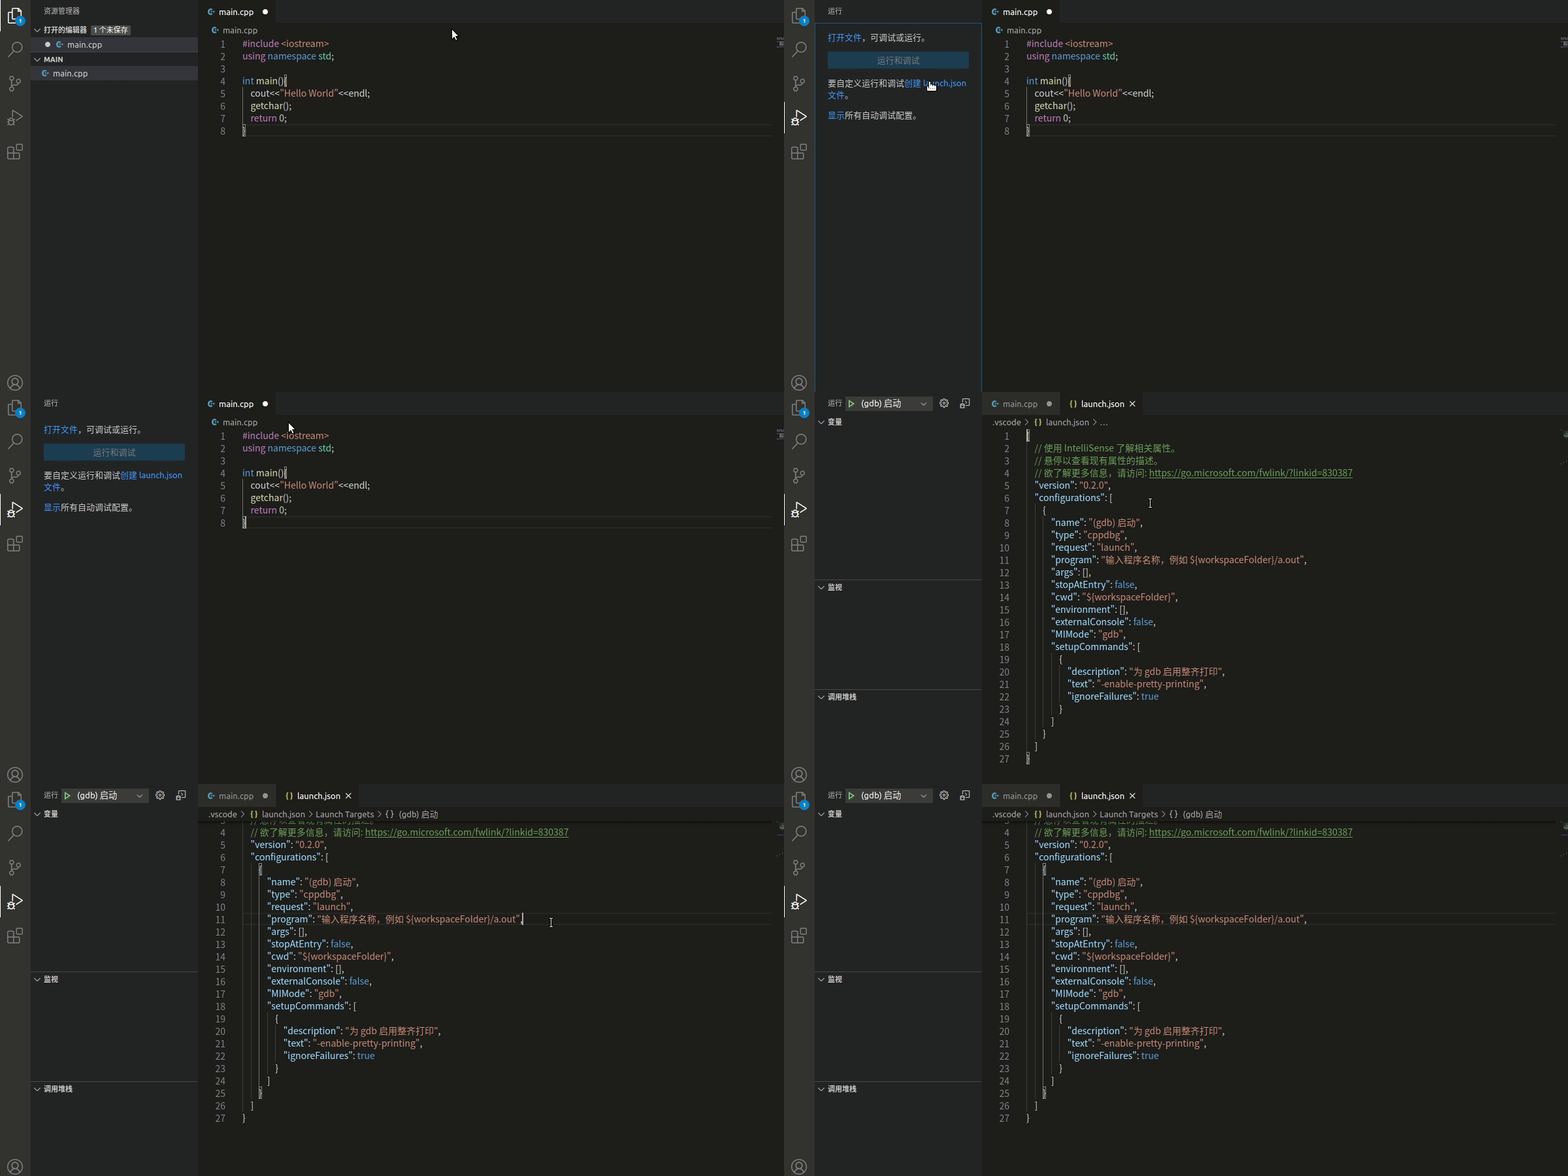
|
1
2
3
4
5
6
7
8
9
10
11
12
13
14
15
16
17
18
19
20
21
22
23
24
25
26
27
|
{ // 使用 intellisense 了解相关属性。 // 悬停以查看现有属性的描述。 // 欲了解更多信息,请访问: https://go.microsoft.com/fwlink/?linkid=830387 "version": "0.2.0", "configurations": [ { "name": "(gdb) 启动",// 配置名称 "type": "cppdbg",// 配置类型 "request": "launch",// 请求配置类型,launch或者attach "program": "输入程序名称,例如 ${workspacefolder}/a.out",// 进行调试程序的路径,程序生成文件.out "args": [],// 传递给程序的命令行参数,一般为空 "stopatentry": false,// 调试器是否在目标的入口点停止, "cwd": "${workspacefolder}",// 项目目录 "environment": [], "externalconsole": false,// 调试时是否显示控制台窗口,一般为true显示控制台 "mimode": "gdb",// 指定连接的调试器 "setupcommands": [ { "description": "为 gdb 启用整齐打印", "text": "-enable-pretty-printing", "ignorefailures": true } ] } ]} |
更改:
将program内容改为调试时运行的程序。
|
1
|
"program": "输入程序名称,例如 ${workspacefolder}/a.out" |
改为
|
1
|
"program": "${workspacefolder}/${filebasenamenoextension}.out" |
新增,prelaunchtask 使得每次调试之前会自动进行build:
|
1
|
"prelaunchtask": "build", |
最终版本为:
|
1
2
3
4
5
6
7
8
9
10
11
12
13
14
15
16
17
18
19
20
21
22
23
24
25
26
27
28
|
{ // use intellisense to learn about possible attributes. // hover to view descriptions of existing attributes. // for more information, visit: https://go.microsoft.com/fwlink/?linkid=830387 "version": "0.2.0", "configurations": [ { "name": "(gdb) launch", "type": "cppdbg", "request": "launch", "program": "${workspacefolder}/${filebasenamenoextension}.out", "args": [], "stopatentry": false, "cwd": "${workspacefolder}", "environment": [], "externalconsole": true, "mimode": "gdb", "prelaunchtask": "build", "setupcommands": [ { "description": "enable pretty-printing for gdb", "text": "-enable-pretty-printing", "ignorefailures": true } ] } ]} |
3、更改编译任务(task.json)
task.json:定义编译方法,转为计算机可识别的语言,生成out文件。
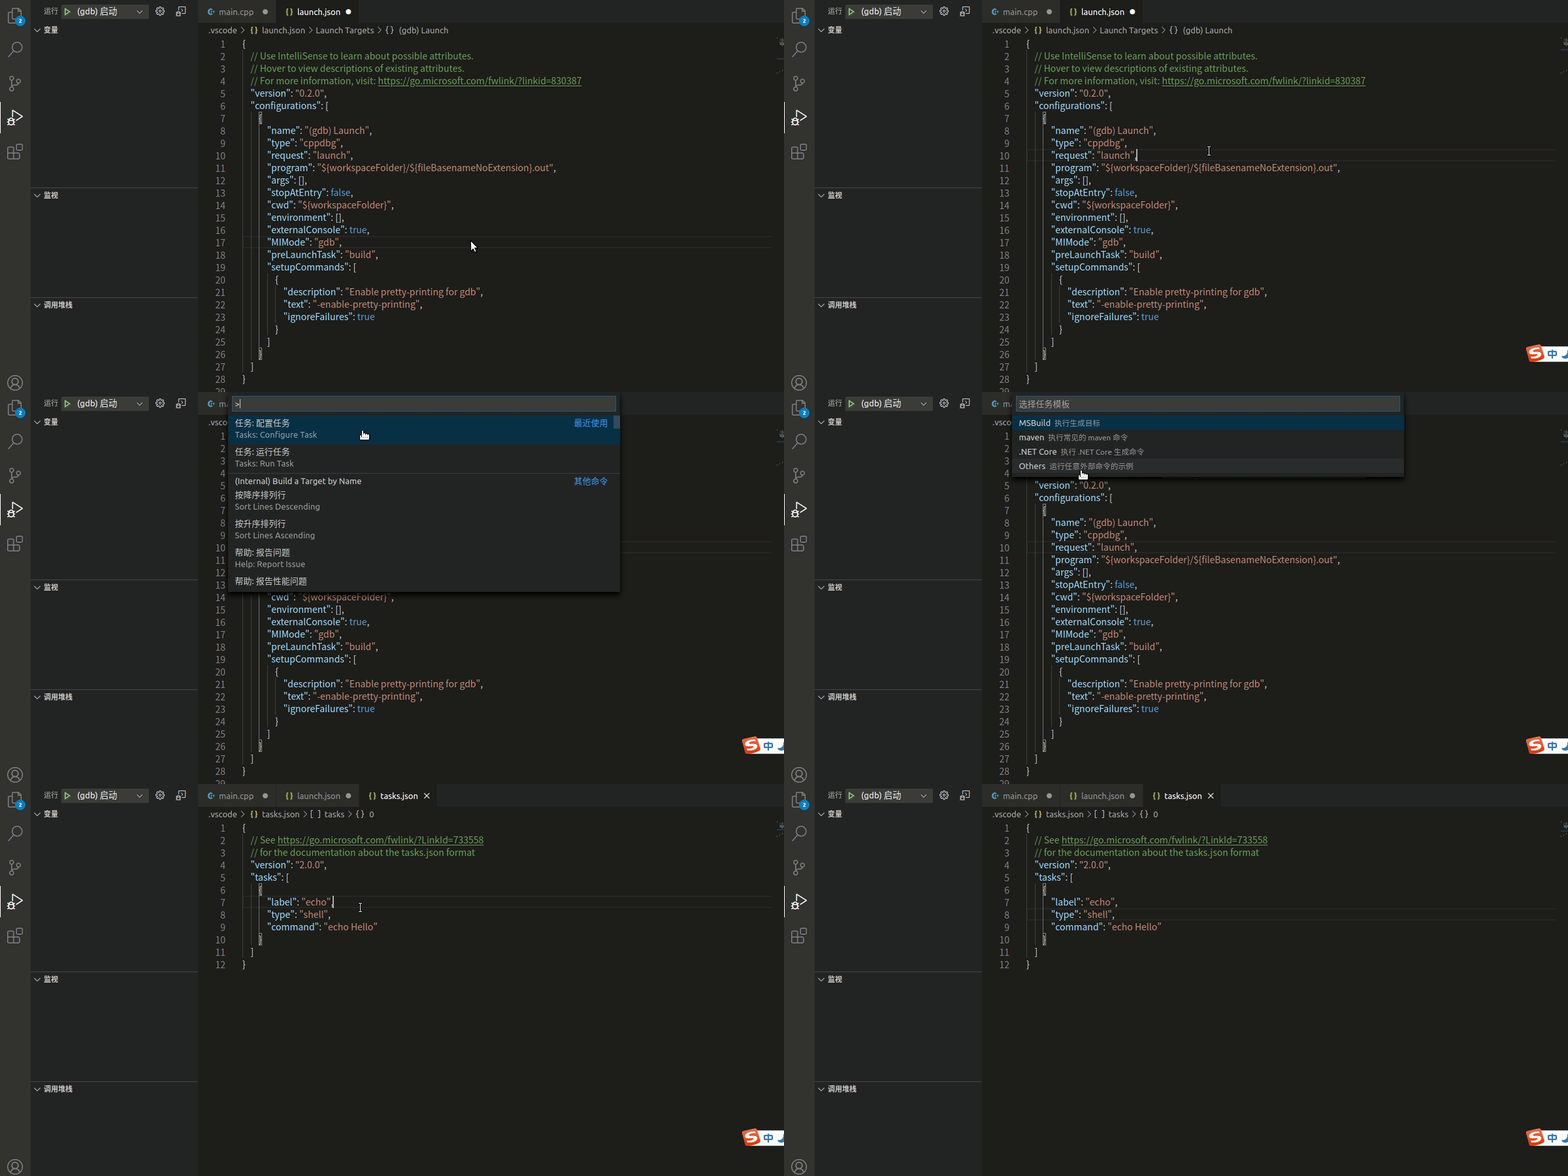
快捷键ctrl+shift+p打开命令行,输入:
task:configure task使用模版创建tasks.json文件 →
others:
|
1
2
3
4
5
6
7
8
9
10
11
12
|
{ // see https://go.microsoft.com/fwlink/?linkid=733558 // for the documentation about the tasks.json format "version": "2.0.0", "tasks": [ { "label": "echo",// 任务名 "type": "shell", "command": "echo hello" // 指令 } ]} |
更改为:
|
1
2
3
4
5
6
7
8
9
10
11
12
13
|
{ // see https://go.microsoft.com/fwlink/?linkid=733558 // for the documentation about the tasks.json format "version": "2.0.0", "tasks": [ { "label": "build", "type": "shell", "command": "g++", "args": ["-g", "${file}", "-std=c++11", "-o", "${filebasenamenoextension}.out"] } ]} |
4、断点调试
以上工作完成后即可编译运行c/c++程序。不过在调试之前最好先ctrl+shift+b编译一下,选择执行我们的build任务,build成功后,点击开始调试。
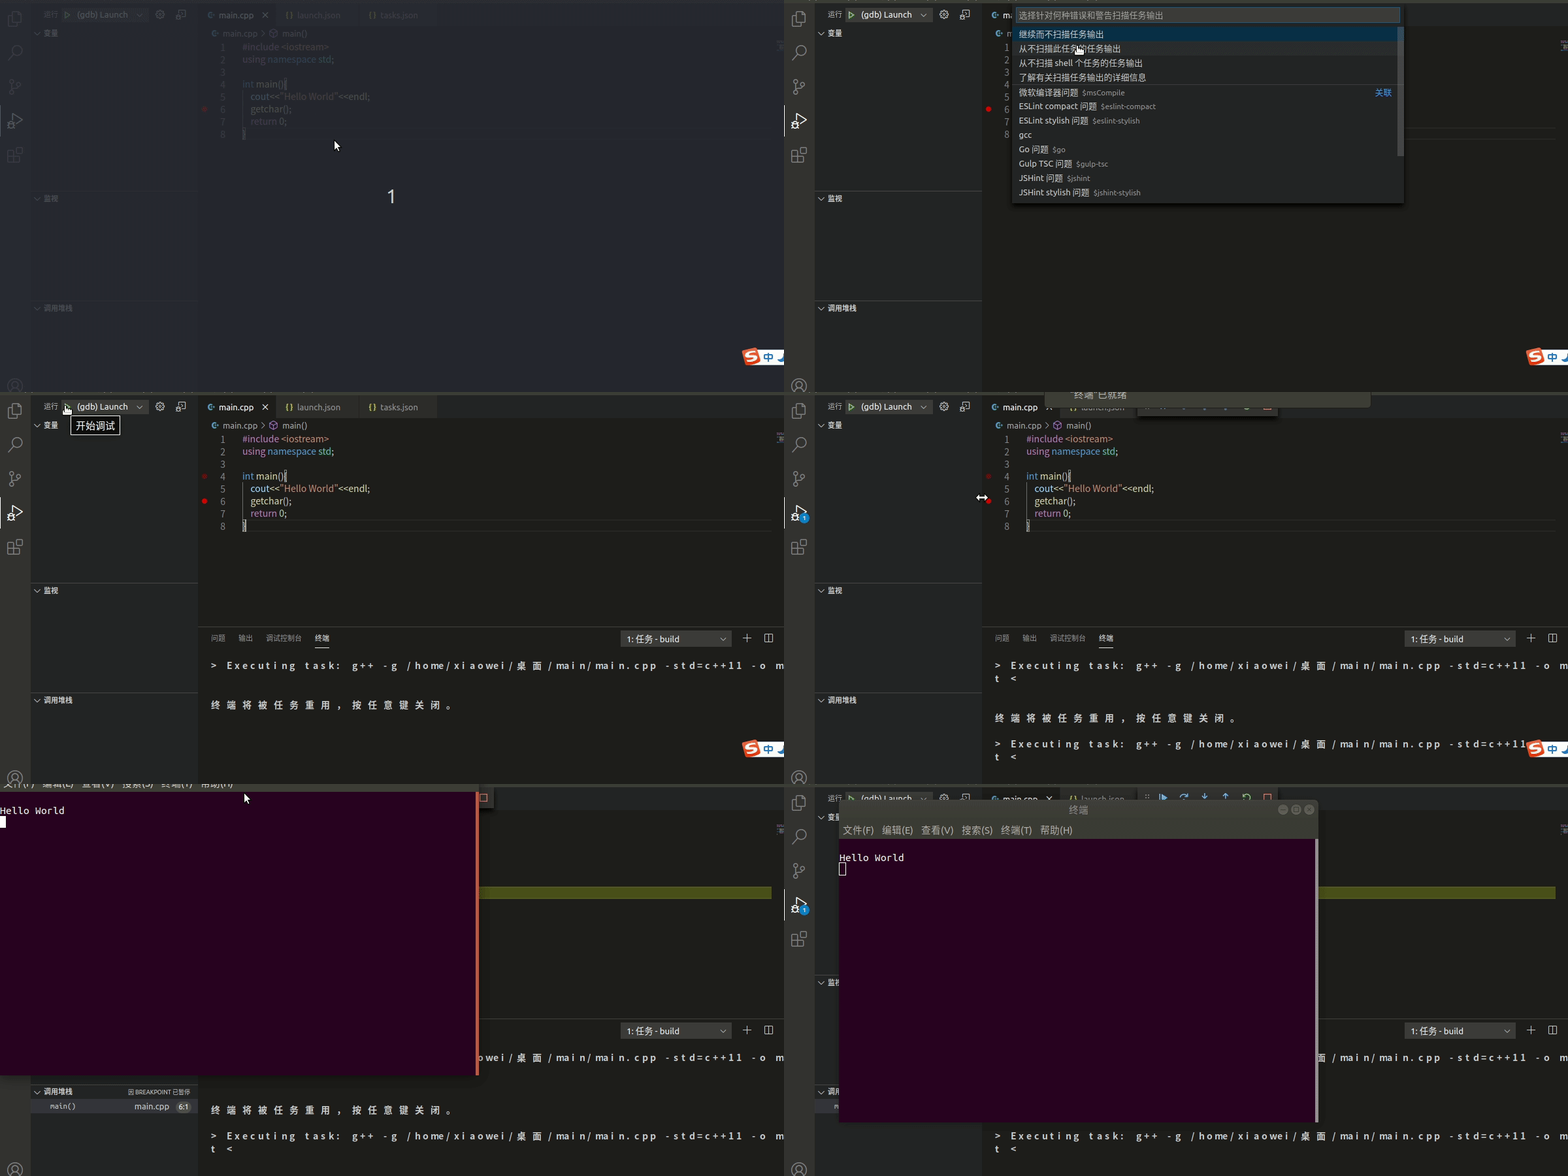
二、cmake调试c++ 工程
1、创建文件
在文件夹内创建文件
|
1
2
|
~$ touch main.cpp~$ touch cmakelists.txt |
cmakelists.txt
|
1
2
3
4
5
6
7
8
9
10
|
cmake_minimum_required(version 2.6) # 工程vscode_cmakeproject(vscode_cmake)#dubug 模式set (cmake_cxx_flags "${cmake_cxx_flags} -g")set(src_list main.cpp)# 可执行程序 resultadd_executable(result ${src_list}) |
main.cpp
|
1
2
3
4
5
6
7
8
9
10
11
12
13
14
15
|
#include<iostream> using namespace std; int main(){ int a = 2+3; int b = a+3; for(int i = 0; i<10; i++){ cout<<"hello vs code & cmake..."<<endl; } return 0;} |
其中, 需要在cmakelists.txt 里加
set (cmake_cxx_flags “${cmake_cxx_flags} -g”)
开启debug 不然断点调试是无效的
2、开始调试
首先要build生成可执行文件result,有了可执行文件才能进行debug操作,然后再设置断点,按下f5,进行调试。
在图中最左侧第四个小蜘蛛形状的图标(调试),点击左上方的小齿轮,添加配置(c++gdb/lldb),修改launch.json文件为:
|
1
2
3
4
5
6
7
8
9
10
11
12
13
14
15
16
17
18
19
20
21
22
23
24
25
26
27
|
{ // 使用 intellisense 了解相关属性。 // 悬停以查看现有属性的描述。 // 欲了解更多信息,请访问: https://go.microsoft.com/fwlink/?linkid=830387 "version": "0.2.0", "configurations": [ { "name": "(gdb) 启动", "type": "cppdbg", "request": "launch", "program": "${workspacefolder}/build/result",// 更改 "args": [], "stopatentry": false, "cwd": "${workspacefolder}", "environment": [], "externalconsole": false, "mimode": "gdb", "setupcommands": [ { "description": "为 gdb 启用整齐打印", "text": "-enable-pretty-printing", "ignorefailures": true } ] } ]} |
更改了
|
1
|
"program": "${workspacefolder}/build/result",// 更改 |
是为了生成的可执行文件result到build文件夹内。
之后按下最下方的build按键,生成可执行文件。
接下来设置断点,按下f5,进行调试

3、配置 c++ intellisense
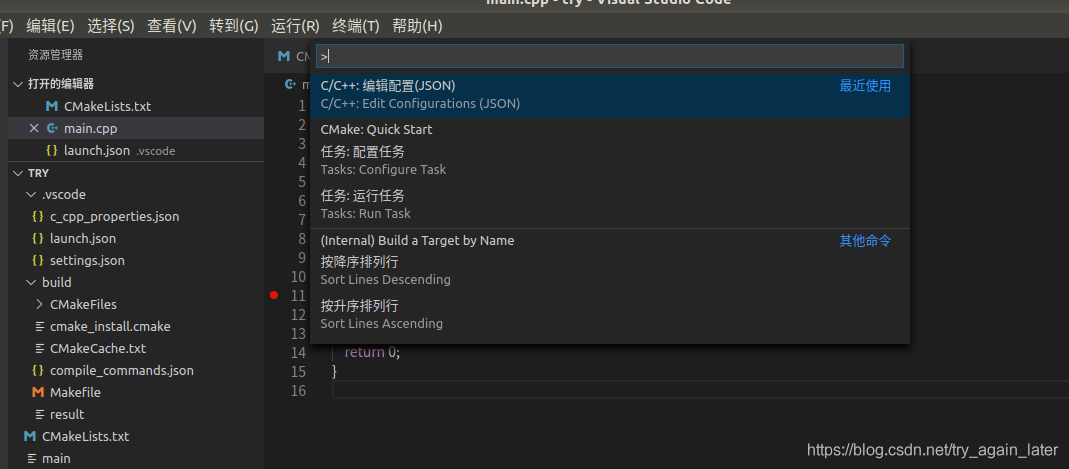
ctrl+shift+p打开命令选项,选择c/c++:edit configuration ,自动生成 c_cpp_properties.json配置文件。
|
1
2
3
4
5
6
7
8
9
10
11
12
13
14
15
16
17
|
{ "configurations": [ { "name": "linux", "includepath": [ "${workspacefolder}/**" ], "defines": [], "compilerpath": "/usr/bin/clang", "cstandard": "c11", "cppstandard": "c++14", "intellisensemode": "clang-x64", "configurationprovider": "ms-vscode.cmake-tools" } ], "version": 4} |
最主要的事includepath的引用和库的路径,根据引用内容进行配置。
三、实例分析
打开《视觉slam十四讲》的ch3的usegeometry文件夹
cmakelists.txt:
|
1
2
3
4
5
6
7
|
cmake_minimum_required( version 2.8 )project( geometry )# 添加eigen头文件include_directories( "/usr/include/eigen3" )add_executable( eigengeometry eigengeometry.cpp ) |
eigengeometry.cpp:
|
1
2
3
4
5
6
7
8
9
10
11
12
13
14
15
16
17
18
19
20
21
22
23
24
25
26
27
28
29
30
31
32
33
34
35
36
37
38
39
40
41
42
43
44
45
46
47
48
49
50
51
52
53
54
55
56
57
58
59
60
|
#include <iostream>#include <cmath>using namespace std;#include <eigen/core>// eigen 几何模块#include <eigen/geometry>/***************************** 本程序演示了 eigen 几何模块的使用方法****************************/int main ( int argc, char** argv ){ // eigen/geometry 模块提供了各种旋转和平移的表示 // 3d 旋转矩阵直接使用 matrix3d 或 matrix3f eigen::matrix3d rotation_matrix = eigen::matrix3d::identity(); // 旋转向量使用 angleaxis, 它底层不直接是matrix,但运算可以当作矩阵(因为重载了运算符) eigen::angleaxisd rotation_vector ( m_pi/4, eigen::vector3d ( 0,0,1 ) ); //沿 z 轴旋转 45 度 cout .precision(3); cout<<"rotation matrix =\n"<<rotation_vector.matrix() <<endl; //用matrix()转换成矩阵 // 也可以直接赋值 rotation_matrix = rotation_vector.torotationmatrix(); // 用 angleaxis 可以进行坐标变换 eigen::vector3d v ( 1,0,0 ); eigen::vector3d v_rotated = rotation_vector * v; cout<<"(1,0,0) after rotation = "<<v_rotated.transpose()<<endl; // 或者用旋转矩阵 v_rotated = rotation_matrix * v; cout<<"(1,0,0) after rotation = "<<v_rotated.transpose()<<endl; // 欧拉角: 可以将旋转矩阵直接转换成欧拉角 eigen::vector3d euler_angles = rotation_matrix.eulerangles ( 2,1,0 ); // zyx顺序,即roll pitch yaw顺序 cout<<"yaw pitch roll = "<<euler_angles.transpose()<<endl; // 欧氏变换矩阵使用 eigen::isometry eigen::isometry3d t=eigen::isometry3d::identity(); // 虽然称为3d,实质上是4*4的矩阵 t.rotate ( rotation_vector ); // 按照rotation_vector进行旋转 t.pretranslate ( eigen::vector3d ( 1,3,4 ) ); // 把平移向量设成(1,3,4) cout << "transform matrix = \n" << t.matrix() <<endl; // 用变换矩阵进行坐标变换 eigen::vector3d v_transformed = t*v; // 相当于r*v+t cout<<"v tranformed = "<<v_transformed.transpose()<<endl; // 对于仿射和射影变换,使用 eigen::affine3d 和 eigen::projective3d 即可,略 // 四元数 // 可以直接把angleaxis赋值给四元数,反之亦然 eigen::quaterniond q = eigen::quaterniond ( rotation_vector ); cout<<"quaternion = \n"<<q.coeffs() <<endl; // 请注意coeffs的顺序是(x,y,z,w),w为实部,前三者为虚部 // 也可以把旋转矩阵赋给它 q = eigen::quaterniond ( rotation_matrix ); cout<<"quaternion = \n"<<q.coeffs() <<endl; // 使用四元数旋转一个向量,使用重载的乘法即可 v_rotated = q*v; // 注意数学上是qvq^{-1} cout<<"(1,0,0) after rotation = "<<v_rotated.transpose()<<endl; return 0;} |
launch.json配置为:
|
1
2
3
4
5
6
7
8
9
10
11
12
13
14
15
16
17
18
19
20
21
22
23
24
25
26
27
|
{ // 使用 intellisense 了解相关属性。 // 悬停以查看现有属性的描述。 // 欲了解更多信息,请访问: https://go.microsoft.com/fwlink/?linkid=830387 "version": "0.2.0", "configurations": [ { "name": "(gdb) 启动", "type": "cppdbg", "request": "launch", "program": "${workspacefolder}/build/eigengeometry",// 更改 "args": [], "stopatentry": false, "cwd": "${workspacefolder}", "environment": [], "externalconsole": false, "mimode": "gdb", "setupcommands": [ { "description": "为 gdb 启用整齐打印", "text": "-enable-pretty-printing", "ignorefailures": true } ] } ]} |
task.json配置为:
|
1
2
3
4
5
6
7
8
9
10
11
12
13
14
15
16
17
18
19
20
21
22
23
|
{ // see https://go.microsoft.com/fwlink/?linkid=733558 // for the documentation about the tasks.json format "version": "2.0.0", "tasks": [ { "label": "make build",//编译的项目名,build,更改 "type": "shell", "command": "cd ./build ;cmake ../ ;make",//编译命令,更改 "group": { "kind": "build", "isdefault": true } }, { "label": "clean", "type": "shell", "command": "make clean", } ]} |
c_cpp_properties.json
|
1
2
3
4
5
6
7
8
9
10
11
12
13
14
15
16
17
18
19
20
|
{ "configurations": [ { "name": "linux", "includepath": [ "${workspacefolder}/**", // 更改 "/usr/include", "/usr/local/include" ], "defines": [], "compilerpath": "/usr/bin/gcc", "cstandard": "c11", "cppstandard": "c++17", "intellisensemode": "clang-x64", "compilecommands": "${workspacefolder}/build/compile_commands.json"// 更改 } ], "version": 4} |
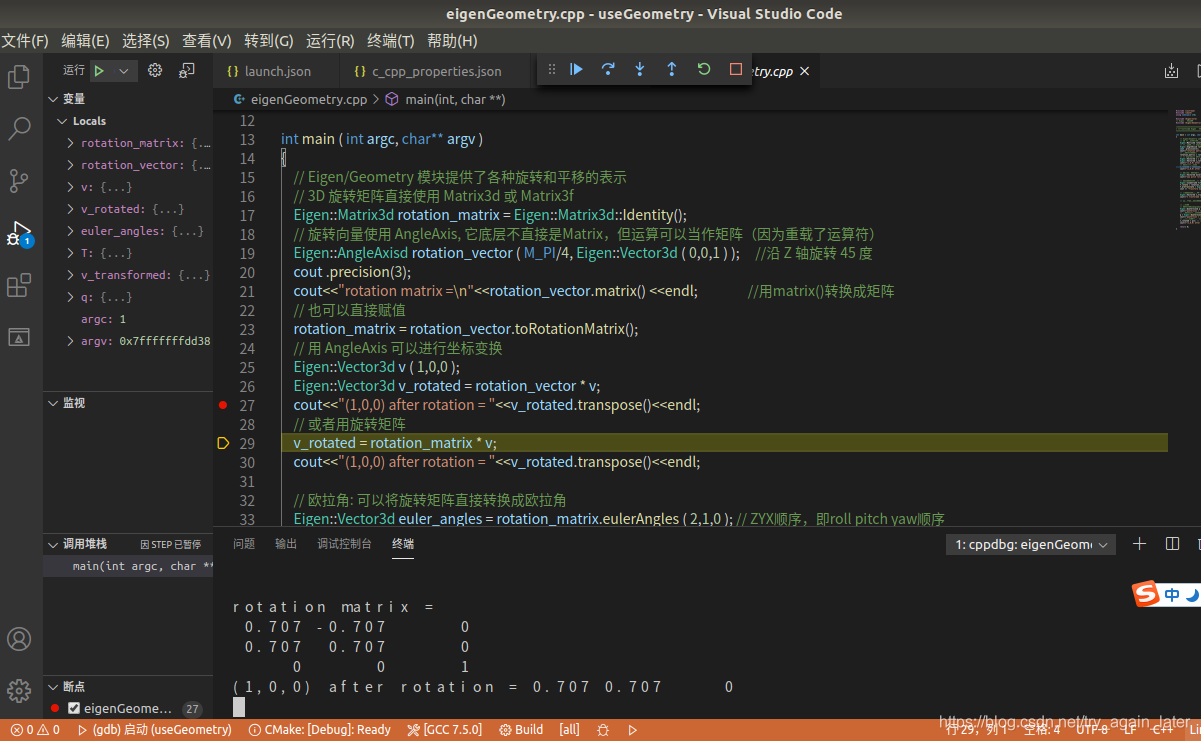
按下build生成可执行文件eigengeometry

生成可执行文件后,按下f5,进行调试
参考:
https://blog.csdn.net/weixin_43374723/article/details/84064644
https://blog.csdn.net/zzz_xxj/article/details/86568353
https://blog.csdn.net/wanzew/article/details/83097457
https://blog.csdn.net/orange_littlegirl/article/details/88397361
到此这篇关于详解ubuntu18.04配置vscode+cmake的c++开发环境的文章就介绍到这了,更多相关vscode cmake配置c++开发环境内容请搜索服务器之家以前的文章或继续浏览下面的相关文章希望大家以后多多支持服务器之家!
原文链接:https://blog.csdn.net/try_again_later/article/details/106770319


