开篇
多线程是开发中必不可少的,往往我们需要多个任务并行,就需要多线程开发;就好比图像检测和图像结果的处理,这就是一个可闭环的任务,用多线程是可以加速这个任务的;
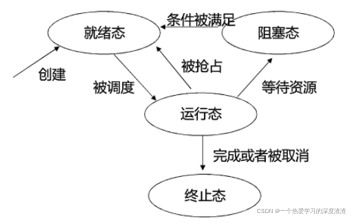
线程的状态
就绪态:线程能够运行,正在等待处理机资源;
运行态:正在运行,可能有多个线程处于运行态;
阻塞态:线程由于等待某些条件而无法运行,例如IO、锁、互斥量等;
终止态:线程从起始函数返回或被取消;

多线程的构建
有三种方式可以构建多线程,前提是都需要引入pthread.h这个头文件;
1、函数;
2、仿函数;
3、Lambda表达式;
三者的本质都是在调用函数;
|
1
2
3
4
5
6
7
8
9
10
11
|
// 函数方式void fun(string s){ cout<< &s<<endl; cout<< "first thread programm"<<s<<endl;}int main(){ string s = "Hell world"; thread th = thread(fun, s); th.join();} |
上面代码为最简单线程的一个构造;
join函数是一个等待线程完成函数,主线程需要等待子线程运行结束才可以结束;还有一个detach的函数,会让线程在后台运行,需要等到程序退出才结束;
计算时间
计算时间在这里介绍两种方式:
一、程序运行时间
|
1
2
3
4
5
6
7
8
|
long n =0;clock_t start,finish;start=clock();while(n<1000000000) n++;finish=clock();printf("spend time %f s ", (double)(finish-start)/CLOCKS_PER_SEC);printf("spend time %f ms ", (double)(finish-start)/1000); |
这种方式和系统时间无关,一般用来调试时打印时间;
二、chrono
|
1
2
3
4
5
6
7
8
9
10
11
12
|
#include <chrono>//方式三 chronostd::chrono::system_clock::time_point Cstart = std::chrono::system_clock::now(); //系统时间// std::chrono::steady_clock::time_point Cstart = std::chrono::steady_clock::now(); //稳定时间long n =0 ;while(n<1000000000)n++;std::chrono::system_clock::time_point Cend = std::chrono::system_clock::now(); //系统时间std::chrono::duration<float> spend_time = Cend-Cstart;cout<<spend_time.count()<<endl; |
这个方式用系统时间进行计算,在实际程序中用这个方式;
共享资源和互斥锁
关于互斥锁的概念,引用这篇博主的讲解:文章
引入互斥锁原因:当有两个线程共享一块资源时,容易造成冲突,也就是上个线程还没结束就进行下个线程,举个例子就是读写操作,添加互斥锁可以很好的解决这个冲突问题;
互斥锁是个简单的加锁方法,互斥锁只有两种状态:上锁(lock)和解锁(unlock);
互斥锁特点:
1、原子性:把一个互斥量锁定为一个原子操作,这意味着如果一个线程锁定了一个互斥量,没有其他线程在同一时间可以成功锁定这个互斥量;
2、唯一性:如果一个线程锁定了一个互斥量,在它解除锁定之前,没有其他线程可以锁定这个互斥量;
3、非繁忙等待:如果一个线程已经锁定了一个互斥量,第二个线程又试图去锁定这个互斥量,则第二个线程将被挂起(不占用任何cpu资源),直到第一个线程解除对这个互斥量的锁定为止,第二个线程则被唤醒并继续执行,同时锁定这个互斥量。
互斥锁的使用:
|
1
2
3
4
5
|
mutex mtx; //创建互斥锁对象mtx.lock();g_pcm_elapseds.push_back(std::make_pair(pcm_data, elapsed)); // 执行语句mtx.unlock(); |
condition_variable
condition_variable条件变量可以阻塞(wait)调用的线程直到使用(notify_one或notify_all)通知恢复为止
使用案例:
|
1
2
3
4
5
6
7
8
9
10
11
12
13
14
15
16
17
18
19
20
21
22
23
24
25
26
27
28
|
std::mutex mtx;std::condition_variable cv;bool ready = false;void print_thread_id(int id){ std::unique_lock<std::mutex> lck(mtx); cv.wait(lck,[]{return ready;}); std::cout<< "thread"<<id <<endl;}void go(){ std::unique_lock<std::mutex> lck(mtx); ready = true; cv.notify_all(); // 唤醒所有线程};int main(){ std::thread threads[10]; for(int i=0;i<10;i++){ threads[i] = std::thread(print_thread_id,i); } std::cout<< " thread read all done"<<endl; go(); for(auto &th:threads) th.join(); return 0;} |
线程池
作用:每一个任务都起一个线程,这样的效率是不高的,起一个线程池,哪个线程空闲就来处理任务,这样的结构高效;
实现思想:管理一个任务队列,一个线程队列,然后每次取一个任务队列分配给一个线程去做,循环反复;
这里参考一个Github:地址
其中的ThreadPool.h头文件写的很好,可以直接使用;
总结
线程这部分涉及的知识点比较多,实现起来细节也多。本篇先对其中的概念部分进行总结,实战代码部分可参考我提供的文章进行学习。后续有精力会更新在线程的实战,想要掌握线程还是需要从实战中学习。
到此这篇关于C++学习之线程详解的文章就介绍到这了,更多相关C++ 线程内容请搜索服务器之家以前的文章或继续浏览下面的相关文章希望大家以后多多支持服务器之家!
原文链接:https://blog.csdn.net/weixin_40620310/article/details/121834841


