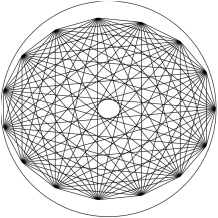
小的时候大家应该都玩过万花尺,将笔尖放置万花尺内不停的转动,便可以画出一幅精致的线稿图,现在我们不用万花尺,我们通过python也能绘制出万花尺图案。
(一)代码
|
1
2
3
4
5
6
7
8
9
10
11
12
13
14
15
16
17
18
19
20
21
22
23
24
25
26
27
28
29
30
31
32
33
34
35
36
37
|
#!/usr/bin/python# -*- coding: utf-8 - *-import mathclass pts:def __ init __(self):self.x = 0self.y = 0points = []def linetodemo():from tkinter import *screenx = 400screeny = 400canvas = canvas(width = screenx,height = screeny,bg = ‘white')aspectratio = 0.85maxpts = 15h = screenyw = screenxxcenter = w / 2ycenter = h / 2radius = (h - 30) / (aspectratio * 2) - 20step = 360 / maxptsangle = 0.0for i in range(maxpts): rads = angle * math.pi / 180.0 p = pts() p.x = xcenter + int(math.cos(rads) * radius) p.y = ycenter - int(math.sin(rads) * radius * aspectratio) angle += step points.append(p)canvas.create_oval(xcenter - radius,ycenter - radius, xcenter + radius,ycenter + radius)for i in range(maxpts): for j in range(i,maxpts): canvas.create_line(points[i].x,points[i].y,points[j].x,points[j].y)canvas.pack()mainloop()if __name__ == '__main__':linetodemo() |
(二)实现结果

我们还可以通过修改不同的参数来实现不同的图案转化,大家可以多试试,做出多种不同的效果图。
到此这篇关于python编写万花尺图案实例的文章就介绍到这了,更多相关python之万花尺图案内容请搜索服务器之家以前的文章或继续浏览下面的相关文章希望大家以后多多支持服务器之家!
原文链接:https://blog.csdn.net/zhimaHTTP/article/details/111406131


