在神经网络入门回顾(感知器、多层感知器)中整理了关于感知器和多层感知器的理论,这里实现关于与门、与非门、或门、异或门的代码,以便对感知器有更好的感觉。
此外,我们使用 pytest 框架进行测试。
|
1
|
pip install pytest |
与门、与非门、或门
通过一层感知器就可以实现与门、与非门、或门。
先写测试代码 test_perception.py:
|
1
2
3
4
5
6
7
8
9
10
11
12
13
14
15
16
17
18
19
20
21
22
23
24
25
26
27
28
29
30
31
32
33
34
|
from perception import and_operate, nand_operate, or_operatedef test_and_operate(): """ 测试与门 :return: """ assert and_operate(1, 1) == 1 assert and_operate(1, 0) == 0 assert and_operate(0, 1) == 0 assert and_operate(0, 0) == 0def test_nand_operate(): """ 测试与非门 :return: """ assert nand_operate(1, 1) == 0 assert nand_operate(1, 0) == 1 assert nand_operate(0, 1) == 1 assert nand_operate(0, 0) == 1def test_or_operate(): """ 测试或门 :return: """ assert or_operate(1, 1) == 1 assert or_operate(1, 0) == 1 assert or_operate(0, 1) == 1 assert or_operate(0, 0) == 0 |
写完测试代码,后面直接输入命令 pytest -v 即可测试代码。
这三个门的权重和偏置是根据人的直觉或者画图得到的,并且不是唯一的。以下是简单的实现,在 perception.py 中写上:
|
1
2
3
4
5
6
7
8
9
10
11
12
13
14
15
16
17
18
19
20
21
22
23
24
25
26
27
28
29
30
31
32
33
34
35
36
37
38
39
40
41
42
43
44
45
46
47
48
49
50
51
52
|
import numpy as npdef step_function(x): """ 阶跃函数 :param x: :return: """ if x <= 0: return 0 else: return 1def and_operate(x1, x2): """ 与门 :param x1: :param x2: :return: """ x = np.array([x1, x2]) w = np.array([0.5, 0.5]) b = -0.7 return step_function(np.sum(w * x) + b)def nand_operate(x1, x2): """ 与非门 :param x1: :param x2: :return: """ x = np.array([x1, x2]) w = np.array([-0.5, -0.5]) b = 0.7 return step_function(np.sum(w * x) + b)def or_operate(x1, x2): """ 或门 :param x1: :param x2: :return: """ x = np.array([x1, x2]) w = np.array([0.5, 0.5]) b = -0.3 return step_function(np.sum(w * x) + b) |
运行 pytest -v 确认测试通过。
|
1
2
3
4
5
6
7
8
9
10
|
========================================================================== test session starts ===========================================================================platform darwin -- python 3.6.8, pytest-5.1.2, py-1.8.0, pluggy-0.12.0 -- /users/mac/.virtualenvs/work/bin/python3...collected 3 items test_perception.py::test_and_operate passed [ 33%]test_perception.py::test_nand_operate passed [ 66%]test_perception.py::test_or_operate passed [100%]=========================================================================== 3 passed in 0.51s ============================================================================ |
异或门

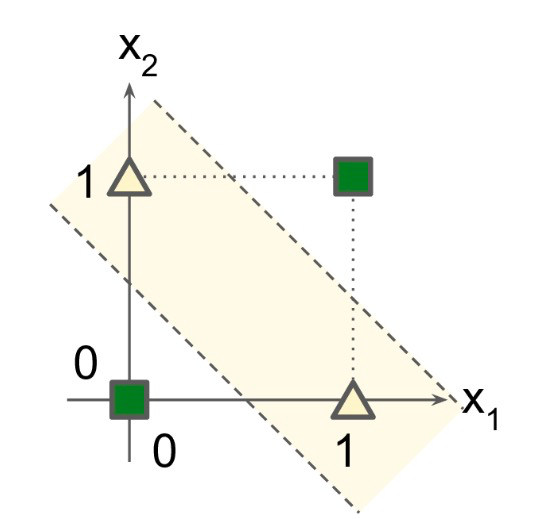
如上图所示,由于异或门不是线性可分的,因此需要多层感知器的结构。
使用两层感知器可以实现异或门。
修改 test_perception.py 文件,加入异或门的测试代码 :
|
1
|
from perception import and_operate, nand_operate, or_operate, xor_operate |
以及
|
1
2
3
4
5
6
7
8
9
|
def test_xor_operate(): """ 测试异或门 :return: """ assert xor_operate(1, 1) == 0 assert xor_operate(1, 0) == 1 assert xor_operate(0, 1) == 1 assert xor_operate(0, 0) == 0 |
在 perception.py 文件里加入异或门的函数:
|
1
2
3
4
5
6
7
8
9
10
|
def xor_operate(x1, x2): """ 异或门 :param x1: :param x2: :return: """ s1 = nand_operate(x1, x2) s2 = or_operate(x1, x2) return and_operate(s1, s2) |
我们通过与非门和或门的线性组合实现了异或门。
运行命令 pytest -v 测试成功。
|
1
2
3
4
5
6
7
8
9
10
11
|
========================================================================== test session starts ===========================================================================platform darwin -- python 3.6.8, pytest-5.1.2, py-1.8.0, pluggy-0.12.0 -- /users/mac/.virtualenvs/work/bin/python3...collected 4 items test_perception.py::test_and_operate passed [ 25%]test_perception.py::test_nand_operate passed [ 50%]test_perception.py::test_or_operate passed [ 75%]test_perception.py::test_xor_operate passed [100%]=========================================================================== 4 passed in 0.60s ============================================================================ |
原文作者:雨先生
原文链接: https://www.cnblogs.com/noluye/p/11465389.html
许可协议:知识共享署名-非商业性使用 4.0 国际许可协议
以上就是python如何实现感知器的逻辑电路的详细内容,更多关于python 感知器的逻辑电路的资料请关注服务器之家其它相关文章!
原文链接:https://www.cnblogs.com/noluye/p/11465389.html


