本指南向您展示如何使用 Linkerd 和 Flagger 来自动化金丝雀部署与 A/B 测试。
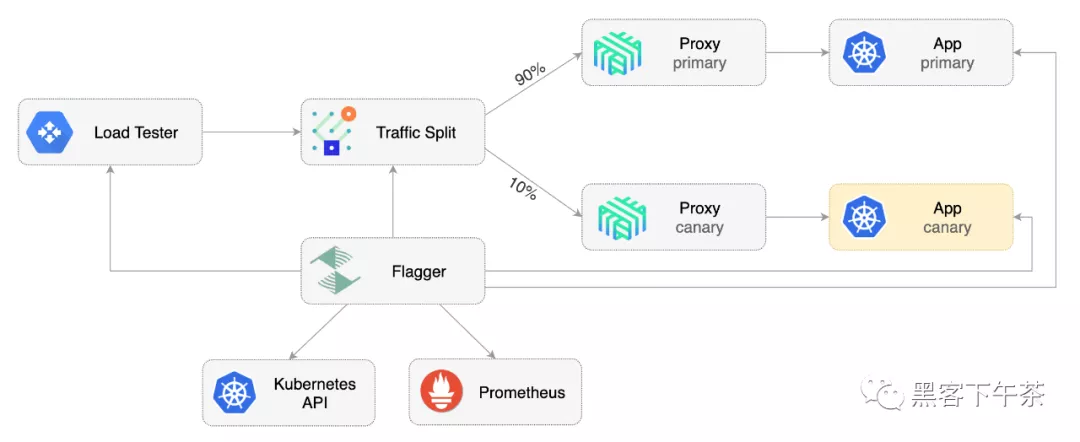
Flagger Linkerd Traffic Split(流量拆分)
前提条件
Flagger 需要 Kubernetes 集群 v1.16 或更新版本和 Linkerd 2.10 或更新版本。
安装 Linkerd the Prometheus(Linkerd Viz 的一部分):
- linkerd install | kubectl apply -f -
- linkerd viz install | kubectl apply -f -
在 linkerd 命名空间中安装 Flagger:
- kubectl apply -k github.com/fluxcd/flagger//kustomize/linkerd
引导程序
Flagger 采用 Kubernetes deployment 和可选的水平 Pod 自动伸缩 (HPA),然后创建一系列对象(Kubernetes 部署、ClusterIP 服务和 SMI 流量拆分)。这些对象将应用程序暴露在网格内部并驱动 Canary 分析和推广。
创建一个 test 命名空间并启用 Linkerd 代理注入:
- kubectl create ns test
- kubectl annotate namespace test linkerd.io/inject=enabled
安装负载测试服务以在金丝雀分析期间生成流量:
- kubectl apply -k https://github.com/fluxcd/flagger//kustomize/tester?ref=main
创建部署和水平 pod autoscaler:
- kubectl apply -k https://github.com/fluxcd/flagger//kustomize/podinfo?ref=main
为 podinfo 部署创建一个 Canary 自定义资源:
- apiVersion: flagger.app/v1beta1
- kind: Canary
- metadata:
- name: podinfo
- namespace: test
- spec:
- # deployment reference
- targetRef:
- apiVersion: apps/v1
- kind: Deployment
- name: podinfo
- # HPA reference (optional)
- autoscalerRef:
- apiVersion: autoscaling/v2beta2
- kind: HorizontalPodAutoscaler
- name: podinfo
- # the maximum time in seconds for the canary deployment
- # to make progress before it is rollback (default 600s)
- progressDeadlineSeconds: 60
- service:
- # ClusterIP port number
- port: 9898
- # container port number or name (optional)
- targetPort: 9898
- analysis:
- # schedule interval (default 60s)
- interval: 30s
- # max number of failed metric checks before rollback
- threshold: 5
- # max traffic percentage routed to canary
- # percentage (0-100)
- maxWeight: 50
- # canary increment step
- # percentage (0-100)
- stepWeight: 5
- # Linkerd Prometheus checks
- metrics:
- - name: request-success-rate
- # minimum req success rate (non 5xx responses)
- # percentage (0-100)
- thresholdRange:
- min: 99
- interval: 1m
- - name: request-duration
- # maximum req duration P99
- # milliseconds
- thresholdRange:
- max: 500
- interval: 30s
- # testing (optional)
- webhooks:
- - name: acceptance-test
- type: pre-rollout
- url: http://flagger-loadtester.test/
- timeout: 30s
- metadata:
- type: bash
- cmd: "curl -sd 'test' http://podinfo-canary.test:9898/token | grep token"
- - name: load-test
- type: rollout
- url: http://flagger-loadtester.test/
- metadata:
- cmd: "hey -z 2m -q 10 -c 2 http://podinfo-canary.test:9898/"
将上述资源另存为 podinfo-canary.yaml 然后应用:
- kubectl apply -f ./podinfo-canary.yaml
当 Canary 分析开始时,Flagger 将在将流量路由到 Canary 之前调用 pre-rollout webhooks。金丝雀分析将运行五分钟,同时每半分钟验证一次 HTTP 指标和 rollout(推出) hooks。
几秒钟后,Flager 将创建 canary 对象:
- # applied
- deployment.apps/podinfo
- horizontalpodautoscaler.autoscaling/podinfo
- ingresses.extensions/podinfo
- canary.flagger.app/podinfo
- # generated
- deployment.apps/podinfo-primary
- horizontalpodautoscaler.autoscaling/podinfo-primary
- service/podinfo
- service/podinfo-canary
- service/podinfo-primary
- trafficsplits.split.smi-spec.io/podinfo
在 boostrap 之后,podinfo 部署将被缩放到零, 并且到 podinfo.test 的流量将被路由到主 pod。在 Canary 分析过程中,可以使用 podinfo-canary.test 地址直接定位 Canary Pod。
自动金丝雀推进
Flagger 实施了一个控制循环,在测量 HTTP 请求成功率、请求平均持续时间和 Pod 健康状况等关键性能指标的同时,逐渐将流量转移到金丝雀。根据对 KPI 的分析,提升或中止 Canary,并将分析结果发布到 Slack。
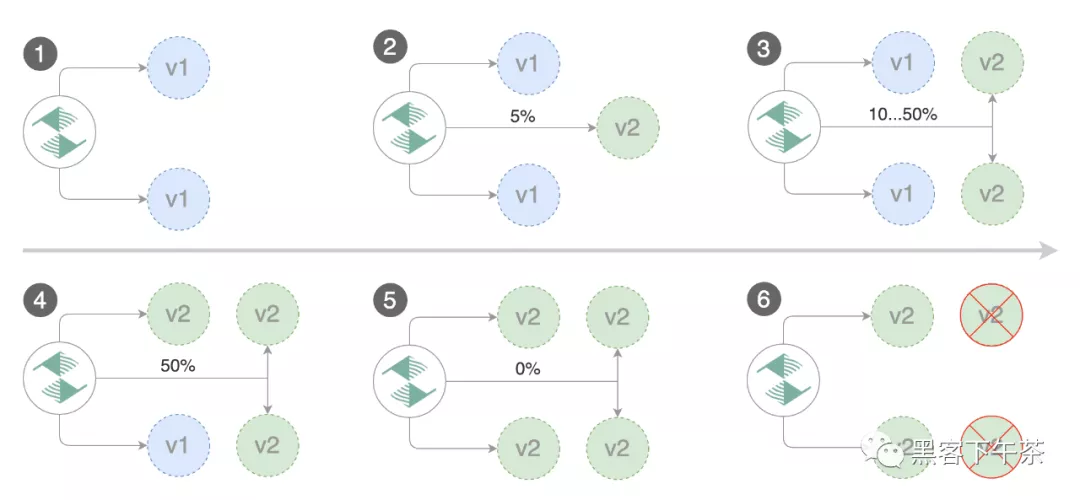
Flagger 金丝雀阶段
通过更新容器镜像触发金丝雀部署:
- kubectl -n test set image deployment/podinfo \
- podinfod=stefanprodan/podinfo:3.1.1
Flagger 检测到部署修订已更改并开始新的部署:
- kubectl -n test describe canary/podinfo
- Status:
- Canary Weight: 0
- Failed Checks: 0
- Phase: Succeeded
- Events:
- New revision detected! Scaling up podinfo.test
- Waiting for podinfo.test rollout to finish: 0 of 1 updated replicas are available
- Pre-rollout check acceptance-test passed
- Advance podinfo.test canary weight 5
- Advance podinfo.test canary weight 10
- Advance podinfo.test canary weight 15
- Advance podinfo.test canary weight 20
- Advance podinfo.test canary weight 25
- Waiting for podinfo.test rollout to finish: 1 of 2 updated replicas are available
- Advance podinfo.test canary weight 30
- Advance podinfo.test canary weight 35
- Advance podinfo.test canary weight 40
- Advance podinfo.test canary weight 45
- Advance podinfo.test canary weight 50
- Copying podinfo.test template spec to podinfo-primary.test
- Waiting for podinfo-primary.test rollout to finish: 1 of 2 updated replicas are available
- Promotion completed! Scaling down podinfo.test
请注意,如果您在 Canary 分析期间对部署应用新更改,Flagger 将重新开始分析。
金丝雀部署由以下任何对象的更改触发:
- Deployment PodSpec(容器镜像container image、命令command、端口ports、环境env、资源resources等)
- ConfigMaps 作为卷挂载或映射到环境变量
- Secrets 作为卷挂载或映射到环境变量
您可以通过以下方式监控所有金丝雀:
- watch kubectl get canaries --all-namespaces
- NAMESPACE NAME STATUS WEIGHT LASTTRANSITIONTIME
- test podinfo Progressing 15 2019-06-30T14:05:07Z
- prod frontend Succeeded 0 2019-06-30T16:15:07Z
- prod backend Failed 0 2019-06-30T17:05:07Z
自动回滚
在金丝雀分析期间,您可以生成 HTTP 500 错误和高延迟来测试 Flagger 是否暂停并回滚有故障的版本。
触发另一个金丝雀部署:
- kubectl -n test set image deployment/podinfo \
- podinfod=stefanprodan/podinfo:3.1.2
使用以下命令执行负载测试器 pod:
- kubectl -n test exec -it flagger-loadtester-xx-xx sh
生成 HTTP 500 错误:
- watch -n 1 curl http://podinfo-canary.test:9898/status/500
生成延迟:
- watch -n 1 curl http://podinfo-canary.test:9898/delay/1
当失败的检查次数达到金丝雀分析阈值时,流量将路由回主服务器,金丝雀缩放为零,并将推出标记为失败。
- kubectl -n test describe canary/podinfo
- Status:
- Canary Weight: 0
- Failed Checks: 10
- Phase: Failed
- Events:
- Starting canary analysis for podinfo.test
- Pre-rollout check acceptance-test passed
- Advance podinfo.test canary weight 5
- Advance podinfo.test canary weight 10
- Advance podinfo.test canary weight 15
- Halt podinfo.test advancement success rate 69.17% < 99%
- Halt podinfo.test advancement success rate 61.39% < 99%
- Halt podinfo.test advancement success rate 55.06% < 99%
- Halt podinfo.test advancement request duration 1.20s > 0.5s
- Halt podinfo.test advancement request duration 1.45s > 0.5s
- Rolling back podinfo.test failed checks threshold reached 5
- Canary failed! Scaling down podinfo.test
自定义指标
Canary analysis 可以通过 Prometheus 查询进行扩展。
让我们定义一个未找到错误的检查。编辑 canary analysis 并添加以下指标:
- analysis:
- metrics:
- - name: "404s percentage"
- threshold: 3
- query: |
- 100 - sum(
- rate(
- response_total{
- namespace="test",
- deployment="podinfo",
- status_code!="404",
- direction="inbound"
- }[1m]
- )
- )
- /
- sum(
- rate(
- response_total{
- namespace="test",
- deployment="podinfo",
- direction="inbound"
- }[1m]
- )
- )
- * 100
上述配置通过检查 HTTP 404 req/sec 百分比是否低于总流量的 3% 来验证金丝雀版本。如果 404s 率达到 3% 阈值,则分析将中止,金丝雀被标记为失败。
通过更新容器镜像触发金丝雀部署:
- kubectl -n test set image deployment/podinfo \
- podinfod=stefanprodan/podinfo:3.1.3
生成 404:
- watch -n 1 curl http://podinfo-canary:9898/status/404
监视 Flagger 日志:
- kubectl -n linkerd logs deployment/flagger -f | jq .msg
- Starting canary deployment for podinfo.test
- Pre-rollout check acceptance-test passed
- Advance podinfo.test canary weight 5
- Halt podinfo.test advancement 404s percentage 6.20 > 3
- Halt podinfo.test advancement 404s percentage 6.45 > 3
- Halt podinfo.test advancement 404s percentage 7.22 > 3
- Halt podinfo.test advancement 404s percentage 6.50 > 3
- Halt podinfo.test advancement 404s percentage 6.34 > 3
- Rolling back podinfo.test failed checks threshold reached 5
- Canary failed! Scaling down podinfo.test
如果您配置了 Slack,Flager 将发送一条通知,说明金丝雀失败的原因。
Linkerd Ingress
有两个入口控制器与 Flagger 和 Linkerd 兼容:NGINX 和 Gloo。
安装 NGINX:
- helm upgrade -i nginx-ingress stable/nginx-ingress \
- --namespace ingress-nginx
为 podinfo 创建一个 ingress 定义,将传入标头重写为内部服务名称(Linkerd 需要):
- apiVersion: extensions/v1beta1
- kind: Ingress
- metadata:
- name: podinfo
- namespace: test
- labels:
- app: podinfo
- annotations:
- kubernetes.io/ingress.class: "nginx"
- nginx.ingress.kubernetes.io/configuration-snippet: |
- proxy_set_header l5d-dst-override $service_name.$namespace.svc.cluster.local:9898;
- proxy_hide_header l5d-remote-ip;
- proxy_hide_header l5d-server-id;
- spec:
- rules:
- - host: app.example.com
- http:
- paths:
- - backend:
- serviceName: podinfo
- servicePort: 9898
使用 ingress controller 时,Linkerd 流量拆分不适用于传入流量,因为 NGINX 在网格之外运行。为了对前端应用程序运行金丝雀分析,Flagger 创建了一个 shadow ingress 并设置了 NGINX 特定的注释(annotations)。
A/B 测试
除了加权路由,Flagger 还可以配置为根据 HTTP 匹配条件将流量路由到金丝雀。在 A/B 测试场景中,您将使用 HTTP headers 或 cookies 来定位您的特定用户群。这对于需要会话关联的前端应用程序特别有用。
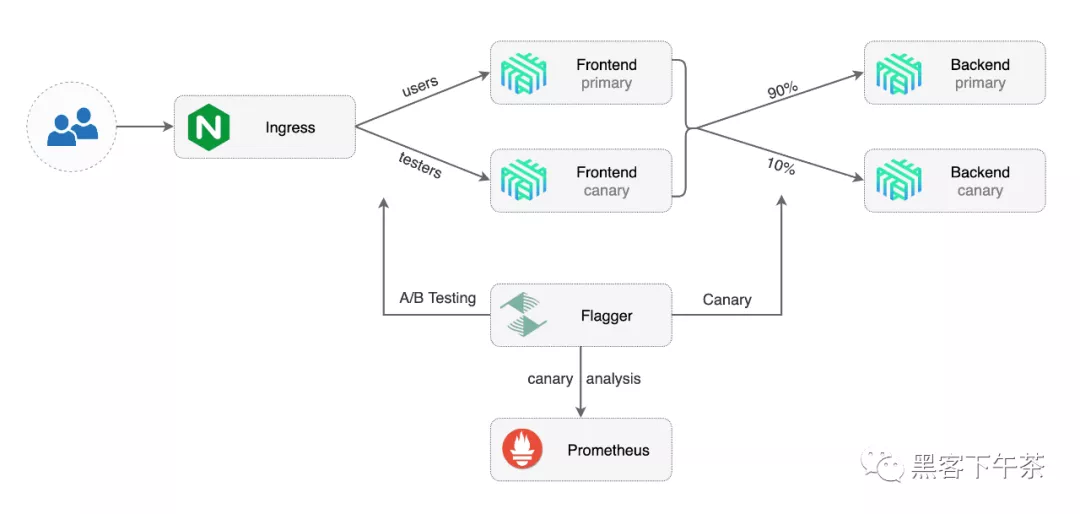
Flagger Linkerd Ingress
编辑 podinfo 金丝雀分析,将提供者设置为 nginx,添加 ingress 引用,移除 max/step 权重并添加匹配条件和 iterations:
- apiVersion: flagger.app/v1beta1
- kind: Canary
- metadata:
- name: podinfo
- namespace: test
- spec:
- # ingress reference
- provider: nginx
- ingressRef:
- apiVersion: extensions/v1beta1
- kind: Ingress
- name: podinfo
- targetRef:
- apiVersion: apps/v1
- kind: Deployment
- name: podinfo
- autoscalerRef:
- apiVersion: autoscaling/v2beta2
- kind: HorizontalPodAutoscaler
- name: podinfo
- service:
- # container port
- port: 9898
- analysis:
- interval: 1m
- threshold: 10
- iterations: 10
- match:
- # curl -H 'X-Canary: always' http://app.example.com
- - headers:
- x-canary:
- exact: "always"
- # curl -b 'canary=always' http://app.example.com
- - headers:
- cookie:
- exact: "canary"
- # Linkerd Prometheus checks
- metrics:
- - name: request-success-rate
- thresholdRange:
- min: 99
- interval: 1m
- - name: request-duration
- thresholdRange:
- max: 500
- interval: 30s
- webhooks:
- - name: acceptance-test
- type: pre-rollout
- url: http://flagger-loadtester.test/
- timeout: 30s
- metadata:
- type: bash
- cmd: "curl -sd 'test' http://podinfo-canary:9898/token | grep token"
- - name: load-test
- type: rollout
- url: http://flagger-loadtester.test/
- metadata:
- cmd: "hey -z 2m -q 10 -c 2 -H 'Cookie: canary=always' http://app.example.com"
上述配置将运行 10 分钟的分析,目标用户是:canary cookie 设置为 always 或使用 X-Canary: always header 调用服务。
请注意,负载测试现在针对外部地址并使用 canary cookie。
通过更新容器镜像触发金丝雀部署:
- kubectl -n test set image deployment/podinfo \
- podinfod=stefanprodan/podinfo:3.1.4
Flagger 检测到部署修订已更改并开始 A/B 测试:
- kubectl -n test describe canary/podinfo
- Events:
- Starting canary deployment for podinfo.test
- Pre-rollout check acceptance-test passed
- Advance podinfo.test canary iteration 1/10
- Advance podinfo.test canary iteration 2/10
- Advance podinfo.test canary iteration 3/10
- Advance podinfo.test canary iteration 4/10
- Advance podinfo.test canary iteration 5/10
- Advance podinfo.test canary iteration 6/10
- Advance podinfo.test canary iteration 7/10
- Advance podinfo.test canary iteration 8/10
- Advance podinfo.test canary iteration 9/10
- Advance podinfo.test canary iteration 10/10
- Copying podinfo.test template spec to podinfo-primary.test
- Waiting for podinfo-primary.test rollout to finish: 1 of 2 updated replicas are available
- Promotion completed! Scaling down podinfo.test
原文链接:https://mp.weixin.qq.com/s/8ThwH9DvFAnc-trOSf_nNQ


