本文实例为大家分享了python实现简单图片物体标注工具的具体代码,供大家参考,具体内容如下
|
1
2
3
4
5
6
7
8
9
10
11
12
13
14
15
16
17
18
19
20
21
22
23
24
25
26
27
28
29
30
31
32
33
34
35
36
37
38
39
40
41
42
43
44
45
46
47
48
49
50
51
52
53
54
55
56
57
58
59
60
61
62
63
64
65
66
67
68
69
70
71
72
73
74
75
76
77
78
79
80
81
82
83
84
85
86
87
88
89
90
91
92
93
94
95
96
97
98
99
100
101
102
103
104
105
106
107
108
109
110
111
112
113
114
115
116
117
118
119
120
121
122
123
124
125
126
127
128
129
130
131
132
133
134
135
136
137
138
139
140
141
142
143
144
145
146
147
148
149
150
151
152
153
154
155
156
157
158
159
160
161
162
163
164
165
166
167
168
169
170
171
172
173
174
175
176
177
178
179
180
181
182
183
184
185
186
187
188
189
190
191
192
193
194
195
196
197
198
199
200
201
202
203
204
205
206
207
208
209
210
211
212
213
214
215
216
217
218
219
220
221
222
223
224
225
226
227
228
229
230
231
232
233
234
235
236
237
238
239
240
241
242
243
244
245
246
247
248
249
250
251
252
253
254
255
256
257
258
259
260
261
262
263
264
265
266
267
268
269
270
271
272
273
274
275
276
277
278
279
280
281
282
283
284
|
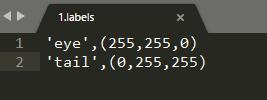
# coding: utf-8 """物体检测标注小工具基本思路:对要标注的图像建立一个窗口循环,然后每次循环的时候对图像进行一次复制,鼠标在画面上画框的操作、画好的框的相关信息在全局变量中保存,并且在每个循环中根据这些信息,在复制的图像上重新画一遍,然后显示这份复制的图像。简化的设计过程:1、输入是一个文件夹的路径,包含了所需标注物体框的图片。如果图片中标注了物体,则生成一个相同名称加额外后缀_bbox的文件,来保存标注信息。2、标注的方式:按下鼠标左键选择物体框的左上角,松开鼠标左键选择物体框的右下角,按下鼠标右键删除上一个标注好的物体框。所有待标注物体的类别和标注框颜色由用户自定义。如果没有定义则默认只标注一种物体,定义该物体名称为object。3、方向键 ← 和 → 键用来遍历图片, ↑ 和 ↓ 键用来选择当前要标注的物体,delete键删除一种脏图片和对应的标注信息。自定义标注物体和颜色的信息用一个元组表示第一个元素表示物体名字第二个元素表示bgr颜色的tuple或者代表标注框坐标的元祖利用repr()保存和eval()读取""" """一些说明:1. 标注相关的物体标签文件即 .labels 结尾的文件,需要与所选文件夹添加到同一个根目录下一定要注意这一点,否则无法更新标注物体的类型标签,致使从始至终都只有一个默认物体出现我就是这个原因,拖了两三天才整好,当然也顺便仔细的读了这篇代码。同时也学习了@staticmethod以及相应python的decorator的知识。可以说,在曲折中前进才是棒的。2. .labels文件为预设物体标签文件,其内容具体格式为:'object1', (b, g, r)'object2', (b, g, r)'object3', (b, g, r)……具体见文后图片。3. 最后生成的标注文件,在文后会有,到时再进行解释。""" import osimport cv2# tkinter是python内置的简单gui库,实现打开文件夹、确认删除等操作十分方便from tkmessagebox import askyesno# 定义标注窗口的默认名称window_name = 'simple bounding box labeling tool'# 定义画面刷新帧率fps = 24# 定义支持的图像格式supported_formats = ['jpg', 'jpeg', 'png']# 定义默认物体框的名字为object,颜色为蓝色,当没有用户自定义物体时,使用该物体default_color = {'object': (255, 0, 0)}# 定义灰色,用于信息显示的背景和未定义物体框的显示color_gray = (192, 192, 192)# 在图像下方多处bar_height的区域,用于显示信息bar_height = 16# 上下左右,delete键对应的cv2.waitkey()函数的返回值key_up = 2490368key_down = 2621440key_left = 2424832key_right = 2555904key_delete = 3014656# 空键用于默认循环key_empty = 0get_bbox_name = '{}.bbox'.format # 定义物体框标注工具类class simplebboxlabeling: def __init__(self, data_dir, fps=fps, windown_name=window_name): self._data_dir = data_dir self.fps = fps self.window_name = windown_name if windown_name else window_name # pt0 是正在画的左上角坐标, pt1 是鼠标所在坐标 self._pt0 = none self._pt1 = none # 表明当前是否正在画框的状态标记 self._drawing = false # 当前标注物体的名称 self._cur_label = none # 当前图像对应的所有已标注框 self._bboxes = [] # 如果有用户自己定义的标注信息则读取,否则使用默认的物体和颜色 label_path = '{}.labels'.format(self._data_dir) self.label_colors = default_color if not os.path.exists(label_path) else self.load_labels(label_path) # self.label_colors = self.load_labels(label_path) # 获取已经标注的文件列表和未标注的文件列表 imagefiles = [x for x in os.listdir(self._data_dir) if x[x.rfind('.') + 1:].lower() in supported_formats] labeled = [x for x in imagefiles if os.path.exists(get_bbox_name(x))] to_be_labeled = [x for x in imagefiles if x not in labeled] # 每次打开一个文件夹,都自动从还未标注的第一张开始 self._filelist = labeled + to_be_labeled self._index = len(labeled) if self._index > len(self._filelist) - 1: self._index = len(self._filelist) - 1 # 鼠标回调函数 def _mouse_ops(self, event, x, y, flags, param): # 按下左键,坐标为左上角,同时表示开始画框,改变drawing,标记为true if event == cv2.event_lbuttondown: self._drawing = true self._pt0 = (x, y) # 松开左键,表明画框结束,坐标为有效较并保存,同时改变drawing,标记为false elif event == cv2.event_lbuttonup: self._drawing = false self._pt1 = (x, y) self._bboxes.append((self._cur_label, (self._pt0, self._pt1))) # 实时更新右下角坐标 elif event == cv2.event_mousemove: self._pt1 = (x, y) # 按下鼠标右键删除最近画好的框 elif event == cv2.event_rbuttonup: if self._bboxes: self._bboxes.pop() # 清除所有标注框和当前状态 def _clean_bbox(self): self._pt0 = none self._pt1 = none self._drawing = false self._bboxes = [] # 画标注框和当前信息的函数 def _draw_bbox(self, img): # 在图像下方多出bar_height的区域,显示物体信息 h, w = img.shape[:2] canvas = cv2.copymakeborder(img, 0, bar_height, 0, 0, cv2.border_constant, value=color_gray) # 正在标注的物体信息,如果鼠标左键已经按下,则像是两个点坐标,否则显示当前待标注物体的名 label_msg = '{}: {}, {}'.format(self._cur_label, self._pt0, self._pt1) \ if self._drawing \ else 'current label: {}'.format(self._cur_label) # 显示当前文件名,文件个数信息 msg = '{}/{}: {} | {}'.format(self._index + 1, len(self._filelist), self._filelist[self._index], label_msg) cv2.puttext(canvas, msg, (1, h+12), cv2.font_hershey_simplex, 0.5, (0, 0, 0), 1) # 画出已经标好的框和对应名字 for label, (bpt0, bpt1) in self._bboxes: label_color = self.label_colors[label] if label in self.label_colors else color_gray cv2.rectangle(canvas, bpt0, bpt1, label_color, thickness=2) cv2.puttext(canvas, label, (bpt0[0]+3, bpt0[1]+15), cv2.font_hershey_simplex, 0.5, label_color, 2) # 画正在标注的框和对应名字 if self._drawing: label_color = self.label_colors[self._cur_label] if self._cur_label in self.label_colors else color_gray if (self._pt1[0] >= self._pt0[0]) and (self._pt1[1] >= self._pt1[0]): cv2.rectangle(canvas, self._pt0, self._pt1, label_color, thickness=2) cv2.puttext(canvas, self._cur_label, (self._pt0[0] + 3, self._pt0[1] + 15), cv2.font_hershey_simplex, 0.5, label_color, 2) return canvas # 利用repr()函数导出标注框数据到文件 @staticmethod def export_bbox(filepath, bboxes): if bboxes: with open(filepath, 'w') as f: for bbox in bboxes: line = repr(bbox) + '\n' f.write(line) elif os.path.exists(filepath): os.remove(filepath) # 利用eval()函数读取标注框字符串到数据 @staticmethod def load_bbox(filepath): bboxes = [] with open(filepath, 'r') as f: line = f.readline().rstrip() while line: bboxes.append(eval(line)) line = f.readline().rstrip() return bboxes # 利用eval()函数读取物体及对应颜色信息到数据 @staticmethod def load_labels(filepath): label_colors = {} with open(filepath, 'r') as f: line = f.readline().rstrip() while line: label, color = eval(line) label_colors[label] = color line = f.readline().rstrip() print label_colors return label_colors # 读取图像文件和对应标注框信息(如果有的话) @staticmethod def load_sample(filepath): img = cv2.imread(filepath) bbox_filepath = get_bbox_name(filepath) bboxes = [] if os.path.exists(bbox_filepath): bboxes = simplebboxlabeling.load_bbox(bbox_filepath) return img, bboxes # 导出当前标注框信息并清空 def _export_n_clean_bbox(self): bbox_filepath = os.sep.join([self._data_dir, get_bbox_name(self._filelist[self._index])]) self.export_bbox(bbox_filepath, self._bboxes) self._clean_bbox() # 删除当前样本和对应的标注框信息 def _delete_current_sample(self): filename = self._filelist[self._index] filepath = os.sep.join([self._data_dir, filename]) if os.path.exists(filepath): os.remove(filepath) filepath = get_bbox_name(filepath) if os.path.exists(filepath): os.remove(filepath) self._filelist.pop(self._index) print('{} is deleted!'.format(filename)) # 开始opencv窗口循环的方法,程序的主逻辑 def start(self): # 之前标注的文件名,用于程序判断是否需要执行一次图像读取 last_filename = '' # 标注物体在列表中的下标 label_index = 0 # 所有标注物体名称的列表 labels = self.label_colors.keys() # 带标注物体的种类数 n_labels = len(labels) # 定义窗口和鼠标回调 cv2.namedwindow(self.window_name) cv2.setmousecallback(self.window_name, self._mouse_ops) key = key_empty # 定义每次循环的持续时间 delay = int(1000 / fps) # 只要没有按下delete键,就持续循环 while key != key_delete: # 上下方向键选择当前标注物体 if key == key_up: if label_index == 0: pass else: label_index -= 1 elif key == key_down: if label_index == n_labels - 1: pass else: label_index += 1 # 左右方向键选择标注图片 elif key == key_left: # 已经到了第一张图片的话就不需要清空上一张 if self._index > 0: self._export_n_clean_bbox() self._index -= 1 if self._index < 0: self._index = 0 elif key == key_right: # 已经到了最后一张图片的就不需要清空上一张 if self._index < len(self._filelist) - 1: self._export_n_clean_bbox() self._index += 1 if self._index > len(self._filelist) - 1: self._index = len(self._filelist) - 1 # 删除当前图片和对应标注的信息 elif key == key_delete: if askyesno('delete sample', 'are you sure?'): self._delete_current_sample() key = key_empty continue # 如果键盘操作执行了换图片, 则重新读取, 更新图片 filename = self._filelist[self._index] if filename != last_filename: filepath = os.sep.join([self._data_dir, filename]) img, self._bboxes = self.load_sample(filepath) # 更新当前标注物体名称 self._cur_label = labels[label_index] # 把标注和相关信息画在图片上并显示指定的时间 canvas = self._draw_bbox(img) cv2.imshow(self.window_name, canvas) key = cv2.waitkey(delay) # 当前文件名就是下次循环的老文件名 last_filename = filename print 'finished!' cv2.destroyallwindows() #如果退出程序,需要对当前文件进行保存 self.export_bbox(os.sep.join([self._data_dir, get_bbox_name(filename)]), self._bboxes) print 'labels updated!' |
以上实现了工具类,当然需要一个入口函数,将工具类保存为simplebboxlabeling.py,新建run_detect.py,写以下内容:
|
1
2
3
4
5
6
7
8
9
10
11
|
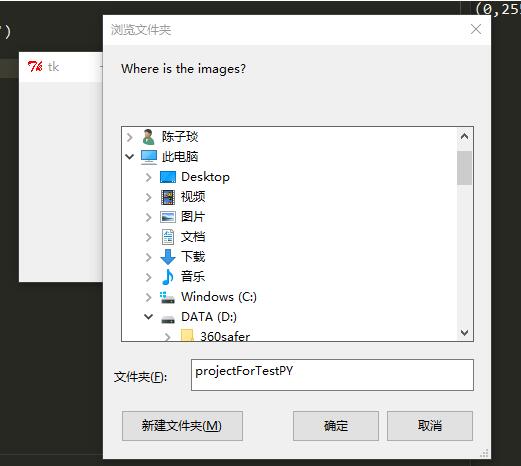
# coding:utf-8 # tkinter是python内置的简单gui库,实现打开文件夹、确认删除等操作十分方便from tkfiledialog import askdirectory# 导入创建的工具类from simplebboxlabeling import simplebboxlabeling if __name__ == '__main__': dir_with_images = askdirectory(title='where is the images?') labeling_task = simplebboxlabeling(dir_with_images) labeling_task.start() |
以下是实现后的效果:

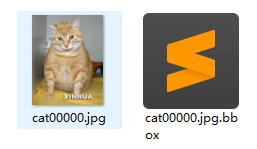
需要的文件

.labels文件内容格式

选择文件夹

进行标注

生成相应标签内容

标注结果
标注后的文件格式为:物体,左上角(起点)和右下角(终点)的坐标。
参考资料: 《深度学习与计算机视觉——算法原理、框架应用与代码实现》 叶韵(编著)
以上就是本文的全部内容,希望对大家的学习有所帮助,也希望大家多多支持服务器之家。
原文链接:https://blog.csdn.net/weixin_34290352/article/details/87630162


