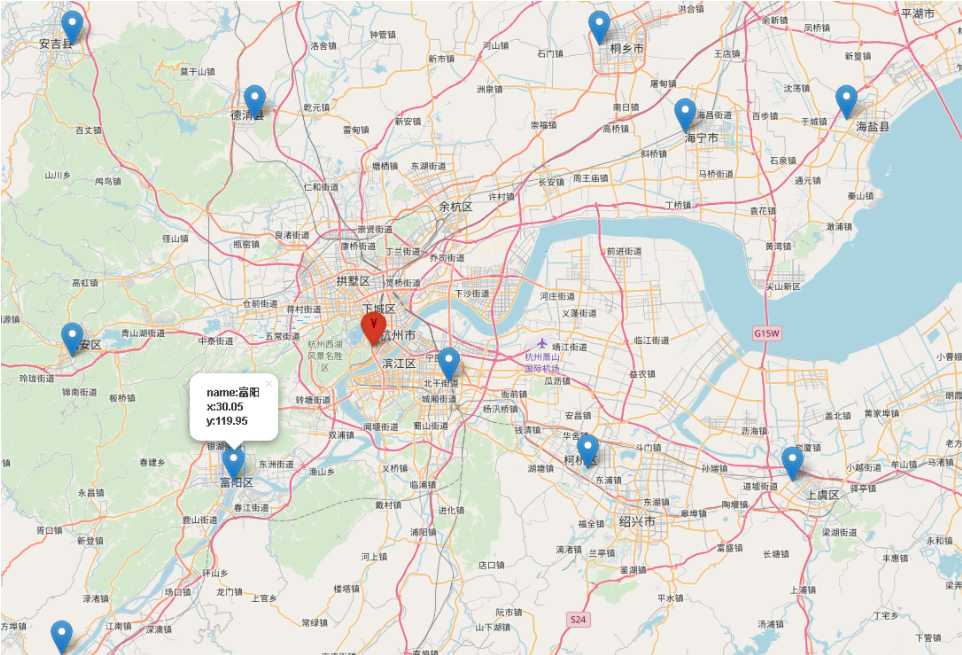
使用folium excel 绘制point
制作内容
- 根据气象台资料获得的点进行绘制
- 对一个特殊的点做特别的标注
- 数据来源
|
1
2
3
4
5
6
7
8
9
10
11
12
13
14
15
16
17
18
19
20
21
22
23
24
25
26
27
28
29
30
31
32
33
34
35
36
37
38
39
40
41
42
43
44
45
46
47
48
49
50
51
52
53
54
55
56
57
58
59
60
61
62
63
64
65
66
67
68
69
70
71
72
73
|
#!/usr/bin/env python# -*- coding: utf-8 -*-# @file : map03.py# @author: huifer# @date : 2018/6/28import pandas as pdimport mathimport foliumdef degree_conversion_decimal(x): """ 度分转换成十进制 :param x: float :return: integer float """ integer = int(x) integer = integer + (x - integer) * 1.66666667 return integerdef distance(origin, destination): """ 经纬度计算两点距离 :param origin: :param destination: :return: """ lat1, lon1 = origin lat2, lon2 = destination radius = 6371 # km dlat = math.radians(lat2 - lat1) dlon = math.radians(lon2 - lon1) a = math.sin(dlat / 2) * math.sin(dlat / 2) + math.cos(math.radians(lat1)) \ * math.cos(math.radians(lat2)) * math.sin(dlon / 2) * math.sin(dlon / 2) c = 2 * math.atan2(math.sqrt(a), math.sqrt(1 - a)) d = radius * c return d# 数据准备data = pd.read_excel('surf_chn_mul_hor_station.xlsx')# 修改成十进制 以及保留1一位小数data['经度'] = data['经度'].apply(degree_conversion_decimal)data['纬度'] = data['纬度'].apply(degree_conversion_decimal)data['观测场拔海高度(米)'] = data['观测场拔海高度(米)'].apply(lambda x: round(x, 1))data['气压传感器拔海高度(米)'] = data['气压传感器拔海高度(米)'].apply(lambda x: round(x, 1))# 保存新的文件# data.to_csv('气象站信息十进制.csv')data["距离杭州(km)"] = data.apply(lambda r: distance((r['纬度'], r['经度']), (30.14, 120.1)), axis=1)# print(data[data['距离杭州(km)']<100].sort_values('距离杭州(km)'))# 选择除了杭州以外的内容selected_st = data[data['距离杭州(km)'] < 100].sort_values('距离杭州(km)').iloc[1::]# 展示地图# 提取数据hzdata = data.ix[data['站名'] == '杭州', ['站名', '纬度', '经度']]mymap = folium.map(location=[hzdata.iloc[0]['纬度'], hzdata.iloc[0]['经度']])icon_hz = dict( prefix='fa', color='red', icon_color='darkred', icon='cny')icon = folium.icon(**icon_hz)folium.marker( location=[hzdata.iloc[0]['纬度'], hzdata.iloc[0]['经度']], popup="杭州", icon=icon).add_to(mymap)for i in range(len(selected_st)): name = selected_st.iloc[i]['站名'] x = selected_st.iloc[i]['纬度'] y = selected_st.iloc[i]['经度'] test = folium.html( '<b>name:{}</b></br> <b>x:{}</b></br> <b>y:{}</b></br>'.format(name, x, y), script=true) popup = folium.popup(test, max_width=2650) folium.marker( location=[x, y], popup=popup, ).add_to(mymap)mymap.save("test.html") |
成果展示

总结
以上就是这篇文章的全部内容了,希望本文的内容对大家的学习或者工作具有一定的参考学习价值,谢谢大家对服务器之家的支持。如果你想了解更多相关内容请查看下面相关链接
原文链接:https://blog.csdn.net/staHuri/article/details/80842679


