首先,简单介绍一下execl中工作簿和工作表的区别:
工作簿的英文是book(workbook),工作表的英文是sheet(worksheet)。
•一个工作簿就是一个独立的文件
•一个工作簿里面可以有1个或者多个工作表
•工作簿是工作表的集合
1:使用python实现对excel文件的读写,首先需要安装专用的模块(可以自己编写)xlrd,xlwt模块
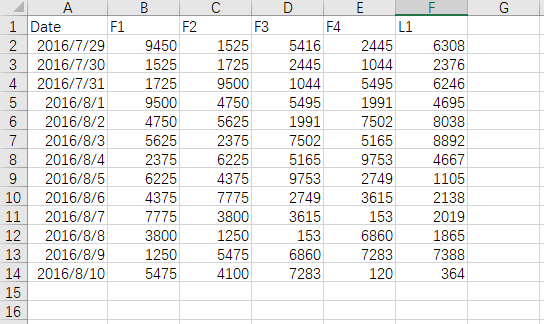
2:读取excel数据(注意事项:sheet编号,行号,列号都是从索引0开始)

|
1
2
3
4
5
6
7
8
9
10
11
12
13
14
15
16
17
18
19
20
21
22
23
24
25
26
27
28
29
30
31
32
33
34
35
36
37
38
39
40
41
42
43
44
45
46
47
|
import xlrd# 设置路径path = 'e:/input.xlsx'# 打开execlworkbook = xlrd.open_workbook(path)# 输出excel文件中所有sheet的名字print(workbook.sheet_names())# 根据sheet索引或者名称获取sheet内容data_sheet = workbook.sheets()[0] # 通过索引获取# data_sheet = workbook.sheet_by_index(0) # 通过索引获取# data_sheet = workbook.sheet_by_name(u'名称') # 通过名称获取print(data_sheet.name) # 获取sheet名称rownum = data_sheet.nrows # sheet行数colnum = data_sheet.ncols # sheet列数# 获取所有单元格的内容list = []for i in range(rownum): rowlist = [] for j in range(colnum): rowlist.append(data_sheet.cell_value(i, j)) list.append(rowlist)# 输出所有单元格的内容for i in range(rownum): for j in range(colnum): print(list[i][j], '\t\t', end="") print()# 获取整行和整列的值(列表)rows = data_sheet.row_values(0) # 获取第一行内容cols = data_sheet.col_values(1) # 获取第二列内容# print (rows)# print (cols)# 获取单元格内容cell_a1 = data_sheet.cell(0, 0).valuecell_b1 = data_sheet.row(0)[1].value # 使用行索引cell_c1 = data_sheet.cell(0, 2).valuecell_d2 = data_sheet.col(3)[1].value # 使用列索引print(cell_a1, cell_b1, cell_c1, cell_d2)# 获取单元格内容的数据类型# ctype:0 empty,1 string, 2 number, 3 date, 4 boolean, 5 errorprint('cell(0,0)数据类型:', data_sheet.cell(0, 0).ctype)print('cell(1,0)数据类型:', data_sheet.cell(1, 0).ctype)print('cell(1,1)数据类型:', data_sheet.cell(1, 1).ctype)print('cell(1,2)数据类型:', data_sheet.cell(1, 2).ctype)# 获取单元格内容为日期的数据date_value = xlrd.xldate_as_tuple(data_sheet.cell_value(1,0),workbook.datemode)print(type(date_value), date_value)print('%d:%d:%d' % (date_value[0:3])) |
3:创建excel并写入数据

|
1
2
3
4
5
6
7
8
9
10
11
12
13
14
15
16
17
18
19
20
21
22
23
24
25
26
27
28
29
|
import xlwtdef set_style(name, height, bold=false): style = xlwt.xfstyle() # 初始化样式 font = xlwt.font() # 为样式创建字体 font.name = name font.bold = bold font.color_index = 4 font.height = height style.font = font return styledef write_excel(path): # 创建工作簿 workbook = xlwt.workbook(encoding='utf-8') # 创建sheet data_sheet = workbook.add_sheet('demo') row0 = [u'字段名称', u'大致时段', 'crnti', 'cell-id'] row1 = [u'测试', '15:50:33-15:52:14', 22706, 4190202] # 生成第一行和第二行 for i in range(len(row0)): data_sheet.write(0, i, row0[i], set_style('times new roman', 220, true)) data_sheet.write(1, i, row1[i], set_style('times new roman', 220, true)) # 保存文件 # workbook.save('demo.xls') workbook.save(path)if __name__ == '__main__': # 设置路径 path = 'e:/demo.xls' write_excel(path) print(u'创建demo.xls文件成功') |
再看一个例子:
转载:ryan in c++
基本的write函数接口很简单:
•新建一个excel文件: file = xlwt.workbook() (注意这里的workbook首字母是大写)
•新建一个sheet: table = file.add_sheet('sheet_name')
•写入数据table.write(行,列,value): table.write(0,0,'test')
•如果是写入中文,则要用u'汉字'的形式。比如: table.write(0,0, u'汉字')
•合并单元格: table.write_merge(x, x + m, y, y + n, string, style)
•x表示行,y表示列,m表示跨行个数,n表示跨列个数,string表示要写入的单元格内容,style表示单元格样式
|
1
2
3
4
5
6
7
8
9
10
11
12
13
14
15
16
17
18
19
20
21
22
23
24
25
26
27
28
29
30
31
32
33
34
35
36
37
38
39
40
41
42
43
44
45
46
47
48
49
50
|
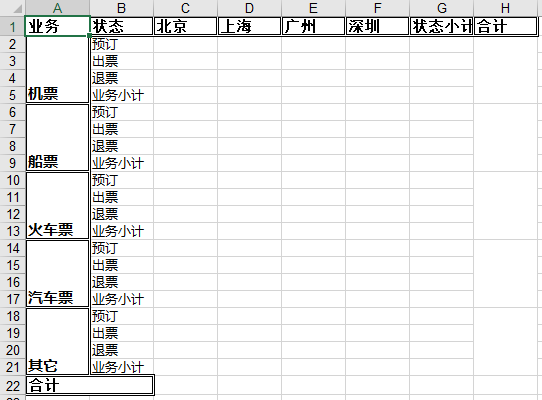
"""设置单元格样式"""import xlwtdef set_style(font_name, font_height, bold=false): style = xlwt.xfstyle() # 初始化样式 font = xlwt.font() # 为样式创建字体 font.name = font_name # 'times new roman' font.bold = bold font.color_index = 4 font.height = font_height borders = xlwt.borders() borders.left = 6 borders.right = 6 borders.top = 6 borders.bottom = 6 style.font = font style.borders = borders return style# 写exceldef write_excel(output_path): f = xlwt.workbook() # 创建工作簿 ''' 创建第一个sheet: sheet1 ''' sheet1 = f.add_sheet(u'sheet1',cell_overwrite_ok=true) # 创建sheet row0 = [u'业务',u'状态',u'北京',u'上海',u'广州',u'深圳',u'状态小计',u'合计'] column0 = [u'机票',u'船票',u'火车票',u'汽车票',u'其它'] status = [u'预订',u'出票',u'退票',u'业务小计'] # 生成第一行 for i in range(0, len(row0)): sheet1.write(0, i, row0[i], set_style('times new roman', 220, true)) # 生成第一列和最后一列(合并4行) i, j = 1, 0 while i < 4*len(column0) and j < len(column0): sheet1.write_merge(i, i+3, 0, 0, column0[j], set_style('arial', 220, true)) # 第一列 sheet1.write_merge(i, i+3, 7, 7) # 最后一列"合计" i += 4 j += 1 sheet1.write_merge(21,21,0,1,u'合计',set_style('times new roman',220,true)) # 生成第二列 i = 0 while i < 4*len(column0): for j in range(0,len(status)): sheet1.write(j+i+1, 1, status[j]) i += 4 f.save(output_path)if __name__ == '__main__': write_excel('e:/demo.xls') # 保存文件.这里如果是.xlsx的话会打不开。 |
注意:如果对一个单元格重复操作,会引发error。所以在打开时加cell_overwrite_ok=true解决
|
1
|
table = file.add_sheet('sheet name',cell_overwrite_ok=true) |
生成的demo.xls效果如下:

总结
以上所述是小编给大家介绍的python3 读、写excel文件的操作方法,希望对大家有所帮助,如果大家有任何疑问请给我留言,小编会及时回复大家的。在此也非常感谢大家对服务器之家网站的支持!
原文链接:https://www.cnblogs.com/fuqia/p/8989712.html


