登录验证码是每个网站登录时的基本标配,网上也有很多相应的文章, 但是从生成验证码到 应用到自己的网站上的全步骤,并没有看到很多, 为了节约大家的时间,我把整体步骤写下来, 即拿即用哈
1. 生成随机验证码
|
1
2
3
4
5
6
7
8
9
10
11
12
13
14
15
16
17
18
19
20
21
22
23
24
25
26
27
28
29
30
31
32
33
34
35
36
37
38
39
40
41
42
43
44
45
46
47
48
49
50
51
52
53
54
55
56
57
58
59
60
61
62
63
|
#_*_coding:utf-8_*_from PIL import Image,ImageDraw,ImageFont,ImageFilterimport randomimport math, string#字体的位置,不同版本的系统会有不同font_path = '/Library/Fonts/Arial.ttf'#font_path = '/Library/Fonts/Hanzipen.ttc'#生成几位数的验证码number = 4#生成验证码图片的高度和宽度size = (100,30)#背景颜色,默认为白色bgcolor = (255,255,255)#字体颜色,默认为蓝色fontcolor = (0,0,255)#干扰线颜色。默认为红色linecolor = (255,0,0)#是否要加入干扰线draw_line = True#加入干扰线条数的上下限line_number = (1,5)def gen_text(): source = list(string.ascii_letters) for index in range(0,10): source.append(str(index)) return ''.join(random.sample(source,number))#number是生成验证码的位数#用来绘制干扰线def gene_line(draw,width,height): begin = (random.randint(0, width), random.randint(0, height)) end = (random.randint(0, width), random.randint(0, height)) draw.line([begin, end], fill = linecolor)def gene_code(save_path,filename): width,height = size #宽和高 image = Image.new('RGBA',(width,height),bgcolor) #创建图片 font = ImageFont.truetype(font_path,25) #验证码的字体和字体大小 #font = ImageFont.truetype(25) #验证码的字体和字体大小 draw = ImageDraw.Draw(image) #创建画笔 #text = "我是中国人" #生成字符串 text = gen_text() #生成字符串 print(text) font_width, font_height = font.getsize(text) draw.text(((width - font_width) / number, (height - font_height) / number),text,\ font= font,fill=fontcolor) #填充字符串 if draw_line: gene_line(draw, width, height) gene_line(draw, width, height) gene_line(draw, width, height) gene_line(draw, width, height) image = image.transform((width + 20, height +10), Image.AFFINE, (1, -0.3, 0, -0.1, 1, 0), Image.BILINEAR) # 创建扭曲 image = image.filter(ImageFilter.EDGE_ENHANCE_MORE) # 滤镜,边界加强 image.save('%s/%s.png' %(save_path,filename)) # 保存验证码图片 print("savepath:",save_path) return textif __name__ == "__main__": gene_code('/tmp','test') #会把生成的图片存成/tmp/test.png |
2. 如何应用到你的django项目中
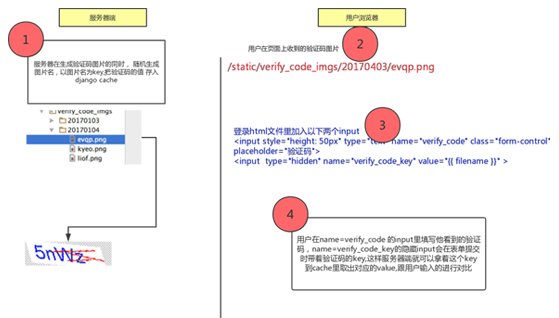
整个验证码的流程如下
1.用户访问登录页面,你的后台程序在给用户返回登录页面时,同时生成了验证码图片
2.用户输入账户信息和验证码数字,提交表单
3.后台判断用户输入的验证码和你生成的图片信息是否一致,如果一致,就代表验证码是没有问题的
问题就卡在第3步,你在第1步生成验证码并返回给用户后,由于一会用户还需要把这个验证码提交过来,你在后台就需要拿用户输入的和你之前生成 的验证码进行对比是否相等,
所以你必须在生成验证码的同时,把验证码存下来,存到哪? 必然是缓存,这样直接在存的同时加个超时时间 , 就可以限定验证码有效期了。
那存入缓存时的key是设置成什么呢?为了保证验证码的安全,我采取了以下设计

3.代码实现
login视图
|
1
2
3
4
5
6
7
8
9
10
11
12
13
14
15
16
17
18
19
20
21
22
23
24
25
26
27
28
29
30
31
32
33
34
35
36
37
38
|
def acc_login(request): err_msg = {} today_str = datetime.date.today().strftime("%Y%m%d") verify_code_img_path = "%s/%s" %(settings.VERIFICATION_CODE_IMGS_DIR, today_str) if not os.path.isdir(verify_code_img_path): os.makedirs(verify_code_img_path,exist_ok=True) print("session:",request.session.session_key) #print("session:",request.META.items()) random_filename = "".join(random.sample(string.ascii_lowercase,4)) random_code = verify_code.gene_code(verify_code_img_path,random_filename) cache.set(random_filename, random_code,30) if request.method == "POST": username = request.POST.get('username') password = request.POST.get('password') _verify_code = request.POST.get('verify_code') _verify_code_key = request.POST.get('verify_code_key') print("verify_code_key:",_verify_code_key) print("verify_code:",_verify_code) if cache.get(_verify_code_key) == _verify_code: print("code verification pass!") user = authenticate(username=username,password=password) if user is not None: login(request,user) request.session.set_expiry(60*60) return HttpResponseRedirect(request.GET.get("next") if request.GET.get("next") else "/") else: err_msg["error"] = 'Wrong username or password!' else: err_msg['error'] = "验证码错误!" return render(request,'login.html',{"filename":random_filename, "today_str":today_str, "error":err_msg}) |
template文件
|
1
2
3
4
5
6
7
8
9
10
11
12
13
14
15
16
17
18
19
20
21
22
23
24
25
26
27
28
29
30
31
32
33
34
35
36
37
38
39
40
41
42
43
44
45
46
47
48
49
50
51
52
53
54
55
56
57
58
59
60
61
62
63
64
65
66
67
68
69
70
71
72
73
74
75
76
77
78
79
80
81
82
83
84
85
86
87
88
89
90
91
92
93
94
95
96
97
98
99
100
101
|
{% extends 'base.html' %}{% block body %} <div id="container" class="cls-container"> <!-- BACKGROUND IMAGE --> <!--===================================================--> <div id="bg-overlay" class="bg-img img-balloon"></div> <!-- HEADER --> <!--===================================================--> <div class="cls-header cls-header-lg"> <div class="cls-brand"> <a class="box-inline" href="index.html" rel="external nofollow" > <!-- <img id="codetool">
以上就是本文的全部内容,希望对大家的学习有所帮助,也希望大家多多支持服务器之家。 原文链接:http://www.cnblogs.com/alex3714/articles/6662365.html 延伸 · 阅读
精彩推荐
|


