一、流程分析:
1.用户在项目前端,输入手机号,然后点击【获取验证码】,将手机号发到post到后台。
2.后台验证手机号是否合法,是否已被占用,如果通过验证,则生成验证码,并通过运行脚本,让短信运营商向该手机号,发送该验证码,如果没通过验证,则返回错误信息
3.用户收到短信验证码以后,再次将所有信息post到后台。
4.后台验证各个数据,通过验证则完成实名制认证,如果没通过则返回错误信息。
总结,一次实名验证,需要两次ajax+post
二、对接短信商:
1.在云片网端:
1.注册云片网
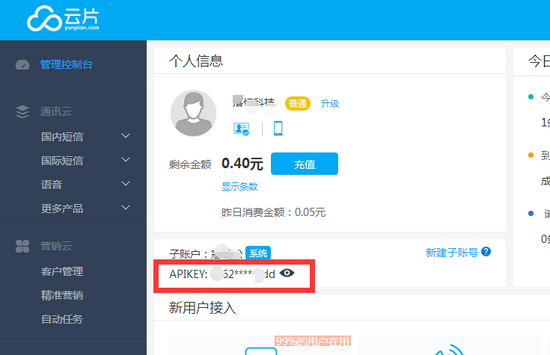
后台管理控制台页面:其中最重要的信息是apikey
2.开发者备案、新增签名、新增模板(模板管理)
1.云片网后台的【测试】是没有意义的,所谓的测试,就是直接给你手机发送一条短信,这算哪门子测试?
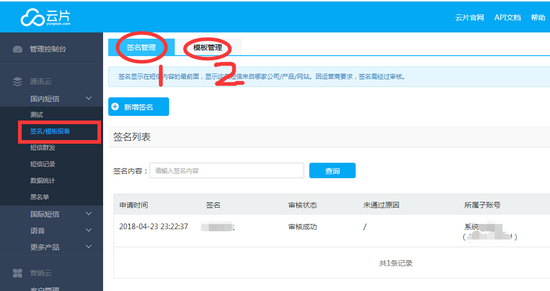
2.【签名/模板设备】页,【签名管理】点击【新增签名】,到这里会被提醒完善【开发者信息】,认证分为开发者的【公司】和【个人】,现在是开发测试阶段,可以先选择【个人】,【个人】要身份证的照片,提交照片。
3.等待认证完成的短信通知,然后按照后台的操作指引,在【签名管理】页【新增签名】,在【模板管理】页【新增模板】,这些都要等待云片网的审核,审核通过会有短信通知。
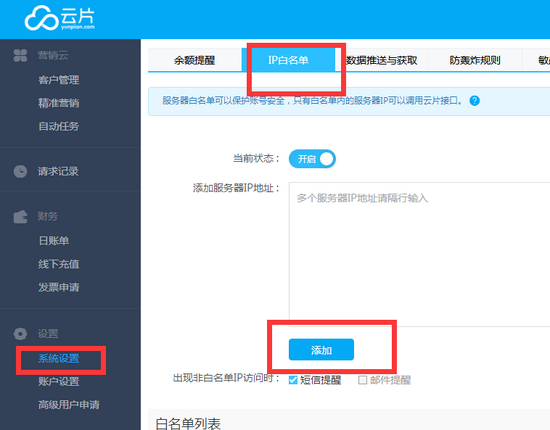
4.在云片网后台设置ip白名单,将外网ip加入白名单
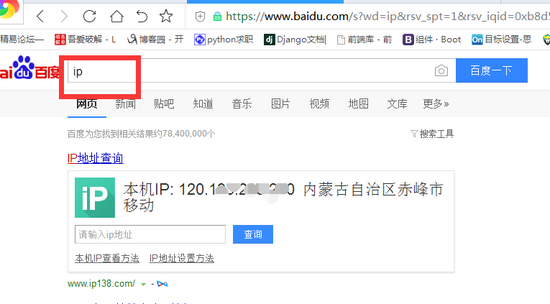
获取本机外网ip最简单的方法,就是百度ip
2.在django项目中写发送短信的脚本
在 项目目录下 新建utils目录 新建yunpian.py
|
1
2
3
4
5
6
7
8
9
10
11
12
13
14
15
16
17
18
19
|
import requestsclass yunpian(object): def __init__(self,api_key): self.api_key=api_key self.single_send_url='https://sms.yunpian.com/v2/sms/single_send.json' def send_sms(self,code,mobile): parmas={ 'apikey':self.api_key, 'mobile':mobile, 'text':'【**网】您的验证码是[code]。如非本人操作,请忽略本短信'.format(code=code) } #text必须要跟云片后台的模板内容 保持一致,不然发送不出去! r=requests.post(self.single_send_url,data=parmas) print(r)if __name__=='__main__': yun_pian=yunpian('***************(你的apikey)') yun_pian.send_sms('***(验证码)','*******(手机号)') |
三、在项目中写发送手机验证码相关代码:
1.前端相关代码:
|
1
2
3
4
5
6
7
8
9
10
11
12
13
14
15
16
17
18
19
20
21
22
23
24
25
26
27
28
29
30
31
32
33
34
35
36
37
38
39
40
41
42
43
44
45
46
47
48
49
50
51
52
53
54
55
56
|
<!--发送按钮倒计时代码--><script type="text/javascript">var countdown=60;function settime(obj) { if (countdown == 0) { obj.removeattribute("disabled"); obj.value="免费获取验证码"; countdown = 60; return; } else { obj.setattribute("disabled", true); obj.value="重新发送(" + countdown + ")"; countdown--; }settimeout(function() { settime(obj) } ,1000)}</script><!--手机号码输入框代码--><div class="form-group"> <label for="mobile" class="col-lg-2 col-sm-2 control-label">手机号码:</label> <div class="col-lg-10"> <div class="input-group m-bot15"> <input type="text" class="form-control" id="mobile" name="mobile" placeholder="手机号码"> <span class="input-group-btn"> <input type="button" id="forcode" onclick="settime(this)" value="免费获取验证码" class="btn btn-success"> </span> </div> <p class="help-block">请填写绑定手机号</p> </div> </div><!--向后台通过ajax发送手机号码数据--><script> $('#forcode').click(function () { $.ajax({ cache:false, type:"post", url:"{% url 'users:forcode' %}", data:{ csrfmiddlewaretoken:$('[name="csrfmiddlewaretoken"]').val(), mobile:$("#mobile").val() }, async:true, success:function (data) { alert(data) } }) })</script> |
效果图:
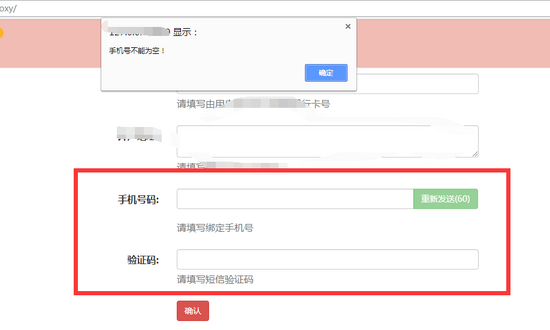
2.在users/views.py中写发送验证码相关代码:
|
1
2
3
4
5
6
7
8
9
10
11
12
13
14
15
16
17
18
19
20
21
22
23
24
25
26
27
28
29
30
31
32
|
import reimport randomfrom xyw.settings import apikeyfrom .models import verifycodeclass forcodeview(view): """获取手机验证码""" def post(self,request): mobile=request.post.get('mobile','') if mobile: #验证是否为有效手机号 mobile_pat=re.compile('^(13\d|14[5|7]|15\d|166|17\d|18\d)\d{8}$') res=re.search(mobile_pat,mobile) if res: #生成手机验证码 code=verifycode() code.mobile=mobile c=random.randint(1000,9999) code.code=str(c) code.save() code=verifycode.objects.filter(mobile=mobile).first().code yunpian=yunpian(apikey) sms_status=yunpian.send_sms(code=code,mobile=mobile) msg=sms_status.msg return httpresponse(msg) else: msg='请输入有效手机号码!' return httpresponse(msg) else: msg='手机号不能为空!' return httpresponse(msg) |
3.在users/urls.py中:
|
1
2
3
4
5
6
7
8
|
from .views import forcodeview......urlpatterns = [ ...... path('forcode/',forcodeview.as_view(),name='forcode'),] |
4.在settings.py中增加代码:
|
1
2
|
#云片网apikeyapikey=‘你云片网的apikey' |
至此,完成了发送手机验证码功能。
其实也有可以优化的地方:
1.虽然前端设置了60秒才可以重新发送,但是这个验证在后端也应该有,以防被有心人利用。
2.没有验证手机号码是否已经被发送过验证码
3.验证码没有生命周期,应该各一段时间让验证码失效
以上就是本文的全部内容,希望对大家的学习有所帮助,也希望大家多多支持服务器之家。
原文链接:http://www.cnblogs.com/xuepangzi/p/8932294.html


