application.properties大家都不陌生,我们在开发的时候,经常使用它来配置一些可以手动修改而且不用编译的变量,这样的作用在于,打成war包或者jar用于生产环境时,我们可以手动修改环境变量而不用再重新编译。
spring boo默认已经配置了很多环境变量,例如,tomcat的默认端口是8080,项目的contextpath是“/”等等,可以在这里看spring boot默认的配置信息http://docs.spring.io/spring-boot/docs/current-SNAPSHOT/reference/htmlsingle/#boot-features-external-config
spring boot允许你自定义一个application.properties文件,然后放在以下的地方,来重写spring boot的环境变量或者定义你自己环境变量
- 当前目录的 “/config”的子目录下
- 当前目录下
- classpath根目录的“/config”包下
- classpath的根目录下
1点和2点适合在生产环境下,例如,打包成可执行的jar包

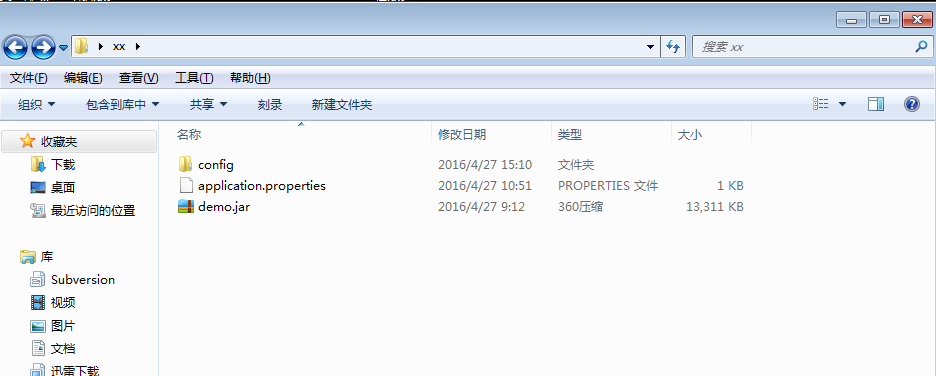
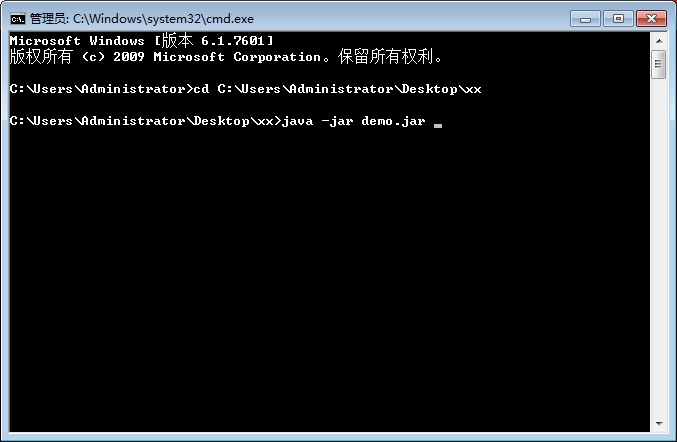
这里要注意,“当前目录”是指demo.jar包的目录下,要使配置文件生效,在使用Java -jar demo.jar的命令时,必须先路由到demo.jar包的路径下,再使用其命名,

3点和4点适合在开发环境下

如果同时在四个地方都有配置文件,配置文件的优先级是从1到4。
使用配置文件之后,spring boo启动时,会自动把配置信息读取到spring容器中,并覆盖spring boot的默认配置,那么,我们怎么来读取和设置这些配置信息呢
1.通过命令行来重写和配置环境变量,优先级最高,例如可以通过下面的命令来重写spring boot 内嵌tomcat的服务端口,注意“=”俩边不要有空格
|
1
|
java -jar demo.jar --server.port=9000 |
如果想要设置多个变量怎么办,可以已json的格式字符串来设置
|
1
|
java -jar demo.jar --spring.application.json='{"foo":"bar"}' |
2.通过@value注解来读取
|
1
2
3
4
5
6
7
8
9
10
11
12
13
|
@RestController@RequestMapping("/task")public class TaskController {@Value("${connection.remoteAddress}") private String address;@RequestMapping(value = {"/",""})public String hellTask(@Value("${connection.username}")String name){ return "hello task !!";}} |
3.通过Environment接口来获取,只需要把接口注进去即可
|
1
2
3
4
5
6
7
8
9
10
11
12
13
14
15
16
|
@RestController@RequestMapping("/task")public class TaskController {@Autowired Environment ev ;@Value("${connection.remoteAddress}") private String address;@RequestMapping(value = {"/",""})public String hellTask(@Value("${connection.username}")String name){ String password = ev.getProperty("connection.password"); return "hello task !!";}} |
4.可以自定义一个工具类,来获取,这种方式关键在于读取配置文件信息,适合自定义的配置信息,spring 容器默认的配置信息会读不到
|
1
2
3
4
5
6
7
8
9
10
11
12
13
14
15
16
17
18
19
20
21
22
23
24
25
26
27
28
29
30
31
32
33
34
35
36
37
38
39
40
41
42
43
44
45
46
47
48
49
50
51
|
@Componentpublic class SystemConfig { private static Properties props ; public SystemConfig(){ try { Resource resource = new ClassPathResource("/application.properties");// props = PropertiesLoaderUtils.loadProperties(resource); } catch (IOException e) { e.printStackTrace(); } } /** * 获取属性 * @param key * @return */ public static String getProperty(String key){ return props == null ? null : props.getProperty(key); } /** * 获取属性 * @param key 属性key * @param defaultValue 属性value * @return */ public static String getProperty(String key,String defaultValue){ return props == null ? null : props.getProperty(key, defaultValue); } /** * 获取properyies属性 * @return */ public static Properties getProperties(){ return props; }}//用的话,就直接这样子String value = SystemConfig.getProperty("key"); |
5.可以利用${…}在application.properties引用变量
|
1
2
|
myapp.name=springmyapp.desc=${myapp.name} nice |
6.可以在application.properties配置随机变量,利用的是RandomValuePropertySource类
|
1
2
3
4
5
|
my.secret=${random.value}my.number=${random.int}my.bignumber=${random.long}my.number.less.than.ten=${random.int(10)}my.number.in.range=${random.int[1024,65536]} |
简单的配置文件的使用就先写到这里,再看看其他高级用法,如Profiles还有@ConfigurationProperties
以上就是本文的全部内容,希望对大家的学习有所帮助,也希望大家多多支持服务器之家。
原文链接:http://blog.csdn.net/yingxiake/article/details/51260302


