简介
GridView和DetailsView控件通过绑定列和CheckBox列,可以简化数据编辑界面制作,呈现只读,编辑和新增界面,我们不需要增加元素标记或编写任何额外代码就可以得到这些界面。然而,绑定列和CheckBox列呈现的界面却缺乏实际应用中经常用到的定制功能。为了对GridView和DetailsView的编辑、新增界面进行定制,需要用模板列(TemplateField)替换原有列。
在上节教程中我们讨论如何增加验证控件来定制数据编辑界面,而本节教程将演示如何使用Web控件对实际的数据集合进行定制:将绑定列和CheckBox列中默认的TextBox、CheckBox控件替换成其他的输入控件。为此,我们将创建一个可编辑的GridView,并允许编辑更新产品的名字、类别、提供商和废弃状态等。而且编辑某行时,类别category和提供商supplier我们将使用DropDownList来显示,以供用户进行选择。此外,还将CheckBox列中默认的CheckBox控件替换成RadioButtonList控件,并提供2个单选选项:Active和Discontinued。 如图1:
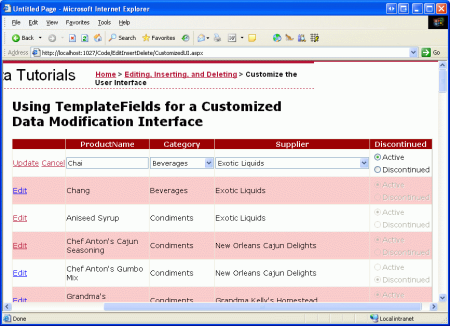
图1:在GridView的编辑界面使用DropDownList和RadioButton控件
一、重载UpdateProduct方法
本节教程我们将创建一个可编辑的GridView并允许编辑更新产品的名字、类别、提供商和废弃状态等。因此,我们要重载UpdateProduct方法,并接受5个输入参数:4个产品参数值加上一个产品ID。像以前那样,本重载将:
1. 根据指定的ProductID从数据库中获取产品信息;
2. 更新ProductName,categoryID,supplierID和Discontinued字段;
3. 通过TableAdapter的Update()方法向数据访问层DAL发出更新请求。
简单起见,这个重载方法省略了一个重要的业务逻辑――检查并确保一个将会标记为discontinued的产品不是它的提供商提供的唯一产品。你愿意的话也可以加进来,或者做的更完善一些,将这个逻辑写到一个独立的方法中。
下面的代码是我们在ProductsBLL类中新增的UpdateProduct重载方法:
|
1
2
3
4
5
6
7
8
9
10
11
12
13
14
15
16
17
18
19
20
21
22
23
24
25
|
[System.ComponentModel.DataObjectMethodAttribute (System.ComponentModel.DataObjectMethodType.Update, false)]public bool UpdateProduct(string productName, int? categoryID, int? supplierID, bool discontinued, int productID){ Northwind.ProductsDataTable products = Adapter.GetProductByProductID(productID); if (products.Count == 0) // no matching record found, return false return false; Northwind.ProductsRow product = products[0]; product.ProductName = productName; if (supplierID == null) product.SetSupplierIDNull(); else product.SupplierID = supplierID.Value; if (categoryID == null) product.SetCategoryIDNull(); else product.CategoryID = categoryID.Value; product.Discontinued = discontinued; // Update the product record int rowsAffected = Adapter.Update(product); // Return true if precisely one row was updated, otherwise false return rowsAffected == 1;} |
二、手工处理可编辑的GridView
编写完UpdateProduct重载方法,下面要做的是创建可编辑的GridView:在设计器窗口中打开EditInsertDelete 文件夹中的CustomizedUI.aspx页,为其增加一个GridView控件;接着通过GridView的智能标记创建一个新的ObjectDataSource,配置这个ObjectDataSource使用ProductBLL类的GetProducts()方法来获取产品信息,并让其使用上面创建的UpdateProduct重载方法来进行产品的更新。在新增和删除标签上,从下拉列表中选择(None)。

图2:配置ObjectDataSource使用上面创建的UpdateProduct重载方法
像《data modification》教程中那样,Visual Studio创建了ObjectDataSource的元素标记并指定OldValuesParameterFormatString属性为original_{0}。由于我们编写的方法不支持传入的原始的ProductID值,所以业务逻辑层不会生效。因此,像上节教程中那样,我们需要从元素标记中移除这些属性,或者设置这些属性。
改动后的ObjectDataSource元素标记将如下所示:
|
1
2
3
4
5
6
7
8
9
10
11
|
<asp:ObjectDataSource ID="ObjectDataSource1" runat="server" SelectMethod="GetProducts" TypeName="ProductsBLL" UpdateMethod="UpdateProduct"> <UpdateParameters> <asp:Parameter Name="productName" Type="String" /> <asp:Parameter Name="categoryID" Type="Int32" /> <asp:Parameter Name="supplierID" Type="Int32" /> <asp:Parameter Name="discontinued" Type="Boolean" /> <asp:Parameter Name="productID" Type="Int32" /> </UpdateParameters></asp:ObjectDataSource> |
注意上面代码中OldValuesParameterFormatString已经被移除,并且在UpdateParameters集合中为UpdateProduct重载方法的每个入口参数提供了一个Parameter。
虽然ObjectDataSource被配置为只对产品的部分信息进行更新,而GridView却显示了所有的产品信息。我们需要按照下面几点来调整GridView:
1. 只包括ProductName, SupplierName, CategoryName字段的绑定列和Discontinued字段的CheckBox列。
2. CategoryName 和 SupplierName字段在Discontinued前面显示(左边)
3. 将CategoryName 和 SupplierName的标题分别改为“Category” 和 “Supplier”
4. 启用编辑模式(在GridView的智能标记中选择启用编辑复选框)
这些调整之后,设计器中的页面将如图3所示:

图3:移除GridView中无用的字段
GridView的元素标记也像下面所示:
|
1
2
3
4
5
6
7
8
9
10
11
12
13
14
15
|
<asp:GridView ID="GridView1" runat="server" AutoGenerateColumns="False" DataKeyNames="ProductID" DataSourceID="ObjectDataSource1"> <Columns> <asp:BoundField DataField="ProductName" HeaderText="ProductName" SortExpression="ProductName" /> <asp:BoundField DataField="CategoryName" HeaderText="Category" ReadOnly="True" SortExpression="CategoryName" /> <asp:BoundField DataField="SupplierName" HeaderText="Supplier" ReadOnly="True" SortExpression="SupplierName" /> <asp:CheckBoxField DataField="Discontinued" HeaderText="Discontinued" SortExpression="Discontinued" /> </Columns></asp:GridView> |
这时GridView的只读界面就改好了。查看数据时,每种产品就作为GridView中的一行,并显示产品的name,category,supplier和discontinued状态。
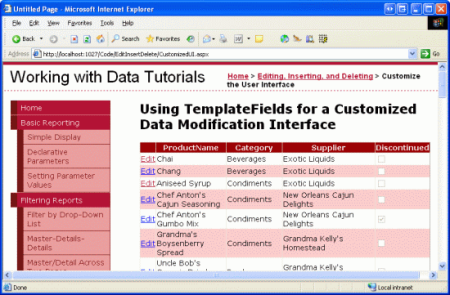
图4: GridView调整后的只读界面
三、在编辑界面中使用DropDownList显示Category和Supplier
我们注意到ProductsRow对象包含产品的CategoryID,CategoryName,SupplierID和SupplierName属性,但是Products数据库只保存了外键,而对应的Name保存在Categories和Suppliers表中。ProductsRow对象中的CategoryID和SupplierID可以读取和写入,而CategoryName和SupplierName属性则标记为只读。
由于CategoryName和SupplierName的只读状态,相应绑定列的ReadOnly属性也被置为true,防止编辑某行时它们的值被修改。尽管也可以通过设置ReadOnly属性为false,使其在编辑状态将这些绑定列转为TextBox,但是这样以来当用户尝试更新产品信息时系统就会抛出异常,因为UpateProduct重载中并不接受CategoryName和SupplierName参数。事实上,我们也不想编写这种重载方法,原因如下:
1. Products表没有SupplierName和CategoryName字段,而是对应的外键SupplierID和CategoryID。因此,我们希望在更新方法中传递外键ID,而不是查找外键表中的值。
2. 要求用户键入supplier或者category的名字也很不合理,因为这要求用户必须知道合法的category和supplier,并且拼写正确无误。
我们打算在只读模式Supplier和category列分别显示了分类和提供商的名字,而在编辑时,通过下拉列表显示可用选项。这样以来,用户可以快速查看有效的category和supplier并且可以很便捷直观的进行选择。
要实现这一点,需要将SupplierName和CategoryName对应的绑定列转换为模板列,在ItemTemplate模板中显示SupplierName和CategoryName,而EidtItemTemplate模板则使用DropDownList控件列出有效的cagegory和supplier。
添加Categories和Suppliers 的DropDownList控件
我们要先将SupplierName和CategoryName绑定列转换为模板列:点击GridView智能标记中的‘编辑列'链接;选择左下的BoundField;点击“将此字段转换为TemplateField”链接,转换过程将创建一个模板列,包括ItemTemplate和EditItemTemplate,最终的元素标记大致如下:
|
1
2
3
4
5
6
7
8
9
10
|
<asp:TemplateField HeaderText="Category" SortExpression="CategoryName"> <EditItemTemplate> <asp:Label ID="Label1" runat="server" Text='<%# Eval("CategoryName") %>'></asp:Label> </EditItemTemplate> <ItemTemplate> <asp:Label ID="Label1" runat="server" Text='<%# Bind("CategoryName") %>'></asp:Label> </ItemTemplate></asp:TemplateField> |
由于绑定列标记为只读,ItemTemplate和EditItemTemplate都将用Label控件的Text属性绑定显示相关数据(如上面的CategoryName)。因此需要修改EditItemTemplate模板,用DropDownList控件来替换原来的Label控件。
像上节教程讲的,即可在设计器中编辑模板也可直接修改模板的元素标记。要在设计器中修改,可以通过GridView的智能标记点击“编辑模板”链接并选择Category字段的EditItemTemplate模板。删除Label控件用DropDownList控件代替,并设置DropDownList的ID属性为Categories。

图5:删除EditItemTemplate模板中的TextBox并增加一个DropDownList
下一步我们需要为DropDownList绑定category。从智能标记中点击“选择数据源”链接并选择创建一个新的ObjectDataSource,命名为CategoriesDataSource。
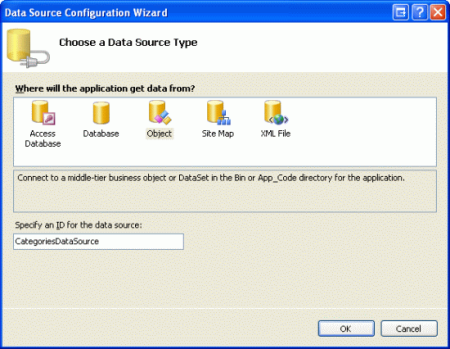
图6:创建一个新的ObjectDataSource控件CategoriesDataSource
为了使ObjectDataSource显示所有的category,我们将它与CategoriesBLL类的GetCategories()方法进行绑定。

图7:将ObjectDataSource控件用GategoriesBLL的GetCategories()方法进行绑定
最后,配置DropDownList,用CategoryName字段作为显示字段而CategoryID作为Value字段。

图8:用CategoryName作为显示字段并用CategoryID作为Value字段
改动后CategoryName的模板项将拥有一个DropDownList控件和一个ObjectDataSource,元素标记大致如下:
|
1
2
3
4
5
6
7
8
9
10
11
12
13
14
15
16
|
<asp:TemplateField HeaderText="Category" SortExpression="CategoryName"> <EditItemTemplate> <asp:DropDownList ID="Categories" runat="server" DataSourceID="CategoriesDataSource" DataTextField="CategoryName" DataValueField="CategoryID"> </asp:DropDownList> <asp:ObjectDataSource ID="CategoriesDataSource" runat="server" OldValuesParameterFormatString="original_{0}" SelectMethod="GetCategories" TypeName="CategoriesBLL"> </asp:ObjectDataSource> </EditItemTemplate> <ItemTemplate> <asp:Label ID="Label1" runat="server" Text='<%# Bind("CategoryName") %>'></asp:Label> </ItemTemplate></asp:TemplateField> |
注意:EditItemTemplate模板中的DropDownList必须启用视图状态(view state)。下面我们将会在DropDownList的元素标记中增加数据绑定语法和数据绑定命令例如Eval()和Bind(),它们要求启用视图状态,否则将无法显示。
重复以上步骤为SupplierName的模板列中EditItemTemplate模板添加DropDownList控件,并命名为Suppliers。包括增加DropDownList控件和创建另一个ObjectDataSource,注意新的ObjectDataSource调用的是SuppliersBLL 类的 GetSuppliers()方法。另外,配置Suppliers下拉框的显示字段为CompanyName,value字段为SupplierID。
两个下拉框都增加完成后,在浏览器中查看页面并点击“Chef Anton's Cajun Seasoning”产品的编辑按钮。如图9所示,产品的category和supplier列都变成了下拉框并包含了对应的category和supplier选项集。但是,你会发现下拉框中默认选择的是下拉框的第一项(category是Beverages,supplier是Exotic Liquids),事实上它们分别应该是Condiment和New Orleans Cajun Delights。
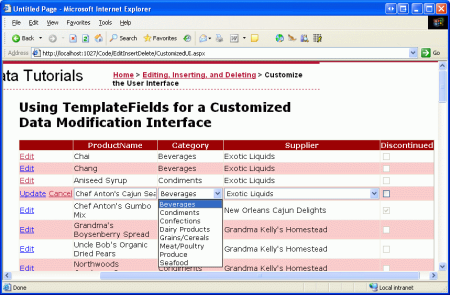
图9:下拉列表默认选中的是第一项
此外,如果点击更新,你会发现该产品的CategoryID 和 SupplierID都变成了NULL。这些都是由于EditItemTemplate模板中的下拉框没有根据数据库中的实际数据进行绑定。
为DropDownList绑定CategoryID 和 SupplierID 数据
为了使product编辑状态下的category和supplier下拉列表选中实际数据,并使其可以根据用户选择调用BLL的UpdateProduct方法对数据库进行更新,我们需要对两个下拉框的SelectedValue分别绑定到CategoryID 和 SupplierID。例如对于Categories下拉框,我们直接在元素标记中增加SelectedValue='<%# Bind("CategoryID") %>'。
另一种做法是在设计器中,通过下拉框的智能标记,点击“编辑DataBinding”链接,设置编辑模板中的下拉框的数据绑定。接下来,用双重模式指定SelectedValue绑定到CategoryID字段(见图10)。重复上面的方法之一,为Suppliers下拉框绑定SupplierID数据。

图10:给DropDownList的SelectedValue属性绑定CategoryID值
一旦完成两个下拉框SelectedValue属性的数据绑定,产品的category和supplier就会默认选中实际选项了。在点击Update按钮时,下拉框中的选择也会准确传递给UpdateProduct方法。图11显示了增加数据绑定后的代码;注意如何选中下拉列表中的项:Chef Anton's Cajun Seasoning产品的分类和提供商分别选中了正确的Condiment和New Orleans Cajun Delights选项。

图11:修改后Categroy和Supplier正确选中了Product的实际数据
处理NULL值
Product表中的CategoryID 和 SupplierID列允许为NULL,而编辑模板中的下拉列表却没有NULL这一项。所以目前存在下面两种问题:
1. 用户无法则现在的界面中将某个product非空的category或supplier设置为NULL
2. 如果产品的CategoryID 或 SupplierID为NULL,在点击Edit按钮时程序会抛出异常。这是因为Bind()表达式中CategoryID(或SupplierID)返回NULL值时,SelectedValue无法找到NULL这一列表项因而抛出异常。
为了支持CategoryID 和 SupplierID的NULL值,需要为两个DropDownList增加一个NULL值选项。在《Master/Detail Filtering With a DropDownList》教程中,我们演示了为绑定的DropDownList增加列表项,方法是将DropDownList的AppendDataBoundItems属性设置为true并手动增加一个值为-1的列表项。在ASP.NET的数据绑定逻辑中,空字符串将自动转换为NULL,NULL值也可以转为空字符串。因此,本节教程我们将增加一个值为空字符串的列表项。
先将这两个DropDownList的AppendDataBoundItems属性设置为true。接着,用<asp:ListItem>元素来增加一个NULL列表项,元素标记大致如下:
|
1
2
3
|
<asp:DropDownList ID="Categories" runat="server" DataSourceID="CategoriesDataSource" DataTextField="CategoryName" DataValueField="CategoryID" SelectedValue='<%# Bind("CategoryID") %>' AppendDataBoundItems="True"> <asp:ListItem Value="">(None)</asp:ListItem></asp:DropDownList> |
我们选择了使用“(None)”作为列表项的文本显示(Text),你也可以空字符串或别的字符。
注意:《Master/Detail Filtering With a DropDownList》教程演示过DropDownList列表项的增加方法――在设计器中点击DropDownList的属性窗口(F4)中的Item属性(将显示ListItem集合编辑器)。这次我们采用直接在元素标记中增加NULL列表项。如果你使用集合编辑器,创建出的元素标记将忽略空字符的Value,如:<asp:ListItem>(None)</asp:ListItem>。看起来并无大碍,可是DropDownList对没有Value的项则使用Text来代替,这样以来选择“None”时,“None”则被赋予CategoryID,系统将产生异常。通过显式设置Value="",选择此项,CategoryID 就被更新为NULL值了。
重复以上步骤设置Supplier的下拉框控件。
通过这一附加的列表项,编辑界面就可以为Product的CategoryID 和 SupplierID设定NULL值了,见图12
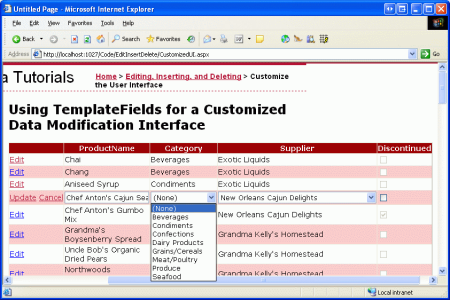
图12:通过选择(None)为产品的Category或Supplier指定NULL值。
四、用RadioButton表示Discontinued状态
Product的Discontinued字段以CheckBox列呈现,只读模式是disabled的,只有编辑模式下才被enable。根据配套需要,我们可以使用模板列对其进行定制。本节教程中,我们将使用含有RadioButtonList控件的模板列代替原来的CheckBox列,并带有两个选项-“Active” 和 “Discontinued” – 让用户选择product的Discontinued值。
先将Discontinued的CheckBox列转为模板列,会用到ItemTemplate 和 EditItemTemplate两个模板。它们使用CheckBox并将通过Checked属性绑定Discontinued字段,唯一的区别在于ItemTemplate模板中的CheckBox的Enabled属性是false。
使用RadioButtonList控件替换掉原来ItemTemplate 和 EditItemTemplate模板中的CheckBox控件,并将它们的ID属性都设置为DiscontinuedChoice。然后,设置RadioButtonLists的两个单选按钮项,一个为“Active”标签,值为“False”,另一个为“Discontinued”标签,值为“True”。这些操作即可直接在元素标记中添加<asp:ListItem>元素,也可通过设计器中ListItem集合编辑器处理。图13演示了指定两个单选按钮后的ListItem集合编辑器。

图13:为RadioButtonList增加Active和Discontinued选项
由于普通项模板ItemTemplate中的RadioButtonList不应是编辑状态,所以设置Enabled属性为false,而编辑状态对应的EditItemTemplate模板中RadioButtonList的Enabled属性则应设置为true。这样以来,非编辑行中单选按钮作为只读显示,而编辑状态则允许用户进行选择。
仍然需要用数据库中product的Discontinued数据绑定RadioButtonList控件的SelectedValue属性。像本节教程前面那样,即可直接添加绑定语法也可通过RadioButtonList的智能标记中的‘编辑DataBinding'链接。
增加完这两个RadioButtonList并做适当配置后,Discontinued的模板列元素标记大致如下:
|
1
2
3
4
5
6
7
8
9
10
11
12
13
14
|
<asp:TemplateField HeaderText="Discontinued" SortExpression="Discontinued"> <ItemTemplate> <asp:RadioButtonList ID="DiscontinuedChoice" runat="server" Enabled="False" SelectedValue='<%# Bind("Discontinued") %>'> <asp:ListItem Value="False">Active</asp:ListItem> <asp:ListItem Value="True">Discontinued</asp:ListItem> </asp:RadioButtonList> </ItemTemplate> <EditItemTemplate> <asp:RadioButtonList ID="DiscontinuedChoice" runat="server" SelectedValue='<%# Bind("Discontinued") %>'> <asp:ListItem Value="False">Active</asp:ListItem> <asp:ListItem Value="True">Discontinued</asp:ListItem> </asp:RadioButtonList> </EditItemTemplate></asp:TemplateField> |
此时,Discontinued列从CheckBox列转变为一对单选按钮(见图14)。当进入product编辑界面时,discontinued对应的单选按钮被选中,点击更新时也会将新的状态更新到数据库。

图14:表示Discontinued的CheckBox被替换成一对单选按钮
注意:由于Product数据库中的Discontinued字段不允许为NULL值,所以显示界面中不用考虑NULL的情况。不过如果Discontinued允许NULL时,就要在列表中增加第3个单选项,值设为空字符串(Value=””),就像category和supplier的下拉框那样。
小结
由于绑定列和CheckBox列自动呈现了只读、编辑和新增界面,缺少定制能力。可是我们却经常需要对新增和编辑界面进行定制,比如增加验证控件(上节教程)或定制数据集的用户界面(本节教程)。用模板列TemplateField定制界面总结为以下几步:
1. 增加模板列或者将现有的绑定列、CheckBox列转为模板列。
2. 按照实际需要给界面增加控件
3. 给新增加的控件进行相关字段的数据绑定。
定制过程除了使用内建的ASP.NET控件,也可以在模板列中使用自定义控件,编译过的服务器控件以及用户控件。
祝编程快乐!
作者简介
Scott Mitchell,著有六本ASP/ASP.NET方面的书,是4GuysFromRolla.com的创始人,自1998年以来一直应用微软Web技术。Scott是个独立的技术咨询顾问,培训师,作家,最近完成了将由Sams出版社出版的新作, 《24小时内精通ASP.NET 2.0》(英文) 。 他的联系电邮为mitchell@4guysfromrolla.com,也可以通过他的博客http://scottonwriting.net/与他联系。


