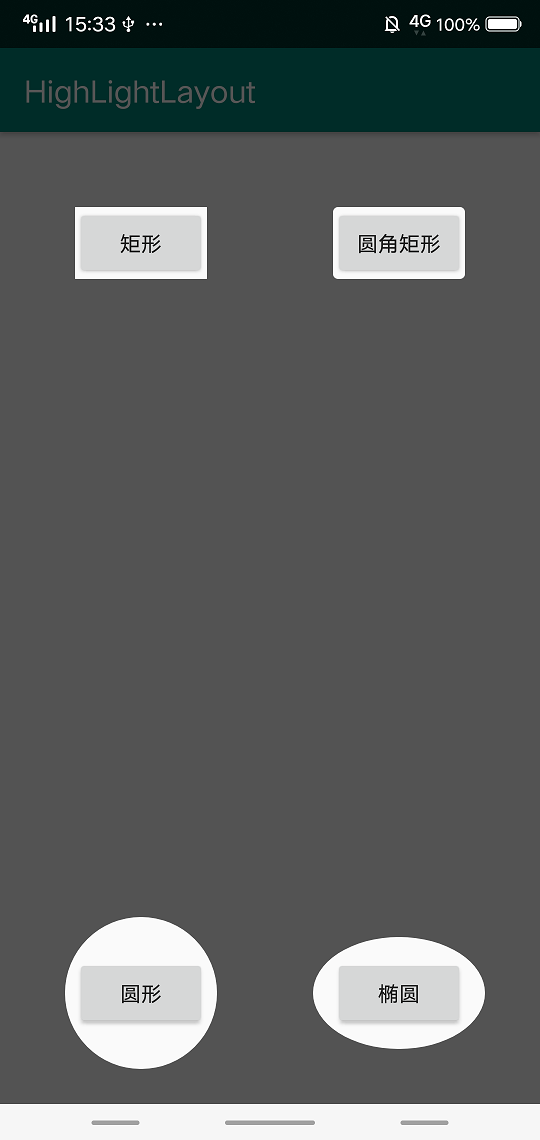
最近项目需求是实现高亮功能引导页的效果,查了很多资料Android确实没有类似iOS的抠图的现成控件,就自己写一个,具体如下:
Demo

代码
|
1
2
3
4
5
6
7
8
9
10
11
12
13
14
15
16
17
18
19
20
21
22
23
24
25
26
27
28
29
30
31
32
33
34
35
36
37
38
39
40
41
42
43
44
45
46
47
48
49
50
51
52
53
54
55
56
57
|
public class HighLightLayout extends FrameLayout { private Paint mPaint; private Path mPath = new Path(); private List<RectRegion> mRegions; public HighLightLayout(@NonNull Context context, @Nullable AttributeSet attrs) { super(context, attrs); mPaint = new Paint(); mPaint.setAntiAlias(true); mPaint.setColor(0xAA000000); setWillNotDraw(false); } @Override protected void onDraw(Canvas canvas) { mPath.reset(); mPath.addRect(0, 0, getWidth(), getHeight(), Path.Direction.CCW); for (RectRegion region : mRegions) { RectF rectF = region.rectF; if (region instanceof RoundRectRegion) { RoundRectRegion roundRectRegion = (RoundRectRegion) region; mPath.addRoundRect(rectF, roundRectRegion.rx, roundRectRegion.ry, Path.Direction.CW); } else if (region instanceof CircleRegion) { CircleRegion circleRegion = (CircleRegion) region; float cX = (rectF.right + rectF.left) / 2; float cY = (rectF.bottom + rectF.top) / 2; mPath.addCircle(cX, cY, circleRegion.radius, Path.Direction.CW); } else if (region instanceof OvalRegion) { mPath.addOval(rectF, Path.Direction.CW); } else { mPath.addRect(rectF, Path.Direction.CW); } } canvas.drawPath(mPath, mPaint); } public void setRegion(@NonNull RectRegion region) { if (mRegions == null) { mRegions = new ArrayList<>(); } else { mRegions.clear(); } mRegions.add(region); invalidate(); } public void setRegions(@NonNull List<RectRegion> regions) { mRegions = regions; invalidate(); } @Override public void setBackgroundColor(int color) { mPaint.setColor(color); }} |
HighLightLayout继承自FrameLayout,重写了 onDraw 方法来实现高亮区域的绘制; setRegion 设置一个高亮区域, setRegions 设置多个高亮区域;重写 setBackgroundColor 来实现设置高亮背景色。
Region表示了一个高亮矩形区域,支持4种高亮类型,
RectRegion 矩形高亮区域
|
1
2
3
4
|
public class RectRegion implements Parcelable { public RectF rectF; //... Parcelable实现代码} |
RoundRectRegion 圆角矩形高亮区域
|
1
2
3
4
|
public class RoundRectRegion extends RectRegion { public float rx, ry; //... Parcelable实现代码} |
CircleRegion 圆形高亮区域
|
1
2
3
4
|
public class CircleRegion extends RectRegion { public float radius; //... Parcelable实现代码} |
OvalRegion 椭圆高亮区域
|
1
2
3
|
public class OvalRegion extends RectRegion { //... Parcelable实现代码} |
使用
创建一个GuideActivity,该Activity根布局是一个HighLightLayout,可以在HighLightLayout中添加任何控件
|
1
2
3
4
5
6
7
|
<wangyi.blog.app.view.HighLightLayout xmlns:android="http://schemas.android.com/apk/res/android" xmlns:tools="http://schemas.android.com/tools" android:id="@+id/highLightLayout" android:layout_width="match_parent" android:layout_height="match_parent" tools:context=".GuideActivity"></wangyi.blog.app.view.HighLightLayout> |
启动GuideActivity 并传递需要高亮显示的区域
|
1
2
3
4
5
6
7
8
9
10
11
12
13
14
15
16
17
18
19
20
21
22
23
24
|
ArrayList<RectRegion> regions = new ArrayList<>(); //矩形高亮 RectF rectF1 = LocationUtils.getViewLocation(mButton1); RectRegion region1 = new RectRegion(rectF1); regions.add(region1); //圆角矩形高亮 RectF rectF2 = LocationUtils.getViewLocation(mButton2); RoundRectRegion region2 = new RoundRectRegion(rectF2, 10, 10); regions.add(region2); //圆形高亮 RectF rectF3 = LocationUtils.getViewLocation(mButton3); float radius = (rectF3.right - rectF3.left) / 2 + 20; CircleRegion region3 = new CircleRegion(rectF3, radius); regions.add(region3); //椭圆高亮 RectF rectF4 = LocationUtils.getViewLocation(mButton4); LocationUtils.expandRectF(rectF4, 40); OvalRegion region4 = new OvalRegion(rectF4); regions.add(region4); Intent intent = new Intent(this, GuideActivity.class); intent.putExtra(GuideActivity.EXTRA_REGION_LIST, regions); startActivity(intent); |
GuideActivity的onCreate中设置高亮区域
|
1
2
3
|
ArrayList<RectRegion> regions = getIntent().getParcelableArrayListExtra(EXTRA_REGION_LIST); HighLightLayout highLightLayout = findViewById(R.id.highLightLayout); highLightLayout.setRegions(regions); |
以上就是本文的全部内容,希望对大家的学习有所帮助,也希望大家多多支持服务器之家。
原文链接:https://www.jianshu.com/p/c46dcc8a5f4b


