本文实例为大家分享了c#实现图片切割、切图的具体代码,供大家参考,具体内容如下
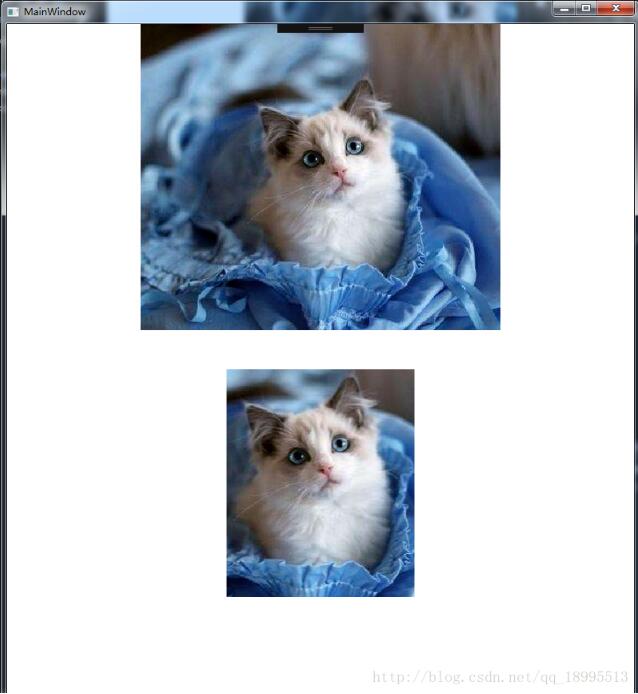
前台准备两个image控件。上面是显示原图,下面显示切割后的效果。
|
1
2
3
4
|
<stackpanel orientation="vertical"> <image width="450" height="383" source="c:\users\administrator\documents\visual studio 2015\projects\splitpic\splitpic\images\1.jpg"/> <image x:name="img" stretch="none" width="450" height="383" /></stackpanel> |
对应的后台代码:
|
1
2
3
4
5
6
7
8
9
10
11
12
13
14
15
16
17
18
19
20
21
22
23
24
25
26
27
28
29
30
31
32
33
34
35
36
37
38
39
40
41
42
43
44
45
46
47
48
49
50
51
52
53
54
55
56
57
58
59
60
61
62
63
64
65
66
67
68
69
70
71
72
73
74
75
76
77
78
79
|
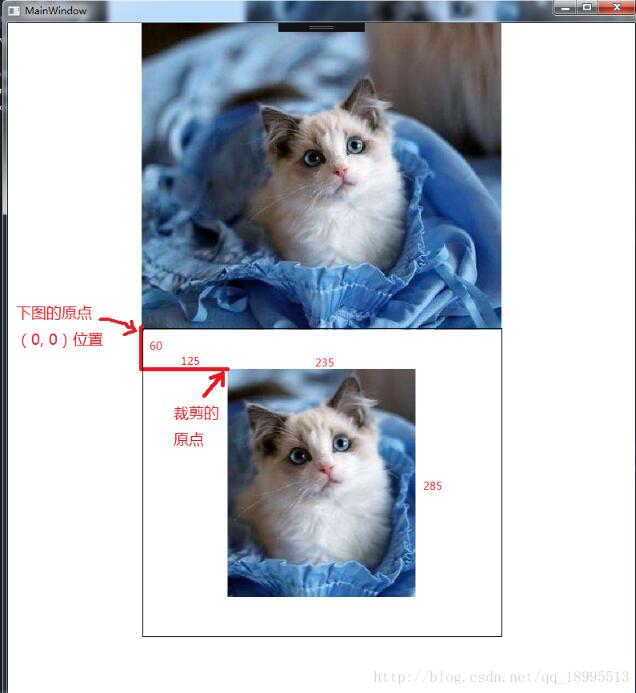
public partial class mainwindow : window{ public mainwindow() { initializecomponent(); // 设置原图 img.source = new bitmapimage(new uri(@"images/1.jpg", urikind.relative)); // 切割图片 imagesource imagesource = img.source; bitmap bitmap = systemutils.imagesourcetobitmap(imagesource); bitmapsource bitmapsource = systemutils.bitmaptobitmapimage(bitmap); bitmapsource newbitmapsource = systemutils.cutimage(bitmapsource, new int32rect(125, 60, 235, 285)); // 使用切割后的图源 img.source = newbitmapsource; }}// 图像工具类public static class systemutils{ /// <summary> /// 切图 /// </summary> /// <param name="bitmapsource">图源</param> /// <param name="cut">切割区域</param> /// <returns></returns> public static bitmapsource cutimage(bitmapsource bitmapsource, int32rect cut) { //计算stride var stride = bitmapsource.format.bitsperpixel * cut.width / 8; //声明字节数组 byte[] data = new byte[cut.height * stride]; //调用copypixels bitmapsource.copypixels(cut, data, stride, 0); return bitmapsource.create(cut.width, cut.height, 0, 0, pixelformats.bgr32, null, data, stride); } // imagesource --> bitmap public static system.drawing.bitmap imagesourcetobitmap(imagesource imagesource) { bitmapsource m = (bitmapsource)imagesource; system.drawing.bitmap bmp = new system.drawing.bitmap(m.pixelwidth, m.pixelheight, system.drawing.imaging.pixelformat.format32bpppargb); system.drawing.imaging.bitmapdata data = bmp.lockbits( new system.drawing.rectangle(system.drawing.point.empty, bmp.size), system.drawing.imaging.imagelockmode.writeonly, system.drawing.imaging.pixelformat.format32bpppargb); m.copypixels(int32rect.empty, data.scan0, data.height * data.stride, data.stride); bmp.unlockbits(data); return bmp; } // bitmap --> bitmapimage public static bitmapimage bitmaptobitmapimage(bitmap bitmap) { using (memorystream stream = new memorystream()) { bitmap.save(stream, imageformat.bmp); stream.position = 0; bitmapimage result = new bitmapimage(); result.begininit(); // according to msdn, "the default ondemand cache option retains access to the stream until the image is needed." // force the bitmap to load right now so we can dispose the stream. result.cacheoption = bitmapcacheoption.onload; result.streamsource = stream; result.endinit(); result.freeze(); return result; } }} |
运行后的效果如下:

补充:关于剪裁的位置和区域的填写说明,如下图。

以上就是本文的全部内容,希望对大家的学习有所帮助,也希望大家多多支持服务器之家。
原文链接:https://blog.csdn.net/qq_18995513/article/details/67637521


