前言:从mvc到webapi,路由机制一直是伴随着这些技术的一个重要组成部分。
它可以很简单:如果你仅仅只需要会用一些简单的路由,如/home/index,那么你只需要配置一个默认路由就能简单搞定;
它可以很神秘:你的url可以千变万化,看到一些看似“无厘头”的url,感觉很难理解它如何找到匹配的action,例如/api/user/1/detail,这样一个url可以让你纠结半天。
它可以很晦涩:当面试官提问“请简单分析下mvc路由机制的原理”,你可能事先就准备好了答案,然后噼里啪啦一顿(型如:urlroutingmodule→routes→routedata→requestcontext→controller),你可能回答很流利,但并不一定能理解这些个对象到底是啥意思。两年前的面试,博主也这样做过。
博主觉得,究竟路由机制在你的印象中处于哪一面,完全取决于你的求知欲。路由机制博大精深,博主并未完全理解,但博主是一个好奇心重的人,总觉得神秘的东西就得探索个究竟。今天,博主根据自己的理解,分享下webapi里面路由的原理以及使用,如有考虑不周,欢迎园友们指正。
一、mvc和webapi路由机制比较
1、mvc里面的路由
在mvc里面,默认路由机制是通过url路径去匹配对应的action方法,比如/home/getuser这个url,就表示匹配home这个controller下面的getuser方法,这个很好理解,因为在mvc里面定义了一个默认路由,在app_start文件夹下面有一个routeconfig.cs文件

|
1
2
3
4
5
6
7
8
9
10
11
12
13
|
public class routeconfig { public static void registerroutes(routecollection routes) { routes.ignoreroute("{resource}.axd/{*pathinfo}"); routes.maproute( name: "default", url: "{controller}/{action}/{id}", defaults: new { controller = "department", action = "index", id = urlparameter.optional } ); } } |
url: "{controller}/{action}/{id}"这个定义了我们url的规则,{controller}/{action}定义了路由的必须参数,{id}是可选参数
2、webapi里面的路由
和mvc里面的路由有点不同,webapi的默认路由是通过http的方法(get/post/put/delete)去匹配对应的action,也就是说webapi的默认路由并不需要指定action的名称。还是来看看它的默认路由配置,我们新建一个webapi项目,在app_start文件夹下面自动生成一个webapiconfig.cs文件:

|
1
2
3
4
5
6
7
8
9
10
11
12
13
14
|
public static class webapiconfig { public static void register(httpconfiguration config) { // web api 路由 config.maphttpattributeroutes(); config.routes.maphttproute( name: "defaultapi", routetemplate: "api/{controller}/{id}", defaults: new { id = routeparameter.optional } ); } } |
和mvc类似,routetemplate: "api/{controller}/{id}"这个定义了路由的模板,api/{controller}是必选参数,{id}是可选参数,那么问题就来了,如果我们的url不包含action的名称,那么如何找到请求的方法呢?我们先来简单看一个例子:
|
1
2
3
4
5
6
7
8
|
public class ordercontroller : apicontroller { [httpget] public object getall() { return "success"; } } |
我们通过url来访问

说明请求能够成功。
为什么这个请求能够成功呢?那是因为,当我们访问http://localhost:21528/api/order这个路径的时候,webapi的路由引擎会自动去匹配"api/{controller}/{id}"这个模板,于是找到了控制器是order这个,那么问题来了?它是如何定位到getall()这个方法的呢?这里就是和mvc不同的地方,前面说过,webapi的路由规则是通过http方法去匹配对应的action,那么,我们通过浏览器访问http://localhost:21528/api/order这个路径的时候,浏览器默认通过url访问的都是get请求,于是webapi的路由引擎就会去找order这个控制器里面的get请求的方法,由于没有参数,所以自动匹配到了无参数的get请求→getall()方法,所以请求成功!
当然,webapi也支持mvc里面的路由机制,但restful风格的服务要求请求的url里面不能包含action,所以,在webapi里面是并不提倡使用mvc路由机制的。
这是一个最简单的例子,下面我们就来详细看看webapi里面的路由原理以及使用。
二、webapi路由基础
1、默认路由
上面我们提到了,新建一个webapi服务的时候,会自动在webapiconfig.cs文件里面生成一个默认路由:
|
1
2
3
4
5
|
config.routes.maphttproute( name: "defaultapi", routetemplate: "api/{controller}/{id}", defaults: new { id = routeparameter.optional } ); |
将maphttproute()方法转到定义可以,它有四个重载方法:

分别来看看各个参数的作用:
name:"defaultapi"→表示此路由的名称,这里只需要保证路由名称不重复就ok了。
routetemplate: "api/{controller}/{id}"→表示路由的url规则,“api”是固定部分,主要用来标识当前请求的url是一个api服务的接口,区别mvc的路由,当然,这里并不是一定要写成“api”,如果你改成“apiserver”,那么你请求的url里面也需要写成“apiserver”;“{controller}”是控制器的占位符部分,在真实的url里面,该部分对应的是具体的控制器的名称,这个和mvc里面一致;“{id}”是参数的占位符部分,表示参数,一般这个参数都会在default里面设置可选。有了这个路由模板约束请求的url,比如:我们请求的url写成http://localhost:21528/order,那么肯定是找不到对应的路由的,因为“api”这个参数必选。如果请求的url匹配不到对应的路由,则会向客户端返回一个404的状态码。
defaults: new { id = routeparameter.optional }→表示路由的默认值,比如上面的routetemplate,{controller}和{id}部分都可以设置默认值,比如:defaults改成new { controller="order", id = routeparameter.optional },那么我们请求http://localhost:21528/api这个url仍然能访问到getall()方法。
constraints→表示路由约束,一般是一个约束路由模板的正则表达式。比如:我们加入约束条件 constraints: new { id = @"\d+" } ,这就约束必须要匹配一到多个参数id,那么,我们在ordercontroller里面加入另一个方法
|
1
2
3
4
5
6
7
8
9
10
11
12
13
14
15
|
public class ordercontroller : apicontroller { [httpget] public object getall() { return "success"; } [httpget] public object getbyid(int id) { return "success" + id ; } } |
我们通过http://localhost:21528/api/order/2来访问,得到结果:

我们再通过http://localhost:21528/api/order/a来访问,得到结果:

这个是很好理解的,id的值不匹配正则表达式。
而我们访问http://localhost:21528/api/order。结果:

竟然连getall()方法都找不到了。这是为什么呢?原来就是这个约束在作怪,正则\d+表示匹配一个或多个数字,所以如果请求的url里面没有传数字,则自动匹配不到。所以,如果需要匹配无参的方法,我们把约束改成这样:constraints: new { id = @"\d*" },这个表示匹配0个或多个数字,再来试试

这样就ok了。
上述说了那么多都是约束id的,其实你也可以使用表达式去约束controller、action等等,但一般不常用,我们就不做过多讲解。
2、自定义路由
上面介绍了这么多,都是关于默认路由原理的介绍。除了默认路由,我们也可以自定义路由,我们将webapiconfig.cs里面改成这样:
|
1
2
3
4
5
6
7
8
9
10
11
12
13
14
15
16
17
18
19
20
21
22
23
24
25
26
27
28
29
|
public static class webapiconfig { public static void register(httpconfiguration config) { // web api 路由 config.maphttpattributeroutes(); //1.默认路由 config.routes.maphttproute( name: "defaultapi", routetemplate: "api/{controller}/{id}", defaults: new { id = routeparameter.optional } ); //2.自定义路由一:匹配到action config.routes.maphttproute( name: "actionapi", routetemplate: "actionapi/{controller}/{action}/{id}", defaults: new { id = routeparameter.optional } ); //3.自定义路由二 config.routes.maphttproute( name: "testapi", routetemplate: "testapi/{controller}/{ordertype}/{id}", defaults: new { ordertype="aa", id = routeparameter.optional } ); } } |
除了默认路由,我们再加入另外两个自定义路由规则
2.1、自定义路由一:匹配到action
第一个自定义路由很好理解,和mvc里面的路由机制保持一致,只不过为了区别默认路由,我们将路由模板的前缀改成了“actionapi”。我们通过这个自定义的路由也能找到匹配的方法。
比如我们访问http://localhost:21528/actionapi/order/getall,得到结果:

通过action的名称来匹配很好理解,上面的getall()是方法名,webapi会默认它就是action的名称,如果你想要方法名和action的名称不一致,你也可以自定义action的名称,这个可以通过特性actionname来实现,如下:
|
1
2
3
4
5
6
|
[actionname("testactionname")] [httpget] public object getbyid(int id) { return "success" + id ; } |
测试结果:

之前博主演示参数和返回值的时候都是使用的匹配到action的路由。这种用法和mvc里面保持一致,比较好理解,但是webapi里面并不提倡。
2.2、自定义路由二
第二个自定义路由第一眼看上去是不太好理解的,没关系,我们先来按照它的路由模板规则使用试试。

通过http://localhost:21528/testapi/order/aa/匹配到getall()方法

通过http://localhost:21528/testapi/order/aa/2匹配到的是getbyid()方法

通过http://localhost:21528/testapi/order/bb/2匹配到的也是getbyid()方法。
什么意思呢?也就是说,只要{ordertype}按照路由规则去配置,都能找到对应的方法。这里的{ordertype}有什么用呢?这个要留在下面介绍特性路由的时候来解释。
3、路由原理
有了上面的这些理论作为基础,我们再来分析下webapi里面路由机制的原理以及路由匹配的过程。由于webapi的路由机制和mvc有许多的相似性,所以要想理解webapi的路由机制,有需要搬出来那些asp.net rounting里面的对象。这个过程有点复杂,博主就根据自己的理解,提提一些主要的过程:
1、webapi服务启动之后,会执行全局配置文件global.asax.cs的protected void application_start(){globalconfiguration.configure(webapiconfig.register);}方法,通过参数委托执行webapiconfig.cs里面的public static void register(httpconfiguration config)这个方法,将所有配置的路由信息添加到httproutecollection对象中(mvc里面可能是routcollection对象)保存起来。这里的httproutcollection对象的实例名是routes,这个很重要,后面要用到。
2、当我们发送请求到webapi服务器的时候,比如我们访问http://localhost:21528/api/order这个url的时候,请求首先还是会被urlroutingmodule监听组件截获,然后,将截获的请求在routes路由集合中匹配到对应的路由模板(如果匹配不到对应的路由模板,则返回404),得到对应的ihttproute对象。ihttproute对象是routes集合里面匹配到的一个实体。
3、将ihttproute对象交给当前的请求的上下文对象requestcontext处理,根据ihttproute对象里面的url匹配到对应的controller,然后再根据http请求的类型和参数找到对应的action。这样一个请求就能找到对应的方法了。
这个过程本身是非常复杂的,为了简化,博主只选择了最主要的几个过程。更详细的路由机制可以参考:。这文章写得有点深,有兴趣的可以看看。
三、webapi路由过程
通过上文路由的过程,我们知道,一个请求过来之后,路由主要需要经历三个阶段
- 根据请求的url匹配路由模板
- 找到控制器
- 找到action
1、根据请求的url匹配路由模板
这点上面已经说了很多了,主要就是路由模板的配置和url的匹配。在此不作过多说明。
2、找到控制器
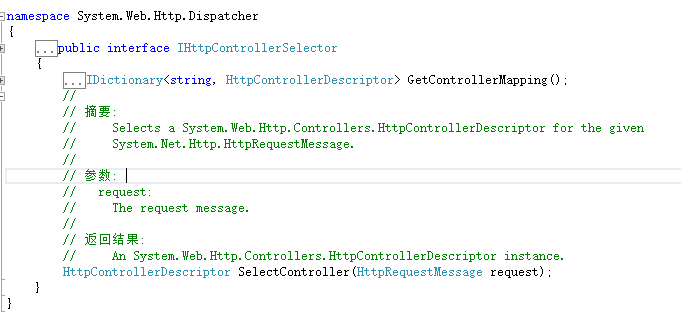
如果你反编译路由模块的代码,你会发现控制器的选择主要在ihttpcontrollerselector这个接口的selectcontroller()方法里面处理。

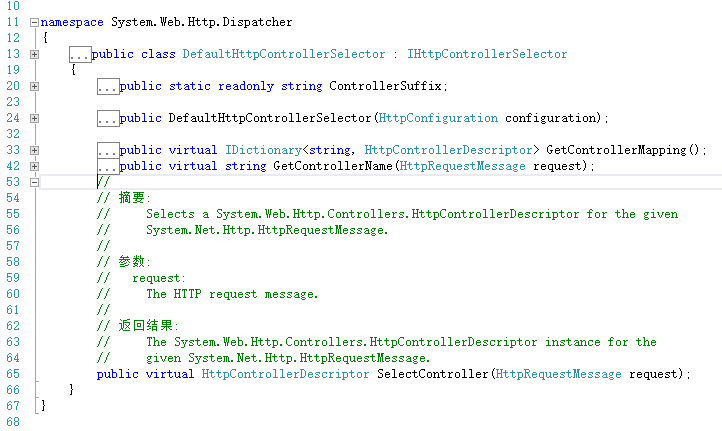
该方法将当前的请求以httprequestmessage对象作为参数传入,返回httpcontrollerdescriptor对象。这个接口默认由defaulthttpcontrollerselector这个类提供实现

默认实现的方法里面大致的算法机制是:首先在路由字典中找到实际的控制器的名称(比如“order”),然后在此控制器名称上面加上字符串“controller”的到请求控制器的全称(比如“ordercontroller”),最后找到对应的webapi的controller,实例化就得到当前请求的控制器对象。
3、找到action
得到了控制器对象之后,api引擎通过调用ihttpactionselector这个接口的selectaction()方法去匹配action。这个过程主要包括:
- 解析当前的http请求,得到请求类型(是get、post、put还是delete)
- 如果路由模板配置了{action},则直接取到url里面的action名称
- 解析请求的参数
如果路由模板配置了{action},那么找到对应的action就很简单,如果没有配置action,则会首先匹配请求类型(get/post/put/delete等),然后匹配请求参数,找到对应的action。我们看个例子,比如,我们的controller加如下一些方法。
|
1
2
3
4
5
6
7
8
9
10
11
12
13
14
15
16
17
18
19
20
21
22
23
24
25
26
27
28
29
30
31
32
33
34
35
36
37
38
|
public class ordercontroller : apicontroller { [httpget] public ihttpactionresult getall() { return ok<string>("success"); } [httpget] public ihttpactionresult getbyid(int id) { return ok<string>("success" + id ); } [httppost] public httpresponsemessage postdata(int id) { return request.createresponse(); } [httppost] public httpresponsemessage savadata(order order) { return request.createresponse(); } [httpput] public ihttpactionresult put(int id) { return ok(); } [httpdelete] public ihttpactionresult deletebyid(int id) { return ok(); } } |
匹配action的结果
| url | http方法 | 参数 | 结果 |
|---|---|---|---|
| http://localhost:21528/api/order | get | none | 匹配getall方法 |
| http://localhost:21528/api/order | get | id | 匹配getbyid方法 |
| http://localhost:21528/api/order | post | order | 匹配savadata方法 |
| http://localhost:21528/api/order | put | id | 匹配put方法 |
| http://localhost:21528/api/order | delete | id | 匹配deletebyid方法 |
webapi还提供了一个action同时支持多个http方法的请求,使用acceptverbs特性去标记。但博主觉得实际使用并不多,有兴趣的可以了解下。
|
1
2
3
4
5
|
[acceptverbs("get", "post")] public ihttpactionresult getbyid(int id) { return ok<string>("success" + id ); } |
四、webapi特性路由
上面说了这么多都是路由的一些全局配置。并且存在问题:
如果http请求的方法相同(比如都是post请求),并且请求的参数也相同。这个时候似乎就有点不太好办了,这种情况在实际项目中还是比较多的。比如
|
1
2
3
4
5
6
7
8
9
10
11
12
13
14
15
16
17
18
19
20
21
22
23
|
public class ordercontroller : apicontroller { //订单排产 [httppost] public void orderproduct([frombody]string strpostdata) { } //订单取消 [httppost] public void ordercancel([frombody]string strpostdata) { } //订单删除 [httppost] public void orderdelete([frombody]string strpostdata) { } } |
这个时候如果使用我们上面讲的restful风格的路由是解决不了这个问题的。当然,有园友可能就说了,既然这样,我们在路由模板里面加上“{action}”不就搞定了么!这样确实可行。但还是那句话,不提倡。我们来看看如何使用特性路由解决这个问题。
1、启动特性路由
如果要使用特性路由,首先在webapiconfig.cs的register方法里面必须先启用特性路由:
|
1
2
3
4
5
6
7
8
9
10
11
12
|
public static void register(httpconfiguration config) { // 启用web api特性路由 config.maphttpattributeroutes(); //1.默认路由 config.routes.maphttproute( name: "defaultapi", routetemplate: "api/{controller}/{id}", defaults: new { id = routeparameter.optional } ); } |
一般情况下,当我们新建一个webapi项目的时候,会自动在register方法里面加上这句话。
2、最简单的特性路由
我们在ordercontroller这个控制器里面加这个action
|
1
2
3
4
5
6
|
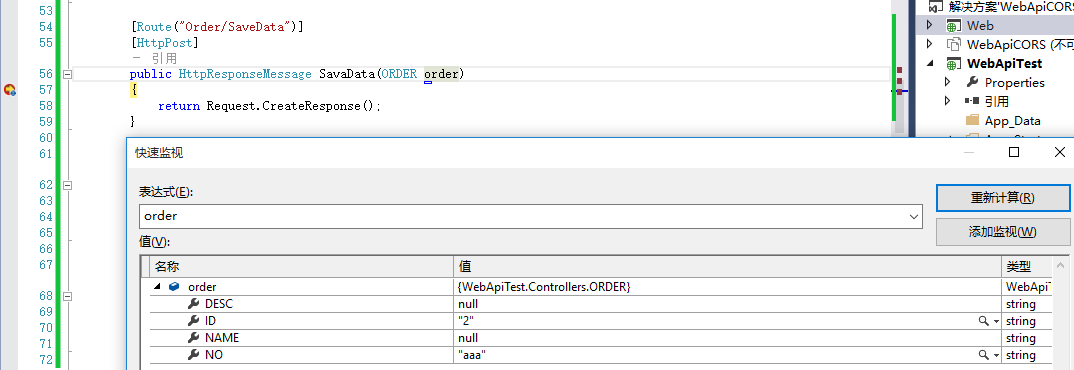
[route("order/savedata")] [httppost] public httpresponsemessage savadata(order order) { return request.createresponse(); } |
然后我们通过web里面的ajax调用
|
1
2
3
4
5
6
7
8
9
10
|
$(function () { $.ajax({ type: 'post', url: 'http://localhost:21528/order/savedata', data: { id: 2, no:"aaa"}, success: function (data, status) { alert(data); } });}); |
得到结果:

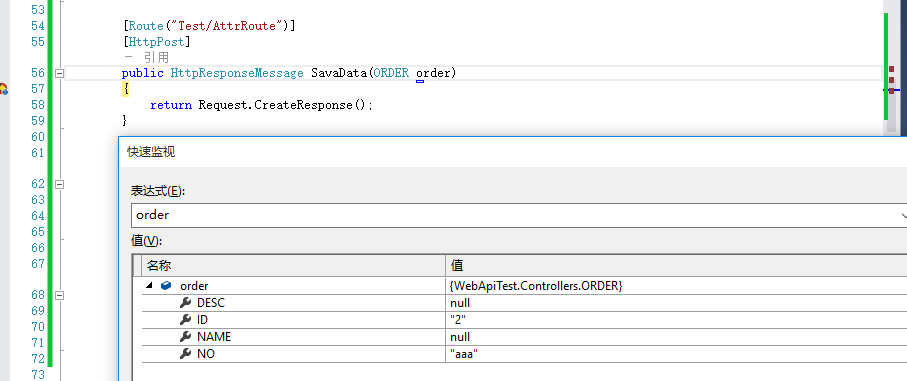
当然,有人可能就有疑义了,这个特性路由的作用和“{action}”的作用一样嘛,其实不然,如果这里改成[route("test/attrroute")],然后请求的url换成http://localhost:21528/test/attrroute,一样能找到对应的action。

特性路由的目的是为了解决我们公共路由模板引擎解决不了的问题。一个action定义了特性路由之后,就能通过特性路由上面的路由规则找到。
3、带参数的特性路由
特性路由的规则可以使用“{}”占位符动态传递参数,比如我们有这样一个特性路由
|
1
2
3
4
5
6
|
[route("ordertype/{id}/order")] [httpget] public ihttpactionresult getbyid(int id) { return ok<string>("success" + id ); } |
在浏览器里面调用

调用成功。到此,我们就能看懂本文最开始那个看似“怪异”的路由→/api/user/1/detail这个了。
4、参数的约束和默认值
|
1
2
3
4
5
6
|
[route("api/order/{id:int=3}/ordertype")] [httpget] public ihttpactionresult getbyid(int id) { return ok<string>("success" + id ); } |
这里约束可变部分{id}的取值必须是int类型。并且默认值是3.
看看效果


不满足约束条件,则直接返回404。
5、路由前缀
在正式项目中,同一个控制器的所有的action的所有特性路由标识一个相同的前缀,这种做法并非必须,但这样能够增加url的可读性。一般的做法是在控制器上面使用特性[routeprefix]来标识。
|
1
2
3
4
5
6
7
8
9
10
11
12
13
14
15
16
17
18
19
20
21
22
23
24
|
[routeprefix("api/order")] public class ordercontroller : apicontroller { [route("")] [httpget] public ihttpactionresult getall() { return ok<string>("success"); } [route("{id:int}")] [httpget] public ihttpactionresult getbyid(int id) { return ok<string>("success" + id ); } [route("postdata")] [httppost] public httpresponsemessage postdata(int id) { return request.createresponse(); } } |
那么这个这个控制器的action的时候,都需要/api/order开头,后面接上action特性路由的规则。
五、第一个restful风格的webapi服务
通过以上,我们就可以构造一个restful风格的webapi服务。
|
1
2
3
4
5
6
7
8
9
10
11
12
13
14
15
16
17
18
19
20
21
22
23
24
25
26
27
28
29
30
31
32
33
34
35
36
37
38
39
40
41
42
43
44
45
|
[routeprefix("api/attrorder")] public class ordercontroller : apicontroller { [route("")] [httpget] public ihttpactionresult getall() { return ok<string>("success"); } [route("{id:int=3}/orderdetailbyid")] [httpget] public ihttpactionresult getbyid(int id) { return ok<string>("success" + id ); } [route("{no}/orderdetailbyno")] [httpget] public ihttpactionresult getbyno(string no) { return ok<string>("success" + no); } [route("{name}/orderdetailbyname")] [httpget] public ihttpactionresult getbyname(string name) { return ok<string>("success" + name); } [route("postdata")] [httppost] public httpresponsemessage postdata(int id) { return request.createresponse(); } [route("test/attrroute")] [httppost] public httpresponsemessage savadata(order order) { return request.createresponse(); } } |
得到结果

六、总结
整了这么久终于整完了。如果你觉得本文对你有帮助,请帮忙博主推荐,您的支持是博主最大的动力!
以上就是本文的全部内容,希望对大家的学习有所帮助,也希望大家多多支持服务器之家。
原文链接:https://www.cnblogs.com/landeanfen/p/5501490.html


