本文实例为大家分享了Android快递物流信息布局展示的具体代码,供大家参考,具体内容如下
1. 思路介绍
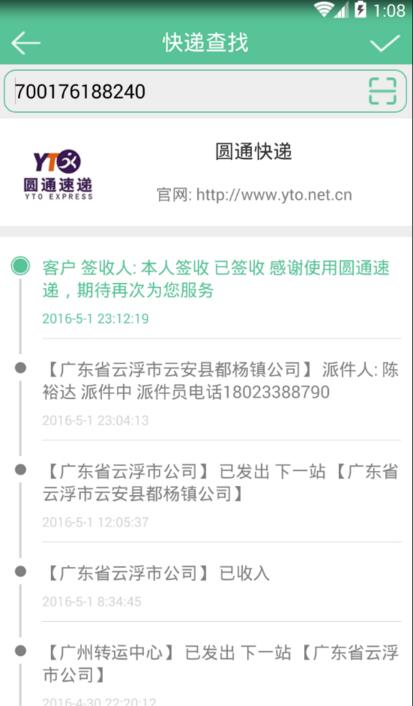
效果图:

思路:
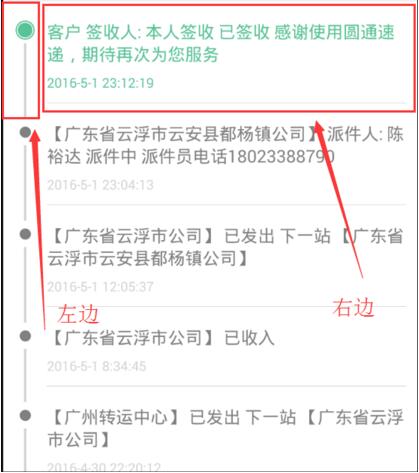
就一个ListView,每个item就是一条物流信息。然后每个item,分为左和右两边,左边是一个进度条的风格,右边是物流文字,适配器里面判断item,position为0 就设置为绿色,其他position就设置为灰色就行了。

2. 代码
item的布局
|
1
2
3
4
5
6
7
8
9
10
11
12
13
14
15
16
17
18
19
20
21
22
23
24
25
26
27
28
29
30
31
32
33
34
35
36
37
38
39
40
41
42
43
44
45
46
47
48
49
50
51
52
53
54
55
56
57
58
59
60
61
62
63
64
65
66
67
68
69
70
71
72
73
74
75
76
77
78
79
80
81
82
83
84
85
86
|
<?xml version="1.0" encoding="utf-8"?><LinearLayout xmlns:android="http://schemas.android.com/apk/res/android" android:orientation="horizontal" android:layout_width="match_parent" android:layout_height="wrap_content" > <!-- 左边 --> <LinearLayout android:layout_width="wrap_content" android:layout_height="match_parent" android:orientation="vertical" > <!-- 上面的竖线 --> <View android:id="@+id/view_top_line" android:layout_width="2dp" android:layout_height="15dp" android:background="@color/lightgray" android:layout_gravity="center_horizontal" android:layout_marginTop="-1dp" /> <!-- 圆点 --> <ImageView android:id="@+id/iv_expres_spot" android:layout_width="20dp" android:layout_height="20dp" android:background="@drawable/express_point_old" android:layout_marginBottom="2dp" android:layout_marginTop="2dp" /> <!-- 竖线 --> <View android:layout_width="2dp" android:layout_height="wrap_content" android:background="@color/lightgray" android:layout_gravity="center_horizontal" /> </LinearLayout> <!-- 右边 --> <LinearLayout android:layout_weight="1" android:layout_width="0dp" android:layout_height="wrap_content" android:orientation="vertical" android:layout_marginLeft="10dp" android:layout_marginTop="17dp" > <TextView android:id="@+id/tv_express_text" android:layout_width="match_parent" android:layout_height="wrap_content" android:text="asdfasdfasd大事发生的苏打粉asdfasdfas阿斯蒂芬斯蒂芬阿萨德发达省份撒旦法" android:textColor="@color/gray" android:lineSpacingExtra="2dp" android:textSize="16sp" android:textIsSelectable="true" /> <TextView android:id="@+id/tv_express_time" android:layout_width="match_parent" android:layout_height="wrap_content" android:textColor="@color/lightgray" android:textSize="12sp" android:text="2016年4月27日 00:27:45" android:layout_marginTop="5dp" android:textIsSelectable="true" android:paddingBottom="10dp" /> <!-- 底部分割线 --> <View android:layout_width="match_parent" android:background="@color/lightgray" android:layout_height="0.5dp" /> </LinearLayout></LinearLayout> |
适配器代码
|
1
2
3
4
5
6
7
8
9
10
11
12
13
14
15
16
17
18
19
20
21
22
23
24
25
26
27
28
29
30
31
32
33
34
35
36
37
38
39
40
41
42
43
44
45
46
47
48
49
50
51
52
53
54
55
56
57
58
59
60
61
62
63
64
65
66
67
68
69
70
71
72
73
74
75
76
77
78
79
80
81
82
83
84
85
86
87
88
89
90
91
92
93
94
95
96
97
98
|
package com.tpnet.hlquery.Express;import android.content.Context;import android.graphics.Color;import android.view.LayoutInflater;import android.view.View;import android.view.ViewGroup;import android.widget.BaseAdapter;import android.widget.ImageView;import android.widget.TextView;import com.tpnet.hlquery.Express.json.Content;import com.tpnet.hlquery.R;import java.util.List;/** * Created by tpnet on 2016/4/27. */public class MessListAdapter extends BaseAdapter { //allContent就是所有物流信息的list private List<Content> allContent; private Context context; private LayoutInflater layoutInflater; MessListAdapter(Context context,List<Content> allContent){ this.allContent = allContent; this.context = context; layoutInflater = LayoutInflater.from(context); } @Override public int getCount() { return allContent.size(); } @Override public Object getItem(int position) { return allContent.get(position); } @Override public long getItemId(int position) { return position; } @Override public View getView(int position, View convertView, ViewGroup parent) { ViewHolder holder; if(convertView == null){ holder = new ViewHolder(); convertView = layoutInflater.inflate(R.layout.item_express_data,null); holder.viewTopLine = convertView.findViewById(R.id.view_top_line); holder.ivExpresSpot = (ImageView) convertView.findViewById(R.id.iv_expres_spot); holder.tvExpressText = (TextView) convertView.findViewById(R.id.tv_express_text); holder.tvExpressTime = (TextView) convertView.findViewById(R.id.tv_express_time); //将ViewHolder与convertView进行绑定 convertView.setTag(holder); }else{ holder = (ViewHolder)convertView.getTag(); } Content content = allContent.get(position); //设置数据颜色,防止view 复用,必须每个设置 if(position == 0 ){ //上顶部背景透明,点是灰色,字体是绿色 holder.viewTopLine.setBackgroundColor(Color.TRANSPARENT); holder.ivExpresSpot.setBackgroundResource(R.drawable.express_point_new); holder.tvExpressText.setTextColor(context.getResources().getColor(R.color.mainColor)); holder.tvExpressTime.setTextColor(context.getResources().getColor(R.color.mainColor)); }else{ holder.viewTopLine.setBackgroundColor(context.getResources().getColor(R.color.lightgray)); holder.ivExpresSpot.setBackgroundResource(R.drawable.express_point_old); holder.tvExpressText.setTextColor(context.getResources().getColor(R.color.gray)); holder.tvExpressTime.setTextColor(context.getResources().getColor(R.color.lightgray)); } holder.tvExpressText.setText(content.getContext()); holder.tvExpressTime.setText(content.getTime()); return convertView; } public class ViewHolder{ public View viewTopLine; private ImageView ivExpresSpot; private TextView tvExpressText; private TextView tvExpressTime; }} |
activity那里就new 上面的Adapter,然后设置进ListView 就可以了。
注意一点:
listView一定要设置:android:divider=”@null”
不然每个item直接默认是有 间隙的。
就这么简单了,重要的还是item的布局
以上就是本文的全部内容,希望对大家的学习有所帮助,也希望大家多多支持服务器之家。
原文链接:https://blog.csdn.net/niubitianping/article/details/51416743


