1.背景
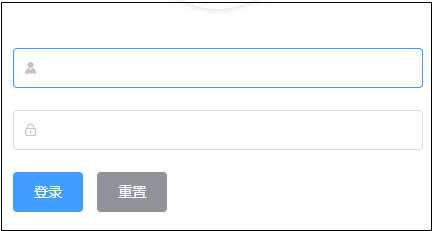
完成了登录的表单输入框界面如下:
代码:
|
1
2
3
4
5
6
7
8
9
10
11
12
13
14
15
16
|
<!-- 输入框--> <el-form label-width="0px" class="login_form"> <!-- 用户名 --> <el-form-item > <el-input prefix-icon="el-icon-s-custom"></el-input> </el-form-item> <!-- 密码 --> <el-form-item > <el-input prefix-icon="el-icon-lock"></el-input> </el-form-item> <!-- 按钮区域 --> <el-form-item > <el-button type="primary">登录</el-button> <el-button type="info">重置</el-button> </el-form-item> </el-form> |
2.表单数据绑定
可以查看element的官方案例
本案例代码如下:
|
1
2
3
4
5
6
7
8
9
10
11
12
13
14
15
16
17
18
|
<div> <!-- 输入框--> <el-form :model="loginForm" label-width="0px" class="login_form"> <!-- 用户名 --> <el-form-item> <el-input v-model="loginForm.username" prefix-icon="el-icon-s-custom"></el-input> </el-form-item> <!-- 密码 --> <el-form-item> <el-input v-model="loginForm.password" prefix-icon="el-icon-lock" type="password"></el-input> </el-form-item> <!-- 按钮区域 --> <el-form-item> <el-button type="primary">登录</el-button> <el-button type="info">重置</el-button> </el-form-item> </el-form> </div> |
|
1
2
3
4
5
6
7
8
9
10
11
12
13
|
<script> export default { name: "Login", data() { return { loginForm: { username: 'admin', password: '123456' } } } }</script> |
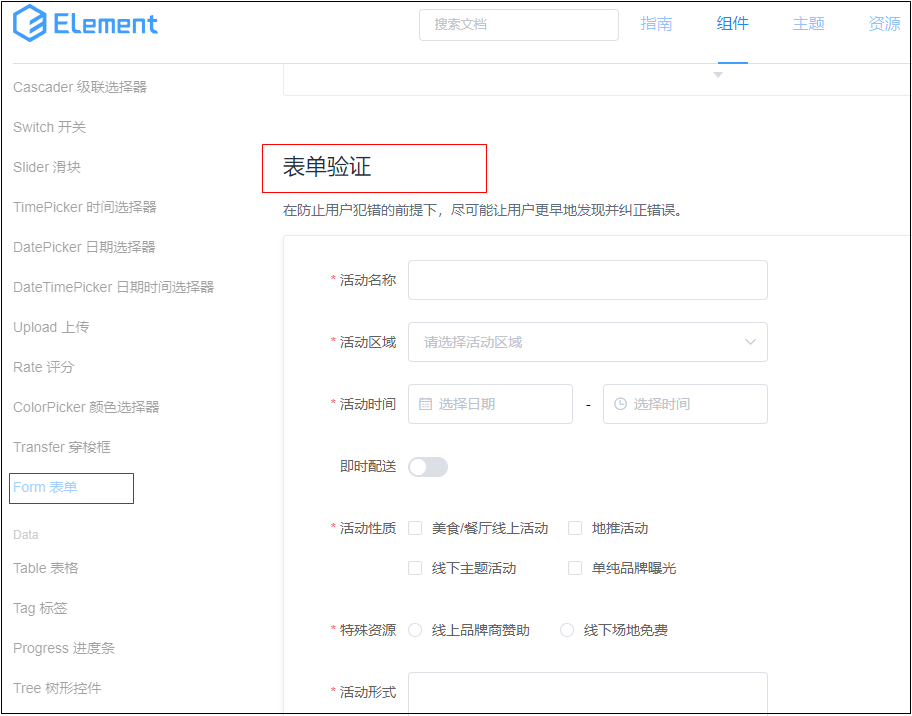
3.表单数据格式错误提示
官方案例:
本案例代码如下:
|
1
2
3
4
5
6
7
8
9
10
11
12
13
14
15
16
17
18
19
20
21
22
23
24
25
26
27
28
29
30
31
32
33
34
35
36
37
38
39
40
41
42
43
44
45
46
47
48
49
50
51
52
53
54
55
56
57
58
59
60
61
62
63
64
65
66
67
68
69
70
71
72
73
74
75
76
77
78
79
80
81
82
83
84
85
86
87
88
89
90
91
92
93
94
95
96
97
98
99
100
101
102
103
|
<template> <div class="login_container"> <div class="login_box"> <!--登录logo--> <div class="avatar_box"> <img src="../assets/logo.png" alt=""> </div> <div> <!-- 输入框--> <el-form :model="loginForm" :rules="loginRules" label-width="0px" class="login_form"> <!-- 用户名 prop="username" 与表单验证属性对应--> <el-form-item prop="username"> <el-input v-model="loginForm.username" prefix-icon="el-icon-s-custom"></el-input> </el-form-item> <!-- 密码 --> <el-form-item prop="password"> <el-input v-model="loginForm.password" prefix-icon="el-icon-lock" type="password"></el-input> </el-form-item> <!-- 按钮区域 --> <el-form-item> <el-button type="primary">登录</el-button> <el-button type="info">重置</el-button> </el-form-item> </el-form> </div> </div> </div></template><script> export default { name: "Login", data() { return { // 表单数据 loginForm: { username: 'admin', password: '123456' }, // 表单验证 loginRules: { username: [ // trigger: 'blur' 表示失去焦点触发 {required: true, message: '请输入登录账号', trigger: 'blur'}, {min: 5, max: 12, message: '长度在 6 到 12 个字符', trigger: 'blur'} ], password: [ {required: true, message: '请输入密码', trigger: 'blur'}, {min: 6, max: 20, message: '长度在 6 到 20 个字符', trigger: 'blur'} ], } } } }</script><style lang="less" type="text/less" scoped> .login_container { background-color: #2b4b6b; height: 100%; } .login_box { width: 450px; height: 300px; background-color: #fff; border-radius: 3px; position: absolute; left: 50%; top: 50%; transform: translate(-50%, -50%); .avatar_box { height: 130px; width: 130px; border: 1px solid #eee; border-radius: 50%; padding: 10px; box-shadow: 0 0 10px #ddd; position: absolute; left: 50%; transform: translate(-50%, -50%); background-color: #fff; img { width: 100%; height: 100%; border-radius: 50%; background-color: #eee; } } } .login_form { position: absolute; bottom: 0; width: 100%; padding: 0 20px; box-sizing: border-box; }</style> |
4.表单重置功能
官方案例如下:
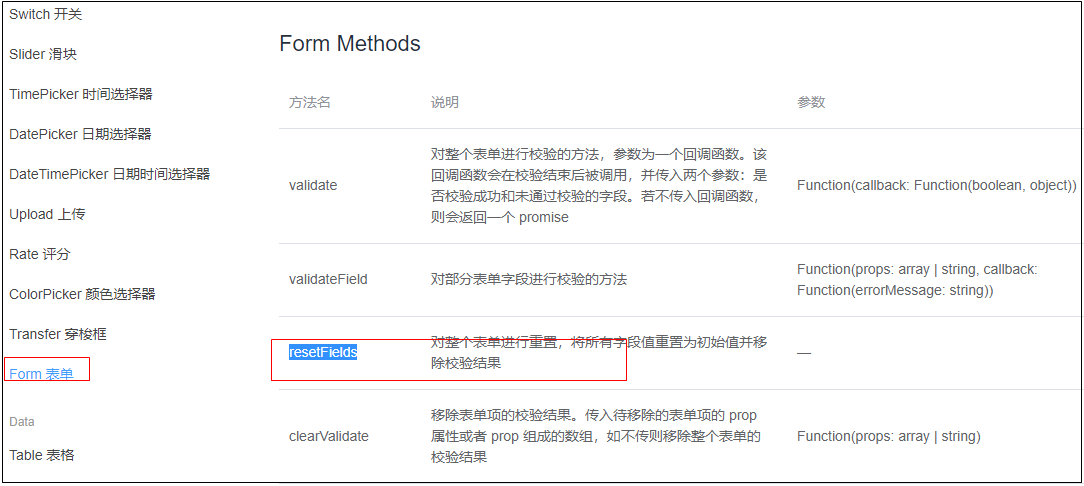
本案例代码:
|
1
2
3
4
5
6
7
8
9
10
11
12
13
14
15
16
17
18
19
20
21
22
23
24
25
26
27
28
29
30
31
32
33
34
35
36
37
38
39
40
41
42
43
44
45
46
47
48
49
50
51
52
53
54
55
56
57
58
59
60
61
62
63
64
65
66
67
68
69
70
71
72
73
74
75
76
77
78
79
80
81
82
83
84
85
86
87
88
89
90
91
92
93
94
95
96
97
98
99
100
101
102
103
104
105
106
107
108
109
|
<template> <div class="login_container"> <div class="login_box"> <!--登录logo--> <div class="avatar_box"> <img src="../assets/logo.png" alt=""> </div> <div> <!-- 输入框--> <el-form ref="loginFormRef" :model="loginForm" :rules="loginRules" label-width="0px" class="login_form"> <!-- 用户名 prop="username" 与表单验证属性对应--> <el-form-item prop="username"> <el-input v-model="loginForm.username" prefix-icon="el-icon-s-custom"></el-input> </el-form-item> <!-- 密码 --> <el-form-item prop="password"> <el-input v-model="loginForm.password" prefix-icon="el-icon-lock" type="password"></el-input> </el-form-item> <!-- 按钮区域 --> <el-form-item> <el-button type="primary">登录</el-button> <el-button type="info" @click="resetLoginForm">重置</el-button> </el-form-item> </el-form> </div> </div> </div></template><script> export default { name: "Login", data() { return { // 表单数据 loginForm: { username: '', password: '' }, // 表单验证 loginRules: { username: [ // trigger: 'blur' 表示失去焦点触发 {required: true, message: '请输入登录账号', trigger: 'blur'}, {min: 5, max: 12, message: '长度在 6 到 12 个字符', trigger: 'blur'} ], password: [ {required: true, message: '请输入密码', trigger: 'blur'}, {min: 6, max: 20, message: '长度在 6 到 20 个字符', trigger: 'blur'} ], } } }, methods:{ // 重置登录表单 resetLoginForm(){ this.$refs.loginFormRef.resetFields() } } }</script><style lang="less" type="text/less" scoped> .login_container { background-color: #2b4b6b; height: 100%; } .login_box { width: 450px; height: 300px; background-color: #fff; border-radius: 3px; position: absolute; left: 50%; top: 50%; transform: translate(-50%, -50%); .avatar_box { height: 130px; width: 130px; border: 1px solid #eee; border-radius: 50%; padding: 10px; box-shadow: 0 0 10px #ddd; position: absolute; left: 50%; transform: translate(-50%, -50%); background-color: #fff; img { width: 100%; height: 100%; border-radius: 50%; background-color: #eee; } } } .login_form { position: absolute; bottom: 0; width: 100%; padding: 0 20px; box-sizing: border-box; }</style> |
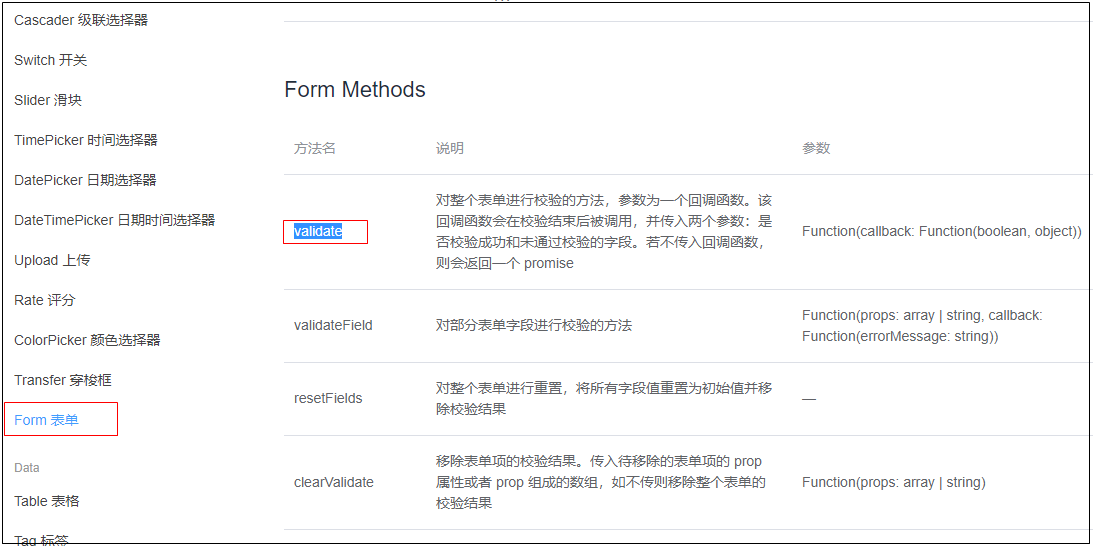
5.请求发出前数据校验
|
1
2
3
4
5
6
7
8
9
10
11
|
// 登录 login() { // 登录前参数验证 this.$refs.loginFormRef.validate((valid) => { if (!valid) { console.log("参数验证失败") return } console.log("参数校验成功") }) } |
6.发起登录请求
1.安装:axios(可以cnpm安装,也可以下载js引入文件)
cnpm install axios -S
-D 等价于 --save-dev
-S 等价于 --save
2.引入到vue项目中
import axios from 'axios'
axios.defaults.baseURL = 'http://127.0.0.1:XXXX/XXXXX'
Vue.prototype.$http = axios
3.发起登录请求
|
1
2
3
4
5
6
7
8
9
10
11
12
13
14
15
16
17
18
19
20
21
22
23
24
25
26
27
28
29
30
31
32
33
34
35
36
37
38
39
40
41
42
43
44
45
46
47
48
49
50
51
52
53
54
55
56
57
58
59
60
61
62
63
64
65
66
67
68
69
70
71
72
73
74
75
76
77
78
79
80
81
82
83
84
85
86
87
88
89
90
91
92
93
94
95
96
97
98
99
100
101
102
103
104
105
106
107
108
109
110
111
112
113
114
115
116
117
118
119
120
121
122
123
124
125
126
127
|
<template> <div class="login_container"> <div class="login_box"> <!--登录logo--> <div class="avatar_box"> <img src="../assets/logo.png" alt=""> </div> <div> <!-- 输入框--> <el-form ref="loginFormRef" :model="loginForm" :rules="loginRules" label-width="0px" class="login_form"> <!-- 用户名 prop="username" 与表单验证属性对应--> <el-form-item prop="username"> <el-input v-model="loginForm.username" prefix-icon="el-icon-s-custom"></el-input> </el-form-item> <!-- 密码 --> <el-form-item prop="password"> <el-input v-model="loginForm.password" prefix-icon="el-icon-lock" type="password"></el-input> </el-form-item> <!-- 按钮区域 --> <el-form-item> <el-button type="primary" @click="login">登录</el-button> <el-button type="info" @click="resetLoginForm">重置</el-button> </el-form-item> </el-form> </div> </div> </div></template><script> export default { name: "Login", data() { return { // 表单数据 loginForm: { username: '', password: '' }, // 表单验证 loginRules: { username: [ // trigger: 'blur' 表示失去焦点触发 {required: true, message: '请输入登录账号', trigger: 'blur'}, {min: 5, max: 12, message: '长度在 6 到 12 个字符', trigger: 'blur'} ], password: [ {required: true, message: '请输入密码', trigger: 'blur'}, {min: 6, max: 20, message: '长度在 6 到 20 个字符', trigger: 'blur'} ], } } }, methods: { // 重置登录表单 resetLoginForm() { this.$refs.loginFormRef.resetFields() }, // 登录 login() { // 登录前参数验证 this.$refs.loginFormRef.validate(async (valid) => { if (!valid) { console.log("参数验证失败") return } // 发起网络请求登录 let {data: result} = await this.$http.post('login', this.loginForm) console.log("result:" + result) if (result.meta.status !== 200) { console.log("登录失败") return } console.log("登录成功") }) } } }</script><style lang="less" type="text/less" scoped> .login_container { background-color: #2b4b6b; height: 100%; } .login_box { width: 450px; height: 300px; background-color: #fff; border-radius: 3px; position: absolute; left: 50%; top: 50%; transform: translate(-50%, -50%); .avatar_box { height: 130px; width: 130px; border: 1px solid #eee; border-radius: 50%; padding: 10px; box-shadow: 0 0 10px #ddd; position: absolute; left: 50%; transform: translate(-50%, -50%); background-color: #fff; img { width: 100%; height: 100%; border-radius: 50%; background-color: #eee; } } } .login_form { position: absolute; bottom: 0; width: 100%; padding: 0 20px; box-sizing: border-box; }</style> |
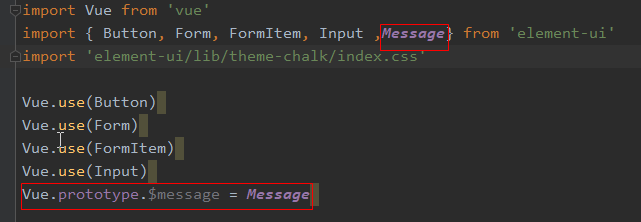
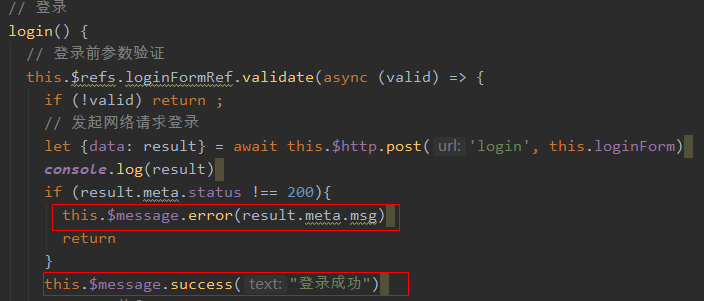
7.消息提示配置
1.添加element 消息组件
2.使用
8.登录成功后token存放
|
1
2
3
4
5
6
7
8
9
10
11
12
13
14
15
16
17
18
19
|
// 登录 login() { // 登录前参数验证 this.$refs.loginFormRef.validate(async (valid) => { if (!valid) return ; // 发起网络请求登录 let {data: result} = await this.$http.post('login', this.loginForm) console.log(result) if (result.meta.status !== 200){ this.$message.error(result.meta.msg) return } this.$message.success("登录成功") // token放入 sessionStorage window.sessionStorage.setItem('token', result.data.token) // 跳转到home路径 this.$router.push("/home") }) } |
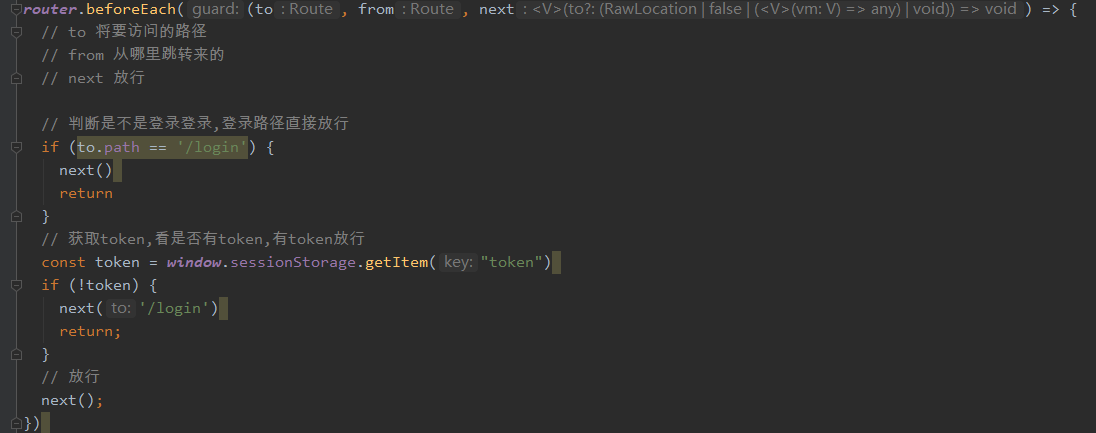
9.路由导航守卫-登录拦截
|
1
2
3
4
5
6
7
8
9
10
11
12
13
14
15
16
17
18
19
20
21
22
23
24
25
26
27
28
29
30
31
32
33
34
35
36
37
38
39
40
41
42
43
44
45
46
|
import Vue from 'vue'import Router from 'vue-router'import Login from '@/components/Login'import Home from '@/components/Home'Vue.use(Router)const router = new Router({ routes: [ { path: "/", redirect: "/login" }, { path: '/login', name: 'Login', component: Login } , { path: '/home', name: 'Home', component: Home } ]})router.beforeEach((to, from, next) => { // to 将要访问的路径 // from 从哪里跳转来的 // next 放行 // 判断是不是登录登录,登录路径直接放行 if (to.path == '/login') { next() return } // 获取token,看是否有token,有token放行 const token = window.sessionStorage.getItem("token") if (!token) { next('/login') return; } // 放行 next();})export default router |
10.退出功能
|
1
2
3
4
5
6
7
8
9
10
11
12
13
14
15
16
17
18
19
20
21
22
|
<template> <div> <el-button type="info" @click="logout">退出</el-button> </div></template><script> export default { name: "Home", methods: { // 退出登录 logout() { window.sessionStorage.clear() this.$router.push("/login") } } }</script><style lang="less" scoped></style> |
以上就是vue实现登录功能的详细内容,更多关于vue 登录功能的资料请关注服务器之家其它相关文章!
原文链接:https://www.cnblogs.com/newAndHui/p/13867699.html

