本文实例为大家分享了python OpenCV实现答题卡识别判卷的具体代码,供大家参考,具体内容如下
完整代码:
|
1
2
3
4
5
6
7
8
9
10
11
12
13
14
15
16
17
18
19
20
21
22
23
24
25
26
27
28
29
30
31
32
33
34
35
36
37
38
39
40
41
42
43
44
45
46
47
48
49
50
51
52
53
54
55
56
57
58
59
60
61
62
63
64
65
66
67
68
69
70
71
72
73
74
75
76
77
78
79
80
81
82
83
84
85
86
87
88
89
90
91
92
93
94
95
96
97
98
99
100
101
102
103
104
105
106
107
108
109
110
111
112
113
114
115
116
117
118
119
120
121
122
123
124
125
126
127
128
129
130
131
132
133
134
135
136
137
138
139
140
141
142
143
144
145
146
147
148
149
150
151
152
153
154
155
156
157
158
159
160
161
162
163
164
165
166
167
168
169
170
171
172
173
174
175
176
177
178
|
#导入工具包import numpy as npimport argparseimport imutilsimport cv2 # 设置参数ap = argparse.ArgumentParser()ap.add_argument("-i", "--image", default="./images/test_03.png", help="path to the input image")args = vars(ap.parse_args()) # 正确答案ANSWER_KEY = {0: 1, 1: 4, 2: 0, 3: 3, 4: 1} def order_points(pts): # 一共4个坐标点 rect = np.zeros((4, 2), dtype = "float32") # 按顺序找到对应坐标0123分别是 左上,右上,右下,左下 # 计算左上,右下 s = pts.sum(axis = 1) rect[0] = pts[np.argmin(s)] rect[2] = pts[np.argmax(s)] # 计算右上和左下 diff = np.diff(pts, axis = 1) rect[1] = pts[np.argmin(diff)] rect[3] = pts[np.argmax(diff)] return rect def four_point_transform(image, pts): # 获取输入坐标点 rect = order_points(pts) (tl, tr, br, bl) = rect # 计算输入的w和h值 widthA = np.sqrt(((br[0] - bl[0]) ** 2) + ((br[1] - bl[1]) ** 2)) widthB = np.sqrt(((tr[0] - tl[0]) ** 2) + ((tr[1] - tl[1]) ** 2)) maxWidth = max(int(widthA), int(widthB)) heightA = np.sqrt(((tr[0] - br[0]) ** 2) + ((tr[1] - br[1]) ** 2)) heightB = np.sqrt(((tl[0] - bl[0]) ** 2) + ((tl[1] - bl[1]) ** 2)) maxHeight = max(int(heightA), int(heightB)) # 变换后对应坐标位置 dst = np.array([ [0, 0], [maxWidth - 1, 0], [maxWidth - 1, maxHeight - 1], [0, maxHeight - 1]], dtype = "float32") # 计算变换矩阵 M = cv2.getPerspectiveTransform(rect, dst) warped = cv2.warpPerspective(image, M, (maxWidth, maxHeight)) # 返回变换后结果 return warpeddef sort_contours(cnts, method="left-to-right"): reverse = False i = 0 if method == "right-to-left" or method == "bottom-to-top": reverse = True if method == "top-to-bottom" or method == "bottom-to-top": i = 1 boundingBoxes = [cv2.boundingRect(c) for c in cnts] (cnts, boundingBoxes) = zip(*sorted(zip(cnts, boundingBoxes), key=lambda b: b[1][i], reverse=reverse)) return cnts, boundingBoxesdef cv_show(name,img): cv2.imshow(name, img) cv2.waitKey(0) cv2.destroyAllWindows() # 预处理image = cv2.imread(args["image"])contours_img = image.copy()gray = cv2.cvtColor(image, cv2.COLOR_BGR2GRAY)blurred = cv2.GaussianBlur(gray, (5, 5), 0)cv_show('blurred',blurred)edged = cv2.Canny(blurred, 75, 200)cv_show('edged',edged) # 轮廓检测cnts = cv2.findContours(edged.copy(), cv2.RETR_EXTERNAL, cv2.CHAIN_APPROX_SIMPLE)[0]cv2.drawContours(contours_img,cnts,-1,(0,0,255),3) cv_show('contours_img',contours_img)docCnt = None # 确保检测到了if len(cnts) > 0: # 根据轮廓大小进行排序 cnts = sorted(cnts, key=cv2.contourArea, reverse=True) # 遍历每一个轮廓 for c in cnts: # 近似 peri = cv2.arcLength(c, True) approx = cv2.approxPolyDP(c, 0.02 * peri, True) # 准备做透视变换 if len(approx) == 4: docCnt = approx break # 执行透视变换 warped = four_point_transform(gray, docCnt.reshape(4, 2))cv_show('warped',warped)# Otsu's 阈值处理thresh = cv2.threshold(warped, 0, 255, cv2.THRESH_BINARY_INV | cv2.THRESH_OTSU)[1] cv_show('thresh',thresh)thresh_Contours = thresh.copy()# 找到每一个圆圈轮廓cnts = cv2.findContours(thresh.copy(), cv2.RETR_EXTERNAL, cv2.CHAIN_APPROX_SIMPLE)[0]cv2.drawContours(thresh_Contours,cnts,-1,(0,0,255),3) cv_show('thresh_Contours',thresh_Contours)questionCnts = [] # 遍历for c in cnts: # 计算比例和大小 (x, y, w, h) = cv2.boundingRect(c) ar = w / float(h) # 根据实际情况指定标准 if w >= 20 and h >= 20 and ar >= 0.9 and ar <= 1.1: questionCnts.append(c) # 按照从上到下进行排序questionCnts = sort_contours(questionCnts, method="top-to-bottom")[0]correct = 0 # 每排有5个选项for (q, i) in enumerate(np.arange(0, len(questionCnts), 5)): # 排序 cnts = sort_contours(questionCnts[i:i + 5])[0] bubbled = None # 遍历每一个结果 for (j, c) in enumerate(cnts): # 使用mask来判断结果 mask = np.zeros(thresh.shape, dtype="uint8") cv2.drawContours(mask, [c], -1, 255, -1) #-1表示填充 cv_show('mask',mask) # 通过计算非零点数量来算是否选择这个答案 mask = cv2.bitwise_and(thresh, thresh, mask=mask) total = cv2.countNonZero(mask) # 通过阈值判断 if bubbled is None or total > bubbled[0]: bubbled = (total, j) # 对比正确答案 color = (0, 0, 255) k = ANSWER_KEY[q] # 判断正确 if k == bubbled[1]: color = (0, 255, 0) correct += 1 # 绘图 cv2.drawContours(warped, [cnts[k]], -1, color, 3) score = (correct / 5.0) * 100print("[INFO] score: {:.2f}%".format(score))cv2.putText(warped, "{:.2f}%".format(score), (10, 30), cv2.FONT_HERSHEY_SIMPLEX, 0.9, (0, 0, 255), 2)cv2.imshow("Original", image)cv2.imshow("Exam", warped)cv2.waitKey(0) |

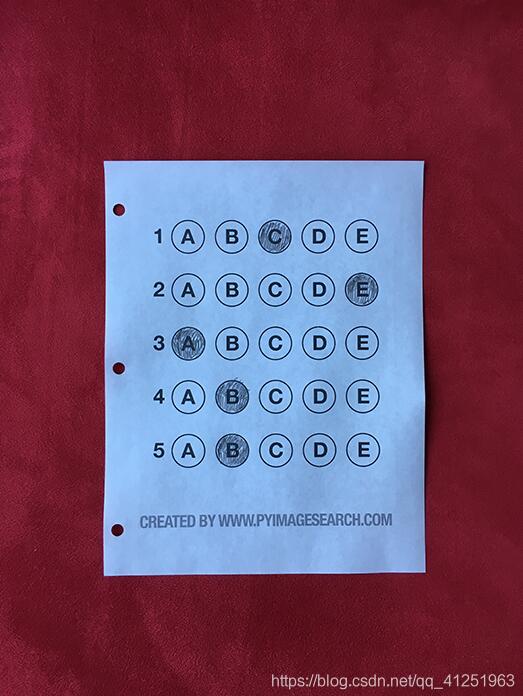
test_03.png

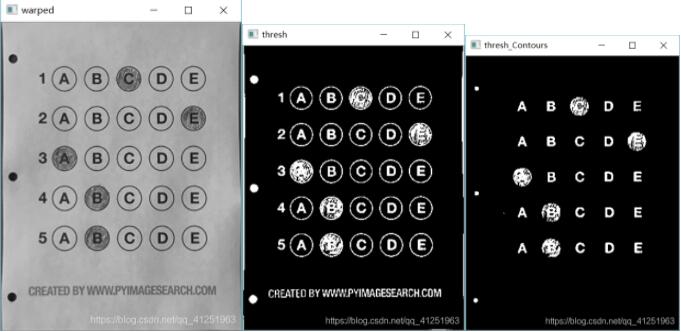
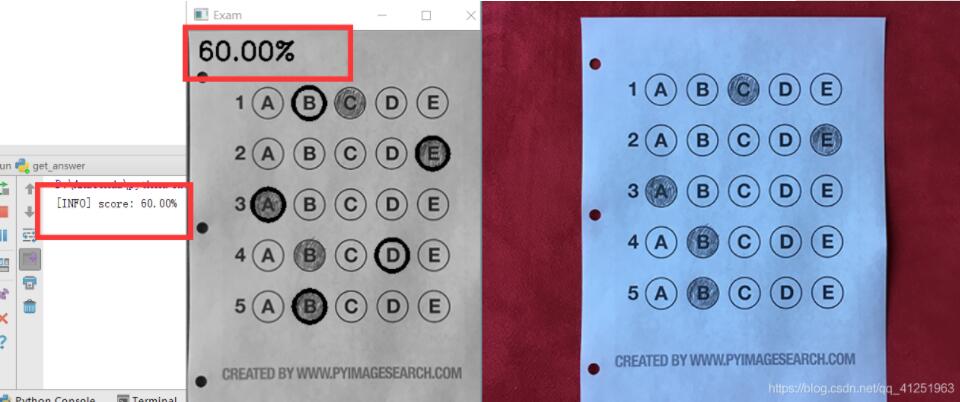
运行效果:


以上就是本文的全部内容,希望对大家的学习有所帮助,也希望大家多多支持服务器之家。
原文链接:https://blog.csdn.net/qq_41251963/article/details/97685790


