前言
最近在听极客时间的课程,里面的讲师极力推崇 pytest 框架,鄙视 unittest 框架,哈哈!然后查了些资料,发现了一条 python 鄙视链:pytest 鄙视 > unittest 鄙视 >robotframework 。
pytest 是 python 的第三方单元测试框架,比自带 unittest 更简洁和高效,支持315种以上的插件,同时兼容 unittest 框架。这就使得我们在 unittest 框架迁移到 pytest 框架的时候不需要重写代码。接下来我们在文中来对分析下 pytest 有哪些简洁、高效的用法。
一、安装
首先使用 pip 安装 pytest
|
1
|
pip3 install pytest |
查看 pytest 是否安装成功
|
1
|
pip3 show pytest |
二、简单使用
1.创建 test_sample.py 文件,代码如下:
|
1
2
3
4
5
6
7
8
9
10
11
12
|
#!/usr/bin/env python# coding=utf-8import pytestdef inc(x): return x + 1def test_answer(): assert inc(3) == 5if __name__ =="__main__": pytest.main() |
执行结果:
test_sample.py F [100%]
================================== FAILURES ===================================
_________________________________ test_answer _________________________________def test_answer():
> assert inc(3) == 5
E assert 4 == 5
E + where 4 = inc(3)test_sample.py:19: AssertionError
============================== 1 failed in 0.41s ==============================
从上面的例子可以看出,pytest 中断言的用法直接使用 assert ,和 unittest 中断言 self.assert 用法有所区别。
2.总结一下:使用 pytest 执行测试需要遵行的规则:
- .py 测试文件必须以test_开头(或者以_test结尾)
- 测试类必须以Test开头,并且不能有 init 方法
- 测试方法必须以test_开头
- 断言必须使用 assert
三、fixture
pytest 提供的 fixture 实现 unittest 中 setup/teardown 功能,可以在每次执行case之前初始化数据。不同点是,fixture 可以只在执行某几个特定 case 前运行,只需要在运行 case 前调用即可。比 setup/teardown 使用起来更灵活。
1.fixture scope 作用范围
先看下 fixture 函数的定义:
|
1
2
3
4
5
6
7
8
|
def fixture(scope="function", params=None, autouse=False, ids=None, name=None): """ :arg scope: 可选四组参数:function(默认)、calss、module、package/session :arg params: 一个可选的参数列表,它将导致多个参数调用fixture函数和所有测试使用它。 :arg autouse: 如果为True,则fixture func将为所有测试激活可以看到它。如果为False(默认值),则需要显式激活fixture。 :arg ids: 每个参数对应的字符串id列表,因此它们是测试id的一部分。如果没有提供id,它们将从参数中自动生成。 :arg name: fixture的名称。 这默认为装饰函数的名称。 如果fixture在定义它的同一模块中使用,夹具的功能名称将被请求夹具的功能arg遮蔽; 解决这个问题的一种方法是将装饰函数命名 “fixture_ <fixturename>”然后使用”@ pytest.fixture(name ='<fixturename>')”。 """ |
重点说下 scope 四组参数的意义:
- function:每个方法(函数)都会执行一次。
- class:每个类都会执行一次。类中有多个方法调用,只在第一个方法调用时执行。
- module:一个 .py 文件执行一次。一个.py 文件可能包含多个类和方法。
- package/session:多个文件调用一次,可以跨 .py 文件。
在所需要调用的函数前面加个装饰器 @pytest.fixture()。举一个简单的例子:
|
1
2
3
4
5
6
7
8
9
10
11
12
13
14
15
16
17
|
#!/usr/bin/env python# coding=utf-8import pytest@pytest.fixture(scope='function')def login(): print("登录")def test_1(): print('测试用例1')def test_2(login): print('测试用例2')if __name__ =="__main__": pytest.main(['test_sample.py','-s']) |
执行结果:
test_sample.py
测试用例1
.
登录
测试用例2
.============================== 2 passed in 0.07s ==============================
2.yield
我们刚刚实现了在每个用例之前执行初始化操作,那么用例执行完之后如需要 清除数据(或还原)操作,可以使用 yield 来实现。
|
1
2
3
4
5
6
7
8
9
10
11
12
13
14
15
16
17
18
|
#!/usr/bin/env python# coding=utf-8import pytest@pytest.fixture(scope='function')def login(): print("登录") yield print("注销登录")def test_1(): print('测试用例1')def test_2(login): print('测试用例2')if __name__ =="__main__": pytest.main(['test_sample.py','-s']) |
执行结果:
test_sample.py
测试用例1
.
登录
测试用例2
.注销登录============================== 2 passed in 0.08s ==============================
3.conftest
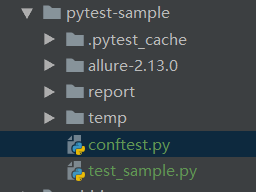
上面的案例都是写在同一个.py 文件内的。倘若有多个.py 文件需要调用 login() 方法,就必须把 login() 方法写在外面,这里引用了conftest.py 配置文件。test_xxx.py 测试文件中无需 import conftest,pytest 会自动搜索同级目录中的 conftest.py 文件。
conftest.py 与 测试文件 目录层级关系

|
1
2
3
4
5
6
7
8
9
10
11
12
13
14
15
16
17
18
19
20
21
|
# 新建conftest.py,和 test_sample.py 同级目录import pytest@pytest.fixture(scope='function')def login(): print("登录")# test_sample.py 代码如下import pytestdef test_1(): print('测试用例1')def test_2(login): print('测试用例2')if __name__ =="__main__": pytest.main(['test_sample.py','-s']) |
执行结果:
test_sample.py
测试用例1
.
登录
测试用例2
.============================== 2 passed in 0.01s ==============================
四、重试机制
有的时候用例执行失败了,然后排查发现不是代码问题,可能和环境或者网络不稳定有关系,这个时候可以引入重试机制,排除一些外在因素。
1、安装pytest-rerunfailures
|
1
|
pip3showpytest-rerunfailures |
2、重试的两种方法
1)使用装饰器@pytest.mark.flaky(reruns=5,reruns_delay=2)
reruns :最大重试次数
reruns_delay :重试间隔时间,单位是秒
|
1
2
3
4
5
6
7
8
9
10
11
|
#!/usr/bin/env python# coding=utf-8import pytest@pytest.mark.flaky(reruns=5, reruns_delay=2)def test(): assert 0==1if __name__ =="__main__": pytest.main(['test_sample.py','-s']) |

R表示用例失败后正在重试,尝试5次。
2)也可以使用命令行pytest--reruns5--reruns-delay 2 -s ,参数与装饰器 @pytest.mark.flaky 一致,这个就不多说了。
到此这篇关于Pytest 使用简介的文章就介绍到这了,更多相关Pytest 使用内容请搜索服务器之家以前的文章或继续浏览下面的相关文章希望大家以后多多支持服务器之家!
原文链接:https://www.cnblogs.com/shenh/p/11572657.html


