一、安装
1.1硬件支持
首先确定你的电脑显卡是支持Cuda安装的。
右键“我的电脑”,然后点击“设备管理器”。在显示适配器里可以查看显卡型号。
如果包含在官网列表 中,则可以点击对应的型号到下载界面下载Cuda安装包。

1.2 安装VS2017
官网下载VS2017,并安装。
1.3 安装Cuda
在安装过程中,会自动检测本机是否已经安装了配套的VS版本其中之一,如果VS版本和Cuda版本不匹配的话,安装无法进行。
( 另外,如果电脑安装了360杀毒的话,安装过程中会不断有疑似病毒修改的提示,要全部允许操作,否则无法安装。)
以上步骤无报错通过之后,基本环境已经搭建完成。
二、测试环境是否成功
参考了很多,所以有好几种办法,我全部列出来。
2.1
运行cmd,
输入nvcc --version,即可查看版本号,如图:
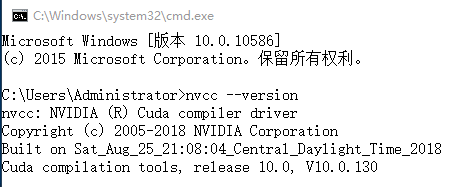
set cuda,可以查看cuda设置的环境变量,如图

2.2
开始菜单->NVIDIA Corporation->CUDA Samples->6.5->Browse CUDA Samples,左键单击打开示例代码的位置,
找到下图所示文件,在VS中打开并编译(Build)。

这个过程大约需要四十分钟,编译成功后,你将在VS中方看到如图所示的提示。

(在编译过程中,我的VS报了如下找不到SDK错误:

解决办法为:
无需重装,在开始菜单中找到VS的安装软件点击打开,点击修改(modify),缺少哪个版本安装哪个windows SDK即可。)
未编译前,Debug文件夹中只有三个文件,如图。

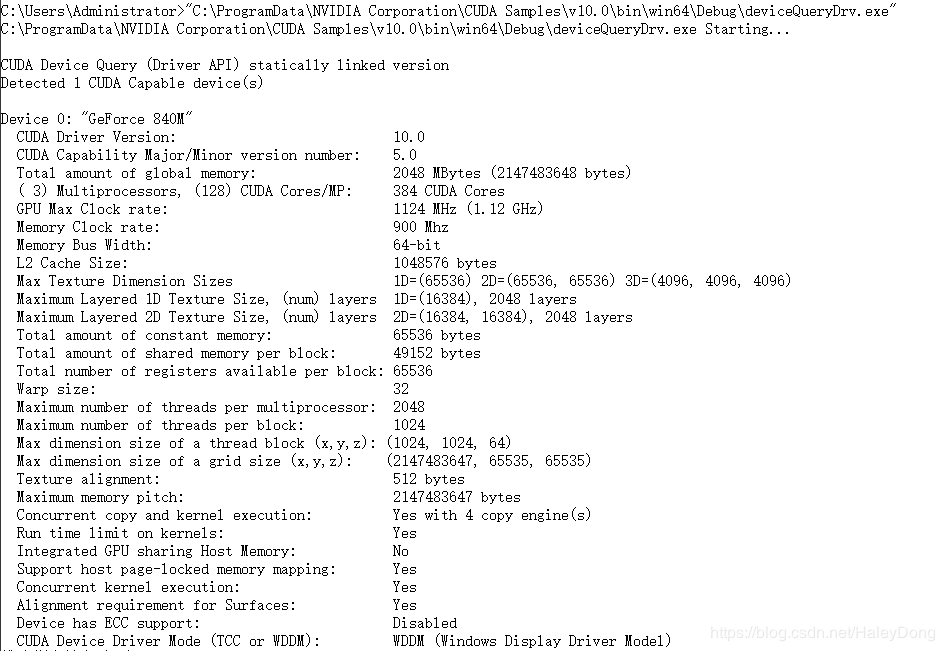
成功编译后这个位置(具体路径见上图)将生成很多文件,在其中找到deviceQueryDrv.exe的程序拖入到cmd中,回车运行。
结果如下图,我们得到了本机的GPU硬件信息。注意:关注第二行计算能力,可以看到这台机器的计算能力是5.0。

2.3
打开vs2017,(我们可以观察到,在VS2017模板一栏下方出现了“NVIDIA/CUDA 10.0”。)创建一个空win32程序,即cuda_test项目。选择cuda_test,点击右键–>项目依赖项–>自定义生成,选择CUDA9.0。右键源文件文件夹->添加->新建项->选择CUDA C/C++File,取名cuda_main。点击cuda_main.cu的属性,在配置属性–>常规–>项类型–>选择“CUDA C/C++”。
注意:以下步骤中的项目属性设置均针对x64

6. 包含目录配置:
1.右键点击项目属性–>属性–>配置属性–>VC++目录–>包含目录
2.添加包含目录:$(CUDA_PATH)\include
7. 库目录配置
1.VC++目录–>库目录
2.添加库目录:$(CUDA_PATH)\lib\x64
8. 依赖项
1.配置属性–>链接器–>输入–>附加依赖项
2.添加库文件:cublas.lib;cuda.lib;cudadevrt.lib;cudart.lib;cudart_static.lib;OpenCL.lib
cuda_main.cu代码如下:
#include "cuda_runtime.h"
#include "cublas_v2.h"

#include <time.h>
#include <iostream>

using namespace std;

// 定义测试矩阵的维度
int const M = 5;
int const N = 10;

int main()
{
	// 定义状态变量
	cublasStatus_t status;

	// 在 内存 中为将要计算的矩阵开辟空间
	float *h_A = (float*)malloc(N*M * sizeof(float));
	float *h_B = (float*)malloc(N*M * sizeof(float));

	// 在 内存 中为将要存放运算结果的矩阵开辟空间
	float *h_C = (float*)malloc(M*M * sizeof(float));

	// 为待运算矩阵的元素赋予 0-10 范围内的随机数
	for (int i = 0; i < N*M; i++) {
		h_A[i] = (float)(rand() % 10 + 1);
		h_B[i] = (float)(rand() % 10 + 1);

	}

	// 打印待测试的矩阵
	cout << "矩阵 A :" << endl;
	for (int i = 0; i < N*M; i++) {
		cout << h_A[i] << " ";
		if ((i + 1) % N == 0) cout << endl;
	}
	cout << endl;
	cout << "矩阵 B :" << endl;
	for (int i = 0; i < N*M; i++) {
		cout << h_B[i] << " ";
		if ((i + 1) % M == 0) cout << endl;
	}
	cout << endl;

	/*
	** GPU 计算矩阵相乘
	*/

	// 创建并初始化 CUBLAS 库对象
	cublasHandle_t handle;
	status = cublasCreate(&handle);

	if (status != CUBLAS_STATUS_SUCCESS)
	{
		if (status == CUBLAS_STATUS_NOT_INITIALIZED) {
			cout << "CUBLAS 对象实例化出错" << endl;
		}
		getchar();
		return EXIT_FAILURE;
	}

	float *d_A, *d_B, *d_C;
	// 在 显存 中为将要计算的矩阵开辟空间
	cudaMalloc(
		(void**)&d_A,  // 指向开辟的空间的指针
		N*M * sizeof(float)  // 需要开辟空间的字节数
	);
	cudaMalloc(
		(void**)&d_B,
		N*M * sizeof(float)
	);

	// 在 显存 中为将要存放运算结果的矩阵开辟空间
	cudaMalloc(
		(void**)&d_C,
		M*M * sizeof(float)
	);

	// 将矩阵数据传递进 显存 中已经开辟好了的空间
	cublasSetVector(
		N*M,  // 要存入显存的元素个数
		sizeof(float),  // 每个元素大小
		h_A,  // 主机端起始地址
		1,  // 连续元素之间的存储间隔
		d_A,  // GPU 端起始地址
		1  // 连续元素之间的存储间隔
	);
	cublasSetVector(
		N*M,
		sizeof(float),
		h_B,
		1,
		d_B,
		1
	);

	// 同步函数
	cudaThreadSynchronize();

	// 传递进矩阵相乘函数中的参数,具体含义请参考函数手册。
	float a = 1; float b = 0;
	// 矩阵相乘。该函数必然将数组解析成列优先数组
	cublasSgemm(
		handle,  // blas 库对象
		CUBLAS_OP_T,  // 矩阵 A 属性参数
		CUBLAS_OP_T,  // 矩阵 B 属性参数
		M,  // A, C 的行数
		M,  // B, C 的列数
		N,  // A 的列数和 B 的行数
		&a,  // 运算式的 α 值
		d_A,  // A 在显存中的地址
		N,  // lda
		d_B,  // B 在显存中的地址
		M,  // ldb
		&b,  // 运算式的 β 值
		d_C,  // C 在显存中的地址(结果矩阵)
		M  // ldc
	);

	// 同步函数
	cudaThreadSynchronize();

	// 从 显存 中取出运算结果至 内存中去
	cublasGetVector(
		M*M,  // 要取出元素的个数
		sizeof(float),  // 每个元素大小
		d_C,  // GPU 端起始地址
		1,  // 连续元素之间的存储间隔
		h_C,  // 主机端起始地址
		1  // 连续元素之间的存储间隔
	);

	// 打印运算结果
	cout << "计算结果的转置 ( (A*B)的转置 ):" << endl;

	for (int i = 0; i < M*M; i++) {
		cout << h_C[i] << " ";
		if ((i + 1) % M == 0) cout << endl;
	}

	// 清理掉使用过的内存
	free(h_A);
	free(h_B);
	free(h_C);
	cudaFree(d_A);
	cudaFree(d_B);
	cudaFree(d_C);

	// 释放 CUBLAS 库对象
	cublasDestroy(handle);

	getchar();

	return 0;
}
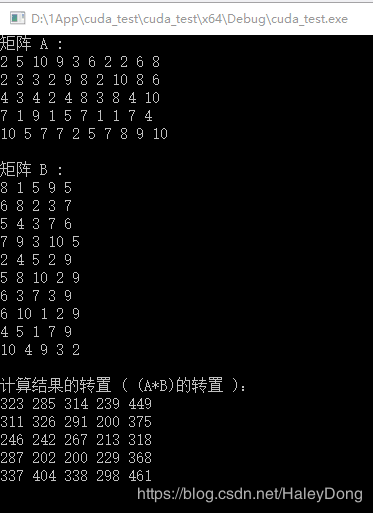
运行结果:
2.4
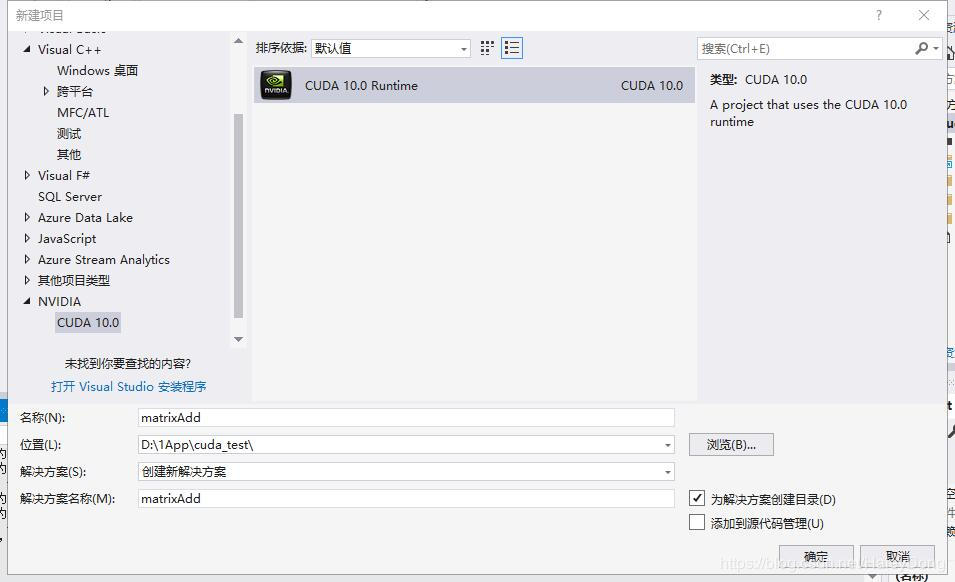
直接新建一个CUDA 10.0 Runtime 项目。如图(注意图中文件命名与本例无关,无需参考),
右键项目 → 属性 → 配置属性 → 链接器 → 常规 → 附加库目录,添加以下目录:
$(CUDA_PATH_V10_0)\lib$(Platform)
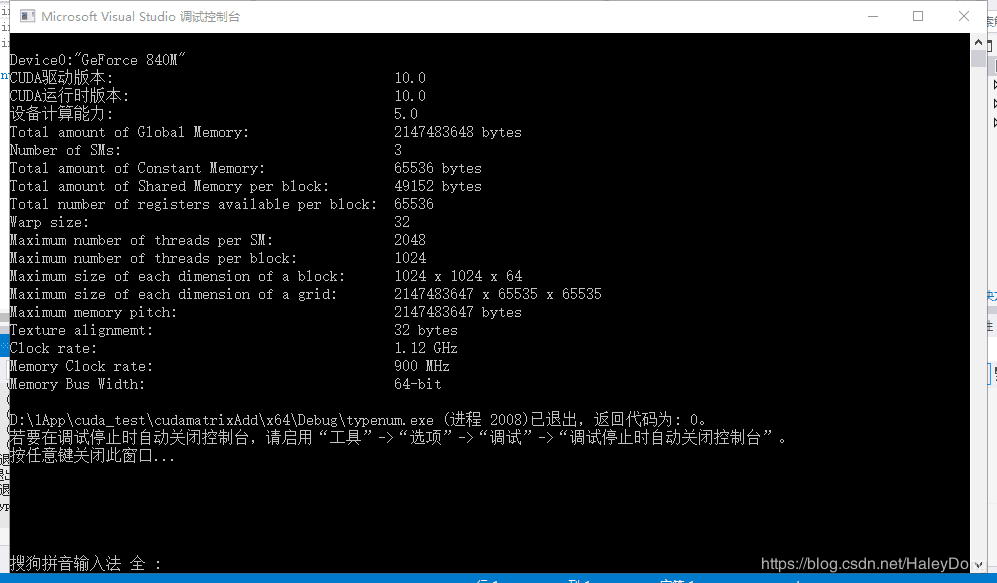
示例代码如下:
#include "cuda_runtime.h"
#include "device_launch_parameters.h"
#include <stdio.h>

int main() {
	int deviceCount;
	cudaGetDeviceCount(&deviceCount);

	int dev;
	for (dev = 0; dev < deviceCount; dev++)
	{
		int driver_version(0), runtime_version(0);
		cudaDeviceProp deviceProp;
		cudaGetDeviceProperties(&deviceProp, dev);
		if (dev == 0)
			if (deviceProp.minor = 9999 && deviceProp.major == 9999)
				printf("\n");
		printf("\nDevice%d:\"%s\"\n", dev, deviceProp.name);
		cudaDriverGetVersion(&driver_version);
		printf("CUDA驱动版本:                  %d.%d\n", driver_version / 1000, (driver_version % 1000) / 10);
		cudaRuntimeGetVersion(&runtime_version);
		printf("CUDA运行时版本:                 %d.%d\n", runtime_version / 1000, (runtime_version % 1000) / 10);
		printf("设备计算能力:                  %d.%d\n", deviceProp.major, deviceProp.minor);
		printf("Total amount of Global Memory:         %u bytes\n", deviceProp.totalGlobalMem);
		printf("Number of SMs:                 %d\n", deviceProp.multiProcessorCount);
		printf("Total amount of Constant Memory:        %u bytes\n", deviceProp.totalConstMem);
		printf("Total amount of Shared Memory per block:    %u bytes\n", deviceProp.sharedMemPerBlock);
		printf("Total number of registers available per block: %d\n", deviceProp.regsPerBlock);
		printf("Warp size:                   %d\n", deviceProp.warpSize);
		printf("Maximum number of threads per SM:        %d\n", deviceProp.maxThreadsPerMultiProcessor);
		printf("Maximum number of threads per block:      %d\n", deviceProp.maxThreadsPerBlock);
		printf("Maximum size of each dimension of a block:   %d x %d x %d\n", deviceProp.maxThreadsDim[0],
			deviceProp.maxThreadsDim[1],
			deviceProp.maxThreadsDim[2]);
		printf("Maximum size of each dimension of a grid:    %d x %d x %d\n", deviceProp.maxGridSize[0], deviceProp.maxGridSize[1], deviceProp.maxGridSize[2]);
		printf("Maximum memory pitch:              %u bytes\n", deviceProp.memPitch);
		printf("Texture alignmemt:               %u bytes\n", deviceProp.texturePitchAlignment);
		printf("Clock rate:                   %.2f GHz\n", deviceProp.clockRate * 1e-6f);
		printf("Memory Clock rate:               %.0f MHz\n", deviceProp.memoryClockRate * 1e-3f);
		printf("Memory Bus Width:                %d-bit\n", deviceProp.memoryBusWidth);
	}

	return 0;
}
运行结果:
本文主要参考:1. https://blog.csdn.net/u013165921/article/details/77891913
2. https://www.cnblogs.com/wayne793377164/p/8185404.html
到此这篇关于win10+VS2017+Cuda10.0环境配置详解的文章就介绍到这了,更多相关win10+VS2017+Cuda10.0配置内容请搜索服务器之家以前的文章或继续浏览下面的相关文章希望大家以后多多支持服务器之家!
原文链接:https://blog.csdn.net/HaleyDong/article/details/86093520


