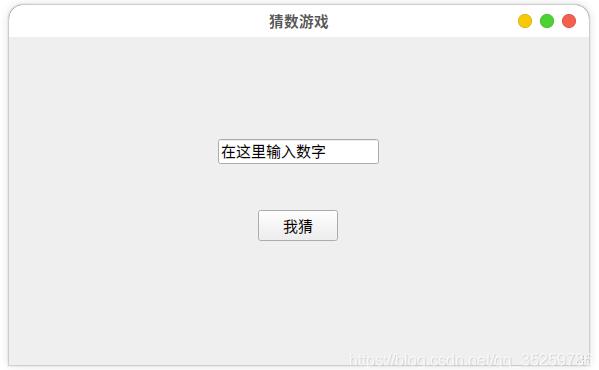
本文实例为大家分享了pycharm实现猜数游戏的具体代码,供大家参考,具体内容如下
1. 设计界面
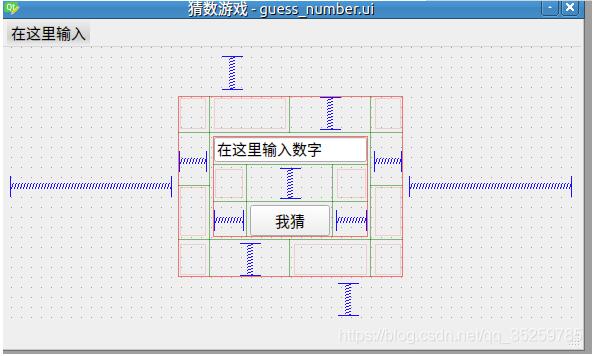
如下所示,利用QTdesigner设计的界面:


然后将设计好的界面转换为.py文件:
guess_number.py
|
1
2
3
4
5
6
7
8
9
10
11
12
13
14
15
16
17
18
19
20
21
22
23
24
25
26
27
28
29
30
31
32
33
34
35
36
37
38
39
40
41
42
43
44
45
46
47
48
49
50
51
52
53
54
55
56
57
58
59
60
61
62
63
64
65
66
67
68
69
70
71
72
73
74
75
76
77
78
79
80
81
82
|
# -*- coding: utf-8 -*-# Form implementation generated from reading ui file 'guess_number.ui'## Created by: PyQt5 UI code generator 5.15.2## WARNING: Any manual changes made to this file will be lost when pyuic5 is# run again. Do not edit this file unless you know what you are doing.from PyQt5 import QtCore, QtGui, QtWidgetsclass Ui_MainWindow(object): def setupUi(self, MainWindow): MainWindow.setObjectName("MainWindow") MainWindow.resize(580, 328) icon = QtGui.QIcon() icon.addPixmap(QtGui.QPixmap("../../../Icon/Comment.svg"), QtGui.QIcon.Normal, QtGui.QIcon.Off) icon.addPixmap(QtGui.QPixmap("../../../Icon/Comment.svg"), QtGui.QIcon.Normal, QtGui.QIcon.On) icon.addPixmap(QtGui.QPixmap("../../../Icon/Comment.svg"), QtGui.QIcon.Disabled, QtGui.QIcon.Off) icon.addPixmap(QtGui.QPixmap("../../../Icon/Comment.svg"), QtGui.QIcon.Disabled, QtGui.QIcon.On) icon.addPixmap(QtGui.QPixmap("../../../Icon/Comment.svg"), QtGui.QIcon.Active, QtGui.QIcon.Off) icon.addPixmap(QtGui.QPixmap("../../../Icon/Comment.svg"), QtGui.QIcon.Active, QtGui.QIcon.On) icon.addPixmap(QtGui.QPixmap("../../../Icon/Comment.svg"), QtGui.QIcon.Selected, QtGui.QIcon.Off) icon.addPixmap(QtGui.QPixmap("../../../Icon/Comment.svg"), QtGui.QIcon.Selected, QtGui.QIcon.On) MainWindow.setWindowIcon(icon) self.centralwidget = QtWidgets.QWidget(MainWindow) self.centralwidget.setObjectName("centralwidget") self.gridLayout_4 = QtWidgets.QGridLayout(self.centralwidget) self.gridLayout_4.setObjectName("gridLayout_4") spacerItem = QtWidgets.QSpacerItem(20, 50, QtWidgets.QSizePolicy.Minimum, QtWidgets.QSizePolicy.Expanding) self.gridLayout_4.addItem(spacerItem, 0, 1, 1, 1) spacerItem1 = QtWidgets.QSpacerItem(181, 20, QtWidgets.QSizePolicy.Expanding, QtWidgets.QSizePolicy.Minimum) self.gridLayout_4.addItem(spacerItem1, 1, 3, 1, 1) spacerItem2 = QtWidgets.QSpacerItem(180, 20, QtWidgets.QSizePolicy.Expanding, QtWidgets.QSizePolicy.Minimum) self.gridLayout_4.addItem(spacerItem2, 1, 0, 1, 1) self.gridLayout_3 = QtWidgets.QGridLayout() self.gridLayout_3.setObjectName("gridLayout_3") spacerItem3 = QtWidgets.QSpacerItem(17, 37, QtWidgets.QSizePolicy.Minimum, QtWidgets.QSizePolicy.Expanding) self.gridLayout_3.addItem(spacerItem3, 0, 2, 1, 1) self.gridLayout_2 = QtWidgets.QGridLayout() self.gridLayout_2.setObjectName("gridLayout_2") self.button = QtWidgets.QPushButton(self.centralwidget) self.button.setObjectName("button") self.gridLayout_2.addWidget(self.button, 2, 1, 1, 1) self.inputnumber = QtWidgets.QLineEdit(self.centralwidget) self.inputnumber.setObjectName("inputnumber") self.gridLayout_2.addWidget(self.inputnumber, 0, 0, 1, 3) spacerItem4 = QtWidgets.QSpacerItem(40, 20, QtWidgets.QSizePolicy.Expanding, QtWidgets.QSizePolicy.Minimum) self.gridLayout_2.addItem(spacerItem4, 2, 2, 1, 1) spacerItem5 = QtWidgets.QSpacerItem(40, 20, QtWidgets.QSizePolicy.Expanding, QtWidgets.QSizePolicy.Minimum) self.gridLayout_2.addItem(spacerItem5, 2, 0, 1, 1) spacerItem6 = QtWidgets.QSpacerItem(20, 40, QtWidgets.QSizePolicy.Minimum, QtWidgets.QSizePolicy.Expanding) self.gridLayout_2.addItem(spacerItem6, 1, 1, 1, 1) self.gridLayout_3.addLayout(self.gridLayout_2, 1, 1, 2, 2) spacerItem7 = QtWidgets.QSpacerItem(37, 17, QtWidgets.QSizePolicy.Expanding, QtWidgets.QSizePolicy.Minimum) self.gridLayout_3.addItem(spacerItem7, 1, 3, 1, 1) spacerItem8 = QtWidgets.QSpacerItem(37, 17, QtWidgets.QSizePolicy.Expanding, QtWidgets.QSizePolicy.Minimum) self.gridLayout_3.addItem(spacerItem8, 1, 0, 1, 1) spacerItem9 = QtWidgets.QSpacerItem(17, 37, QtWidgets.QSizePolicy.Minimum, QtWidgets.QSizePolicy.Expanding) self.gridLayout_3.addItem(spacerItem9, 3, 1, 1, 1) self.gridLayout_4.addLayout(self.gridLayout_3, 1, 1, 1, 2) spacerItem10 = QtWidgets.QSpacerItem(20, 49, QtWidgets.QSizePolicy.Minimum, QtWidgets.QSizePolicy.Expanding) self.gridLayout_4.addItem(spacerItem10, 2, 2, 1, 1) MainWindow.setCentralWidget(self.centralwidget) self.menubar = QtWidgets.QMenuBar(MainWindow) self.menubar.setGeometry(QtCore.QRect(0, 0, 580, 28)) self.menubar.setObjectName("menubar") MainWindow.setMenuBar(self.menubar) self.statusbar = QtWidgets.QStatusBar(MainWindow) self.statusbar.setObjectName("statusbar") MainWindow.setStatusBar(self.statusbar) self.retranslateUi(MainWindow) QtCore.QMetaObject.connectSlotsByName(MainWindow) def retranslateUi(self, MainWindow): _translate = QtCore.QCoreApplication.translate MainWindow.setWindowTitle(_translate("MainWindow", "猜数游戏")) self.button.setText(_translate("MainWindow", "我猜")) self.inputnumber.setText(_translate("MainWindow", "在这里输入数字")) |
2.对ui界面的功能具体实现
如果直接使用生成好的.py文件使用起来不是很方便,修改界面以后重新生成的.py文件会直接覆盖,这里我采用一个新类直接获取前面设计好的界面从而实现算法与界面程序分离,先上代码。
main.py
|
1
2
3
4
5
6
7
8
9
10
11
12
13
14
15
16
17
18
19
20
21
22
23
24
25
26
27
28
29
30
31
32
33
34
35
36
37
38
39
40
41
42
43
44
45
46
47
48
49
50
|
import sysimport guess_numberfrom PyQt5.QtWidgets import QApplication, QMainWindow, QMessageBox, QWidgetfrom random import randintclass guess_ui(QMainWindow): def __init__(self): # get ui from guess_number super().__init__() self.num = randint(1, 100) self.MainWindow = QMainWindow() self.InitUI() def InitUI(self): ui = guess_number.Ui_MainWindow() ui.setupUi(self) button = self.findChild(QWidget, 'button') button.clicked.connect(self.show_message) self.show() # self.MainWindow.show() def show_message(self): inputnumber = self.findChild(QWidget, 'inputnumber') guessnumber = int(inputnumber.text()) print(guessnumber) if guessnumber > self.num: QMessageBox.about(self, 'see the result', 'bigger!') inputnumber.setFocus() elif guessnumber < self.num: QMessageBox.about(self, 'see the result', 'smaller!') inputnumber.setFocus() else: QMessageBox.about(self, 'see the result', 'true') self.num = randint(1, 100) inputnumber.clear() inputnumber.setFocus() def closeEvent(self, event): reply = QMessageBox.question(self, 'confirm', 'Are you sure?', QMessageBox.Yes | QMessageBox.No) if reply == QMessageBox.Yes: event.accept() else: event.ignore()if __name__ == '__main__': app = QApplication(sys.argv) guess = guess_ui() sys.exit(app.exec_()) |
3.对部分代码的解析
|
1
|
class guess_ui(QMainWindow): |
将此类直接从QMainWindow继承过来可以实现对QT事件的重写,事件重现代码如下:
|
1
2
3
4
5
6
|
def closeEvent(self, event): reply = QMessageBox.question(self, 'confirm', 'Are you sure?', QMessageBox.Yes | QMessageBox.No) if reply == QMessageBox.Yes: event.accept() else: event.ignore() |
在界面文件中按钮的定义是直接add进去的,所以定义某个控件功能首先要获取该控件,代码如下所示:
|
1
|
button = self.findChild(QWidget, 'button') |
以上就是本文的全部内容,希望对大家的学习有所帮助,也希望大家多多支持服务器之家。
原文链接:https://blog.csdn.net/qq_35259785/article/details/110739511


